

To remove the background from a car photo, isolate the vehicle with a precise selection, then delete or hide everything outside it. Two methods exist: an automatic selection for speed, and a manual clipping path with the Pen tool for accuracy.
For car listings, the manual path is the reliable choice, because automatic tools fail on the three features every car has — transparent windows, spoked wheels, and thin antennas or mirrors. This guide covers both methods and the edge cases that decide which one you need.
Clean cutouts matter for inventory because a consistent backdrop makes a listing gallery look professional, and shoppers respond to it. Dealer.com (a Cox Automotive brand) reports that 90% of shoppers prefer real, high-quality vehicle photos over stock images (Corcoran & Pierce, Dealer.com, updated March 2026).
Used or certified listings using actual photos are 40% more likely to generate a lead. A clean background turns a real lot shot into that high-quality photo.
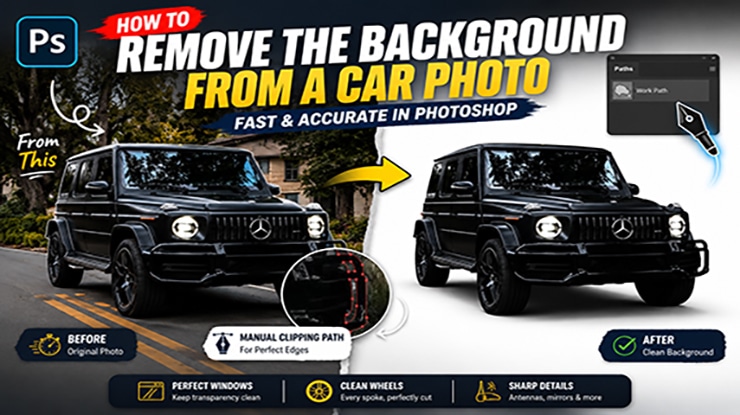
If you process inventory in volume, our background removal and clipping path services do this at batch scale — but here is exactly how the work is done.
Key takeaways
- Background removal on a car needs a precise selection, then everything outside it is masked or deleted.
- Two methods exist: automatic selection for speed, and a manual clipping path with the Pen tool for accuracy.
- Cars break automatic tools on three features: transparent windows, spoked wheels, and thin antennas or mirrors.
- The manual clipping path is the professional standard for listings because its edge is clean and reusable.
- After the cutout, add a contact shadow under the tires so the car does not look pasted onto the new background.
- At inventory volume, standardize the capture so one path transfers across vehicles, then outsource the repetitive tracing.
Why car backgrounds are harder than ordinary product cutouts
A car is not a solid, opaque object, which is why standard background removal fails on it. Three features break the automatic tools.
Transparent windows
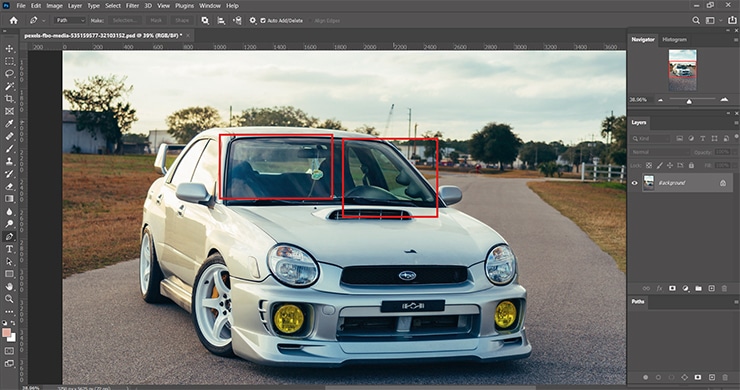
The glass shows the background through it, so a tool that selects “the car” either keeps the old background inside the windows or deletes the glass entirely. Neither is correct.
Spoked wheels
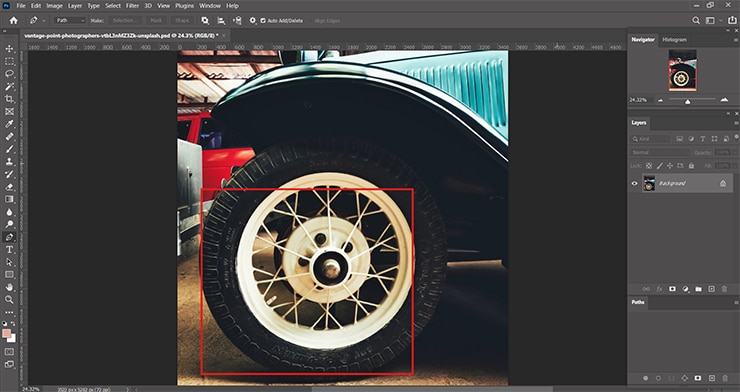
The gaps between spokes are the background that sits inside the car’s outline, so a single outer selection misses them.
Thin protrusions
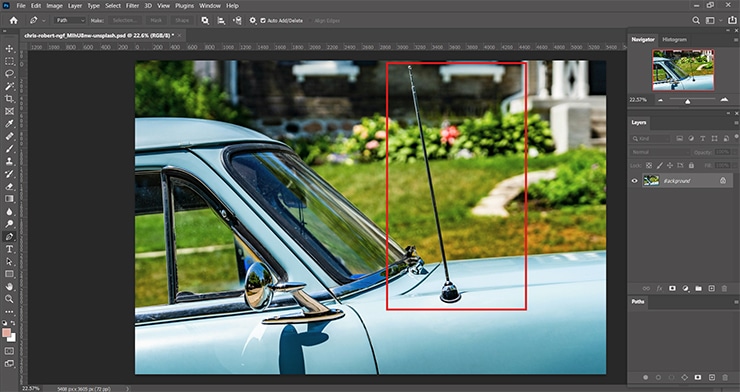
Antennas, side mirrors, and door handles are narrow, low-contrast edges that automatic selection rounds off or drops.
The consequence: a method that works on a shoe or a handbag produces a visibly wrong car. The cutout has to treat the body, the glass, and the wheel gaps as separate problems.
(Method 1)
Automatic selection (fast, for simple shots)
Use the automatic method when the car sits against a high-contrast, uncluttered background and you need speed over precision. In Photoshop, run Select > Subject, then refine the edge.
Open the image and choose Select > Subject. Photoshop’s AI generates a selection of the vehicle.
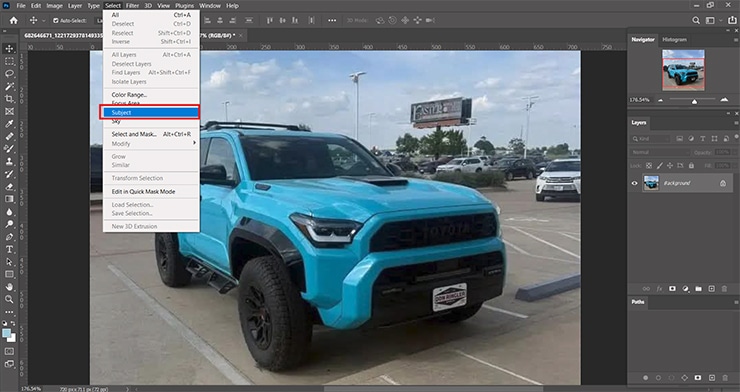
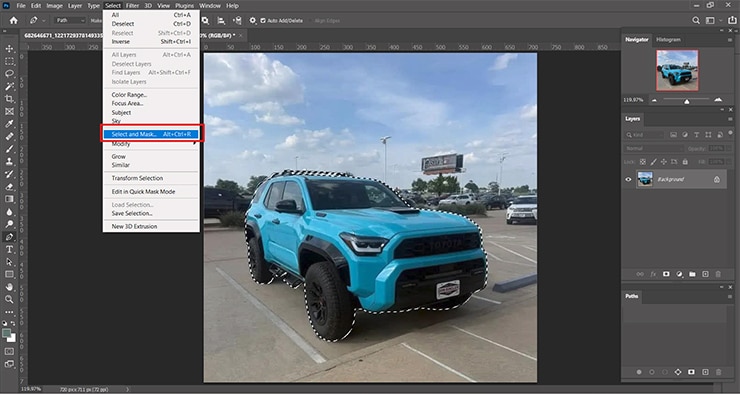
Open Select and Mask.
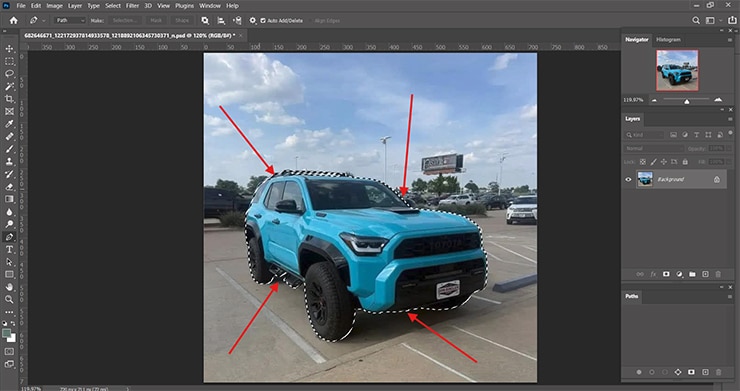
Use the Refine Edge brush along the tires and bumper where the selection is rough.
Output the result to a Layer Mask, not a deletion, so the cutout stays editable.
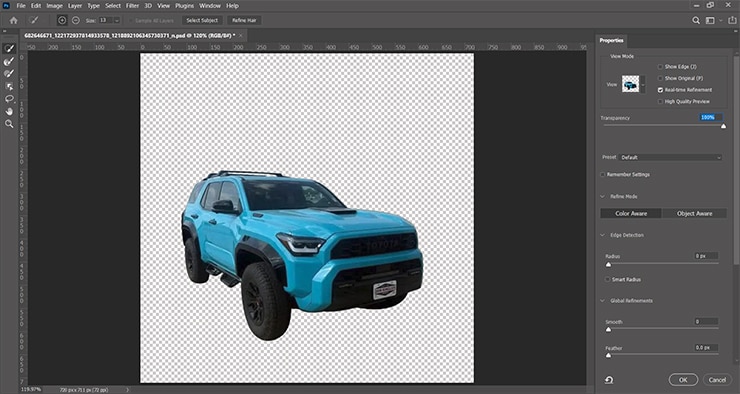
Inspect the windows and wheel spokes at 100% zoom. This is where the automatic selection almost always fails.
The automatic method gets you 80% of the way in seconds, but the remaining 20% — glass, spokes, thin edges — is exactly the part buyers notice. For a single quick social post it is enough. For a listing gallery it is not.
(Method 2)
Manual clipping path (accurate, for listings)
The manual clipping path is the professional standard for car listings because it produces a clean, repeatable edge the automatic tool cannot. A clipping path is a vector outline drawn with the Pen tool that defines exactly where the car ends and the background begins.
Select the Pen tool and set it to Path mode.
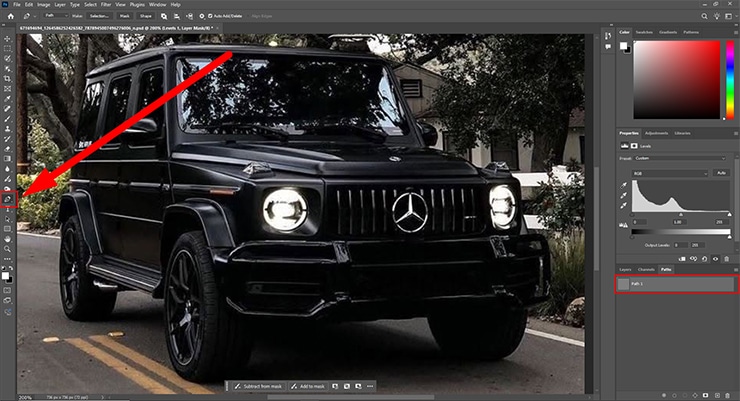
Trace the outer outline of the car’s body.
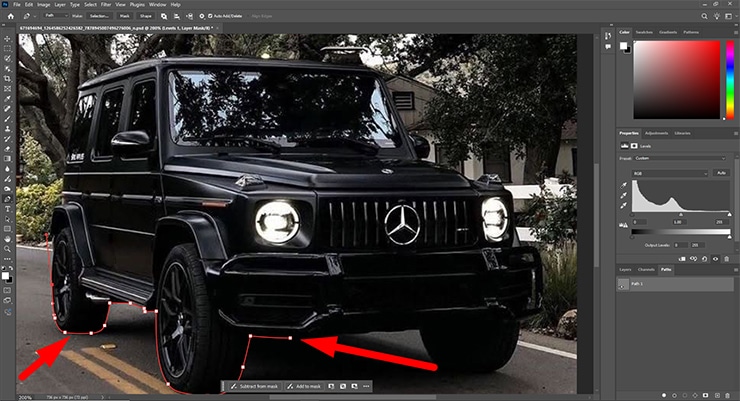
Click to place anchor points on corners; click-drag to curve the path along the panels.
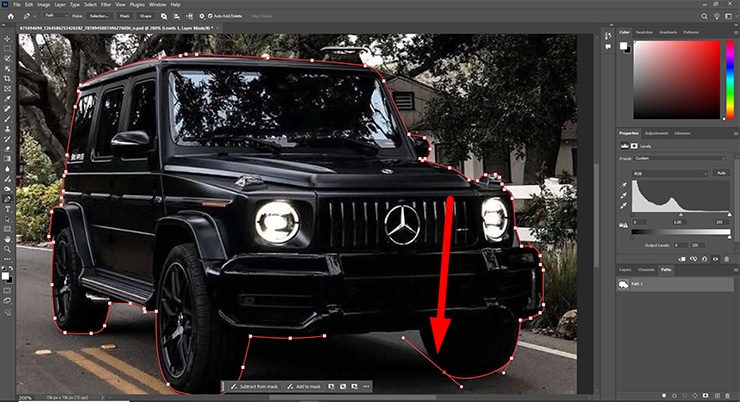
Keep the path slightly inside the edge — about one pixel — to avoid a background-colored halo.
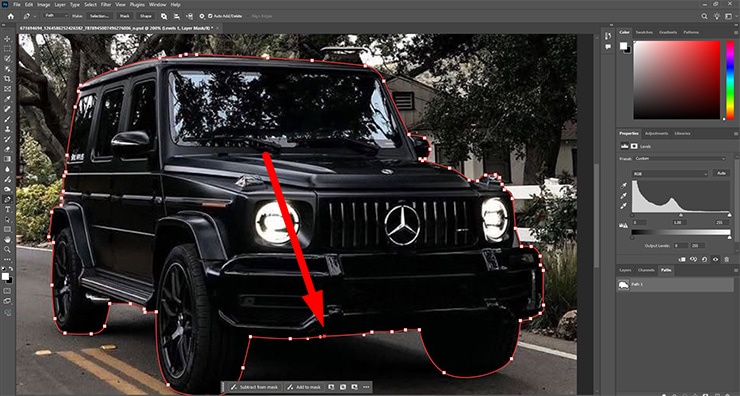
Close the path, then create separate sub-paths for each enclosed background area: every gap between wheel spokes, and the space inside a roof rack or spoiler.
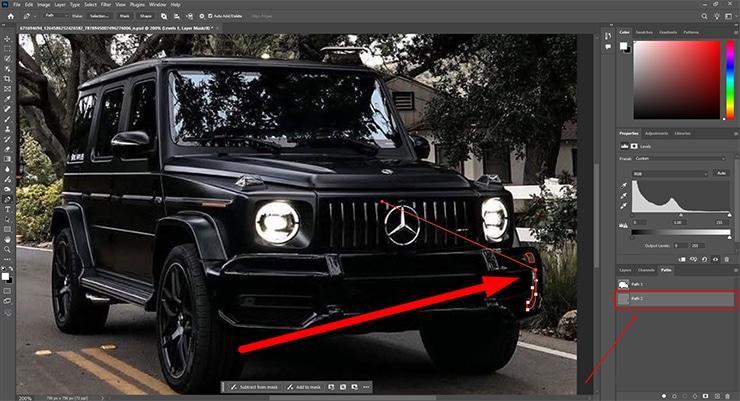
Convert the completed path to a selection (Ctrl/Cmd + Enter) and apply it as a layer mask.
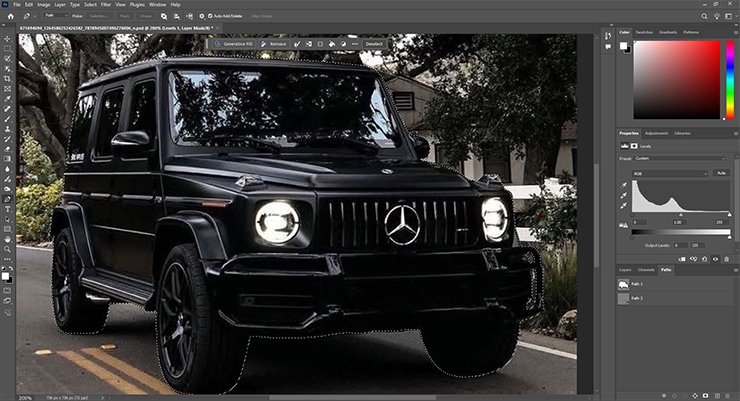
The Pen-tool path is slower than the automatic selection, but it is precise and it is reusable. Because it is a vector, you can nudge a single anchor point without redoing the whole edge.
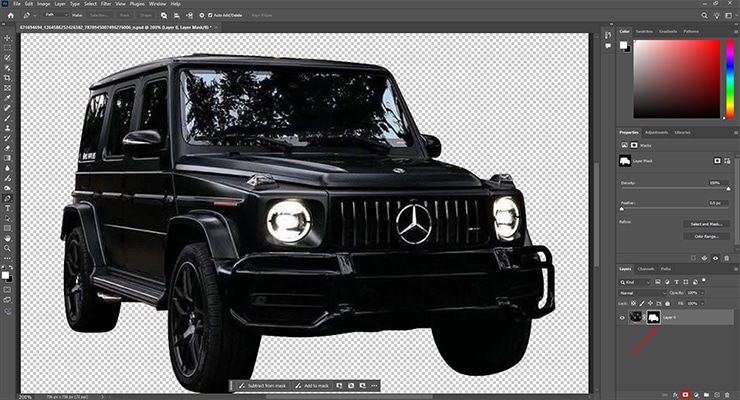
This precision is why background work is the most commonly outsourced editing step — it is hand-work that does not scale on its own.
Handling the three hard cases
Transparent windows
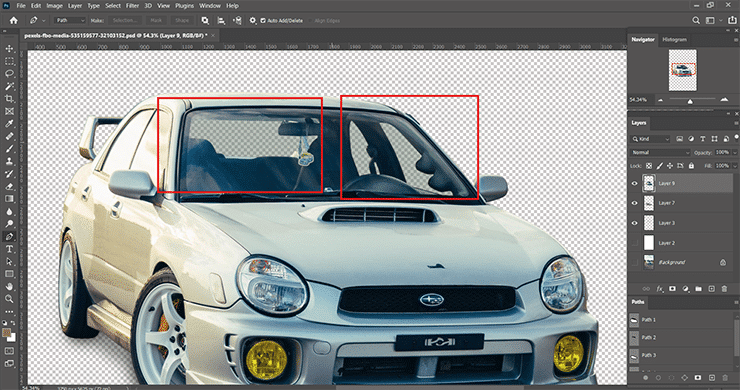
Decide whether the windows stay transparent or get a uniform tint. For a white-background listing, mask the glass so the new white shows through, which reads as clean and natural.
For a composite onto a showroom scene, add a subtle reflection layer so the glass does not look like an empty hole; transparent-glass work is handled by an image masking service. The wrong move is leaving the original lot reflected in the windows after replacing everything else — the mismatch is immediately visible.
Spoked wheels
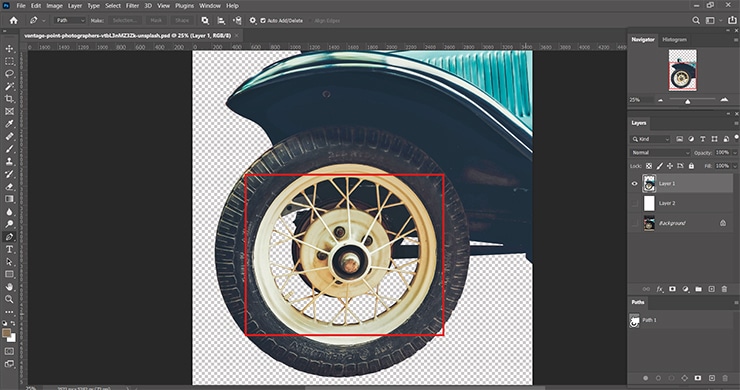
Cut out the gaps between spokes as separate path segments. This is tedious on multi-spoke alloy wheels, but skipping it leaves chunks of the old background floating inside the wheel, which is the clearest tell of a rushed cutout.
Antennas, mirrors, and thin edges
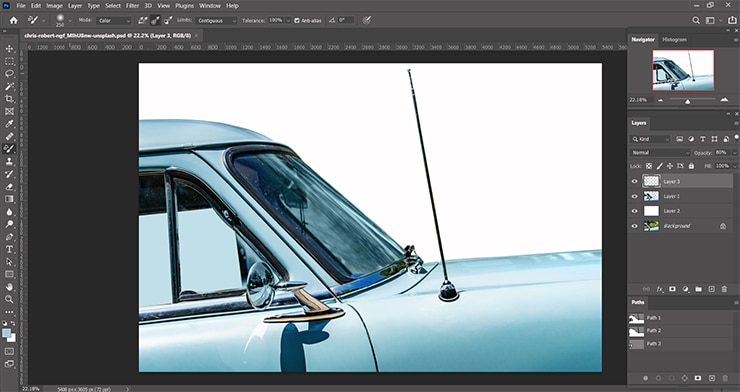
Trace thin protrusions with the Pen tool rather than relying on edge detection. Automatic tools drop low-contrast slivers like a roof antenna; the manual path keeps them. Where an antenna crosses a busy background, zoom to 200% so the anchor points land on the true edge.
Batch background removal across an inventory
Removing one background is a task; removing 200 is a workflow, and the bottleneck is the hand-work, not the tools. The cutout and shadow steps are identical for every vehicle, so the only way to scale them is to standardize the inputs and split the work.
Standardize the capture first. When every car is shot at the same angle, distance, and background, the cutouts share the same geometry, and a Pen-tool path or an action built for one shot transfers to the next with minor adjustment.
Inconsistent capture forces a fresh path every time and destroys any efficiency. Photoshop Actions can automate the repeatable parts — the export, the resize, the white-background fill — but the actual edge tracing on glass and spokes still needs a human, because the automatic selection fails there.
This is why the cutout step is the most outsourced part of dealership editing. It is precise, repetitive, and identical across vehicles, which makes it the clearest candidate to delegate to a team running it at volume while the photographer keeps shooting.
Placing the car on a new background
Once the cutout is clean, place it on white, transparent, or a scene — and add a contact shadow so it does not float. A car dropped onto a new background with no shadow looks pasted, because the cutout removed the original ground contact. Build a shadow on a layer beneath the car, tight and dark under the tires, fading outward.
For listings, the three standard outputs are: a pure white background for marketplace uniformity, a transparent PNG for use over any page color, and a composited showroom or outdoor scene for hero images.
Match the lighting direction of the new background to the light on the car, or the composite reads as fake. The full shadow-and-reflection technique is part of the broader Photoshop car-editing workflow.
For step-by-step compositing onto a new scene, see the guide to merging images with a background.
Frequently asked questions
AI tools like Photoshop’s Select Subject remove the outer background in seconds, but they fail on transparent windows, wheel spokes, and thin antennas — the features every car has. For a quick social post, AI is adequate. For a listing gallery where buyers scrutinize the image, a manual clipping path is still required for a clean result.
A clipping path is a vector outline drawn with the Pen tool that defines exactly where the car ends and the background begins. Because it is a vector, it produces a sharp, editable edge and can be adjusted point by point without redoing the whole cutout. It is the professional standard for product and vehicle background removal.
Use white for third-party marketplace listings where a uniform backdrop makes the gallery consistent. Use a transparent PNG when the image will sit over different page colors on your own website. Many dealerships produce both from a single cutout, which is why a clean, reusable path matters.
The two usual causes are a missing contact shadow and leftover background inside the windows or wheel spokes. Add a shadow beneath the tires to re-anchor the car, and mask the glass and spoke gaps so no old background shows through. Both are signs the cutout was rushed.
An automatic selection takes under a minute but needs cleanup. A full manual clipping path with windows, spokes, and a contact shadow takes 15–30 minutes per image depending on wheel complexity. At inventory volume, this is the step most dealerships outsource.
Need clean cutouts across your whole inventory? See the background removal service or start a free trial.

Salim Ahmed is the CEO of Graphic Experts India, with over 25 years of expertise in photo editing, clipping path, image retouching, and eCommerce image editing services.