

To change a car’s color in Photoshop, select the paintwork precisely, then shift its hue on a separate adjustment layer while protecting the reflections, shadows, and trim.
The realistic result depends on two things: a clean selection that excludes glass, tires, and chrome, and a recolor method that keeps the original lighting intact. Painting over the car with a solid color destroys the metallic sheen and looks fake; the correct approach re-tints the existing tones so the new color still reads as real paint under real light.
This guide covers the selection, the recolor, and the metallic-paint problem that trips up most attempts.
Color accuracy is a trust issue for car listings, not just an aesthetic one. Dealer.com (a Cox Automotive brand) reports that used and certified vehicle listings using actual photos are 40% more likely to generate a lead than listings without them (Casey Corcoran & Jeffrey Pierce, Dealer.com, updated March 2026). A recolor that looks obviously fake undoes that advantage, so the goal is a believable color, never a painted-on one.
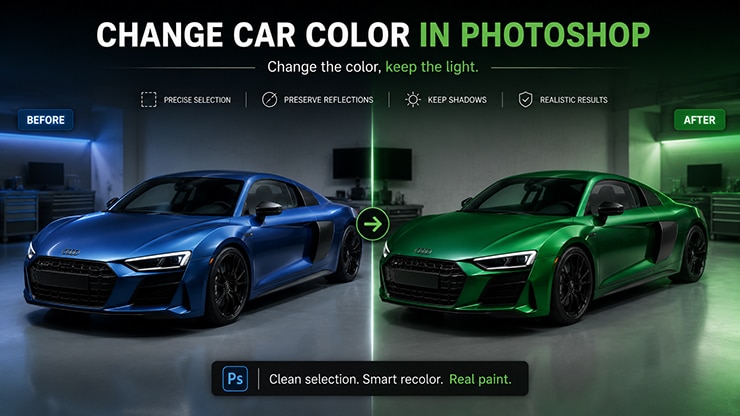
If you need color changes across a full inventory rather than a single image, GEI’s color correction service handles recolors at batch scale. The method below is the same one a retoucher applies by hand.
Key takeaways
- Changing a car’s color means re-tinting the existing paint, not painting over it with a solid fill.
- A clean selection is the whole job: exclude glass, tires, chrome, lights, and trim, or the recolor bleeds.
- Use a Hue/Saturation or Solid Color layer clipped to the selection so the edit stays non-destructive.
- Metallic and pearl paints are the hard case, because their color shifts across the panel with the light.
- Keep the original highlights and shadows — they carry the “real paint” realism the new hue sits on.
- Accurate color matters for listings: a fake recolor undercuts the trust a real photo builds.
Why solid-color painting fails
Filling a car’s body with a flat color removes the exact detail that makes paint look like paint. Real automotive paint is not one color — it is a gradient of the base hue, from bright highlights on the panel crowns to deep shadow in the recesses, plus reflections of the sky and surroundings.
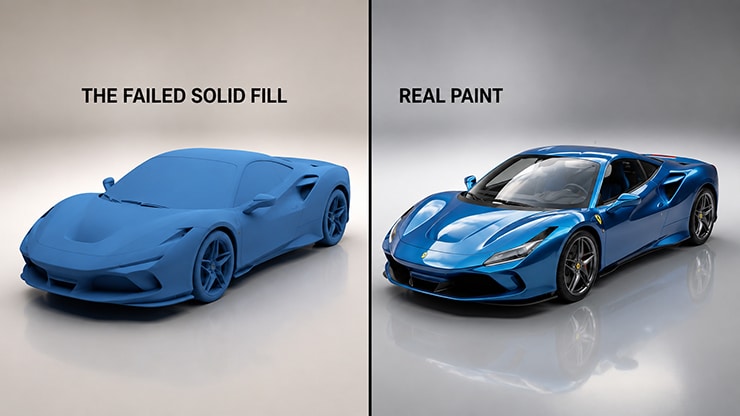
A solid fill flattens all of that into a single dead tone. The consequence is a car that looks like a cardboard cutout. The eye reads paint through its highlights and reflections, so any recolor that erases them registers as fake instantly.
The correct methods below all share one principle: change the color, keep the light.
Step 1 — Select the paintwork precisely
The selection is where a recolor succeeds or fails, so isolate only the painted body panels. Everything that is not paint must be excluded: the windows, tires, chrome trim, headlights, grille, badges, and door handles.
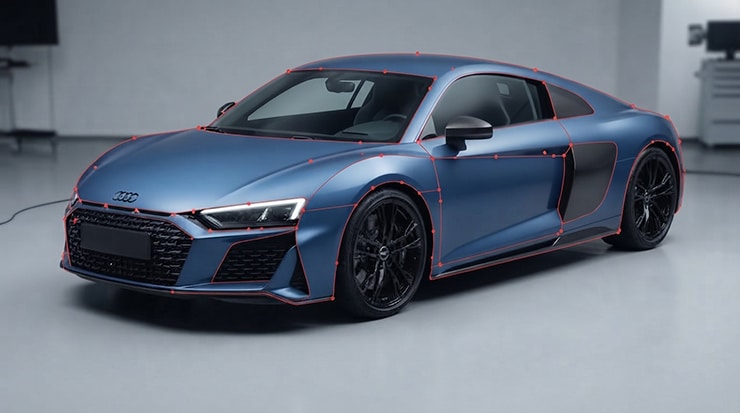
If any of these fall inside the selection, the new color bleeds onto them, and the edit looks careless.
Use the Pen tool for the clean outer edge of the body, the same precise approach used in a clipping path. Then subtract the non-paint areas — this is where a hair-accurate image masking service approach earns its place on complex trim and grilles.
Save the finished selection as a mask so you can adjust the recolor later without re-selecting. For the full cutout workflow that this selection builds on, see the guide to removing the background from a car photo.
Step 2 — Change the car’s color with a non-destructive layer
Apply the new color through an adjustment layer clipped to your selection, never with the brush directly on the image. Two methods work, depending on how far the new color sits from the original.
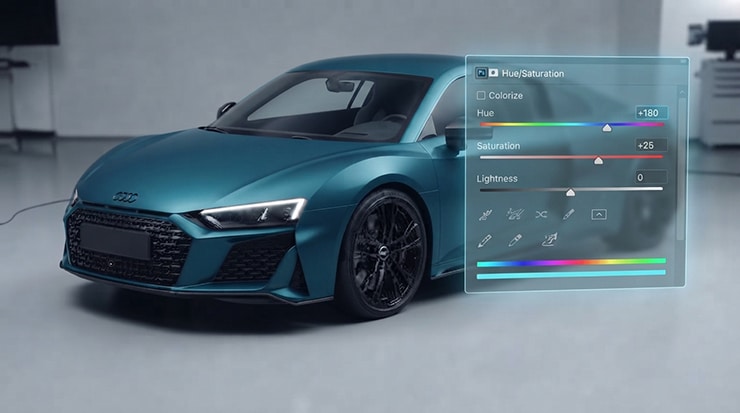
For a shift within the same tonal range — red to blue, silver to grey — use a Hue/Saturation adjustment layer. Clip it to the paint mask, then move the Hue slider to the target color and fine-tune Saturation and Lightness so the panels keep their depth. Because it is an adjustment layer, the change stays fully editable.
For a bigger jump or a specific brand color, use a Solid Color fill layer set to the Color or Hue blend mode. The blend mode applies only the hue and saturation of the fill while preserving the original lightness — which means the highlights and shadows of the real paint show straight through. This is the method that keeps a recolor believable.
Step 3 — Handle metallic and pearl paint
Metallic and pearl finishes are the hardest recolor, because their color changes across the panel as the flake catches the light.
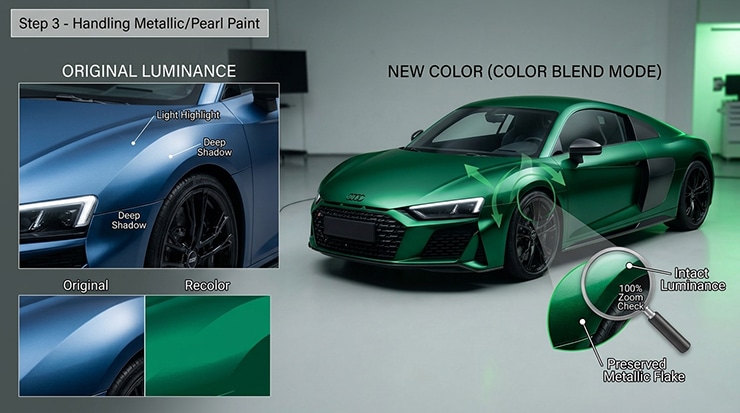
A metallic silver reads near-white on the highlight and dark grey in the shadow, so a single flat hue shift looks wrong on it. The fix is to let the original luminance drive the result.
Keep the Solid Color layer on Color blend mode so the metallic flake’s light-to-dark variation stays intact underneath the new hue.
Then check the panel transitions at 100% zoom, because a recolor that looks right on a flat door can break on a curved fender where the light rolls off.
Where the effect weakens, mask back some strength rather than pushing the saturation, which would kill the metallic look. High-end recolors on metallic and pearl finishes are exactly the work GEI’s photo retouching service is built to handle.
Step 4 — Match the color to a real reference
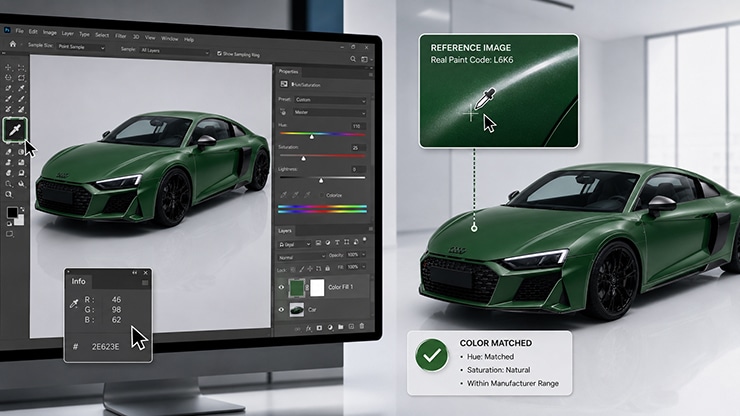
A recolor for a listing must match a real, orderable paint color, not an invented shade. A buyer who sees “racing green” in the photo expects that specific green in person, so the recolor should land within the true range of the manufacturer’s color, not an exaggerated version. Pull a reference image of the actual paint code and sample it.
Set the target hue against that reference, then confirm the saturation is not pushed past what real paint shows.
Oversaturated recolors are the most common tell of an amateur edit, and on a listing they create the same expectation gap as a wrong photo — the buyer arrives, the color is off, and trust is gone. Accurate, reference-matched color is the core of any professional car image editing service.
Common mistakes
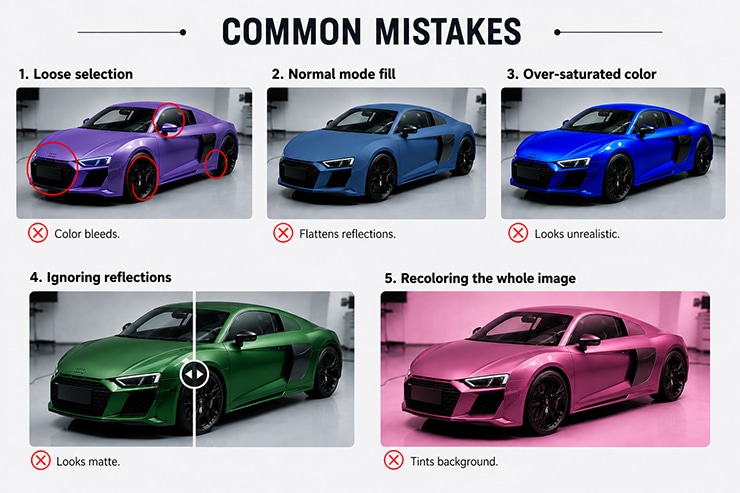
- Selecting too loosely, so the new color bleeds onto chrome, glass, or tires. Tighten the mask.
- Using a solid fill on Normal mode, which flattens the paint. Switch to Color or Hue blend mode.
- Over-saturating to make the color “pop,” which destroys realism and misrepresents the car.
- Ignoring reflections — the sky and surroundings reflected in the paint should stay, or the surface looks matte and fake.
- Recoloring the whole image instead of the masked body, which tints the background and shadows too.
Frequently asked questions
Yes, when you re-tint the existing paint rather than paint over it. A Hue/Saturation or Solid Color layer set to Color blend mode shifts the hue while keeping the original highlights, shadows, and reflections, which is what makes the new color read as real paint. The realism depends on a clean selection that excludes glass, chrome, and tires.
The usual cause is a solid color fill on Normal blend mode, which flattens the paint into one dead tone and erases the highlights the eye uses to read a surface. Switch to Color or Hue blend mode so the original lighting shows through. A loose selection that bleeds onto trim is the other common cause.
Keep the recolor on a Color blend mode layer so the metallic flake’s light-to-dark variation stays intact under the new hue. A flat hue shift looks wrong on metallic because its color changes across the panel with the light. Check curved panels at full zoom and mask back strength where the effect breaks.
It does if the recolor shows a color the car cannot be ordered in, or an exaggerated shade. Ethical recoloring matches a real manufacturer paint code so the listing photo reflects what the buyer will receive. Accurate color reduces wasted showroom visits and complaints.
For a single image, the in-Photoshop method is straightforward. For a full inventory, or for metallic and pearl finishes that need panel-by-panel checking, outsourcing to a dedicated color correction team is faster and more consistent. The per-image selection work is repetitive and scales poorly in-house.
Need color changes across your inventory? See GEI’s color correction service or start a free trial.

Salim Ahmed is the CEO of Graphic Experts India, with over 25 years of expertise in photo editing, clipping path, image retouching, and eCommerce image editing services.