Whiten teeth in photoshop are simple and easy to learn. Learn teeth whitening from this guide with a picture and detailed instructions and make teeth whitening by using Photoshop tools step by step.
In Photoshop, editors require using the Hue or saturation adjustment layer to do the teeth whitening. This would help us to whiten and brighten the teeth. Here you would learn to whiten teeth of a single person.
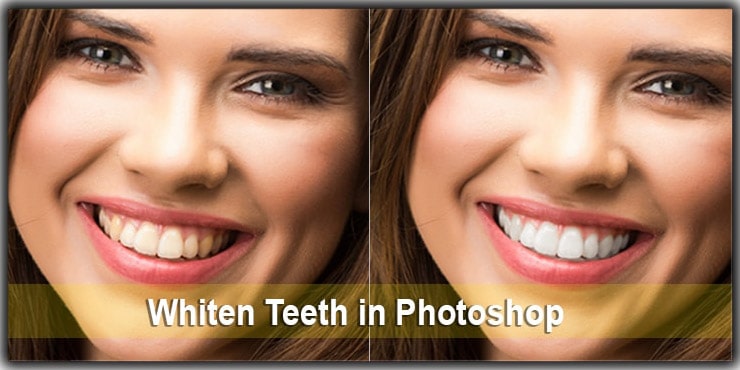
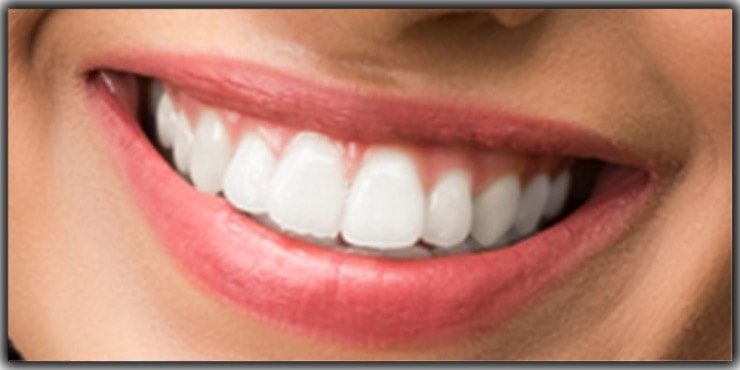
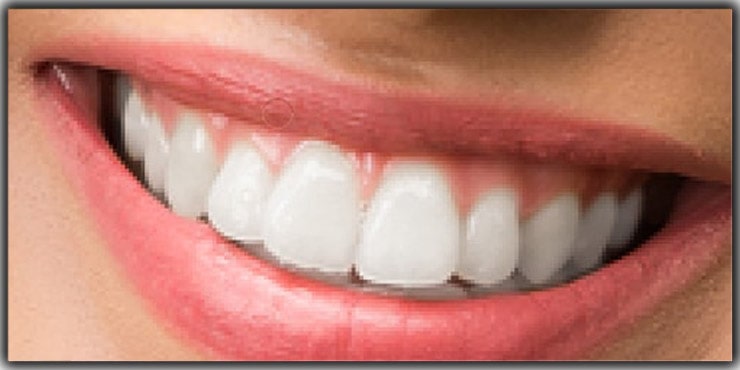
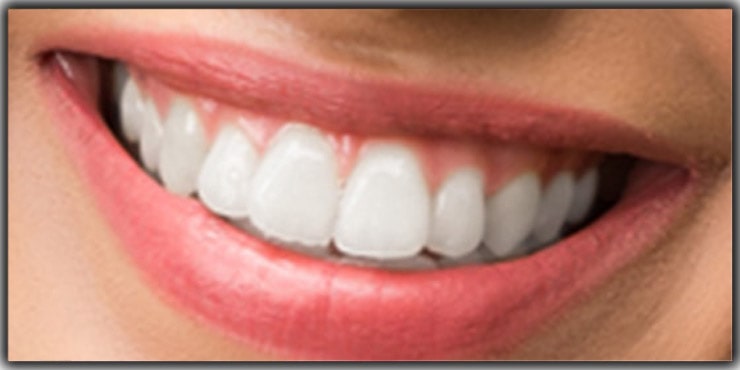
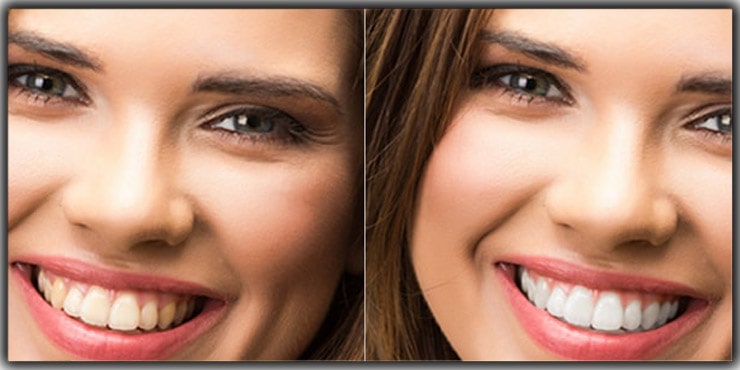
Afterward, we will help you study about two people in that photo. For that, separate adjustment layers would ease. When obeying this process, use any photo where one person’s teeth look whiter than the separate person’s. In this tutorial, I would use this image.
Raw Model Image With Yellow Teeth
After zooming the picture, there are some yellow teeth, the person on the left. Using Whiten Teeth in Photoshop, brightening both person’s teeth can be white. A single hue or saturation layer can be made by whitening and brightening teeth.
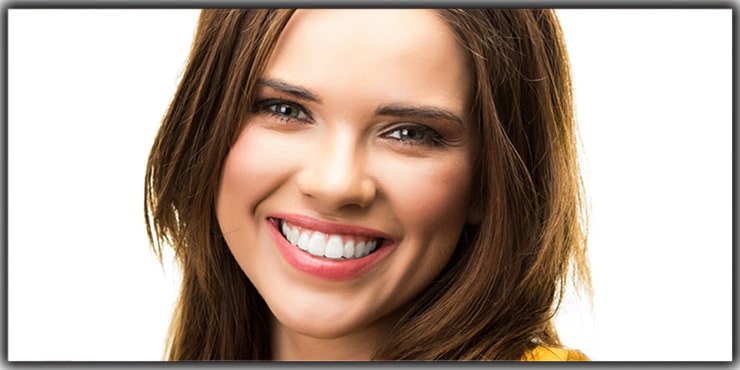
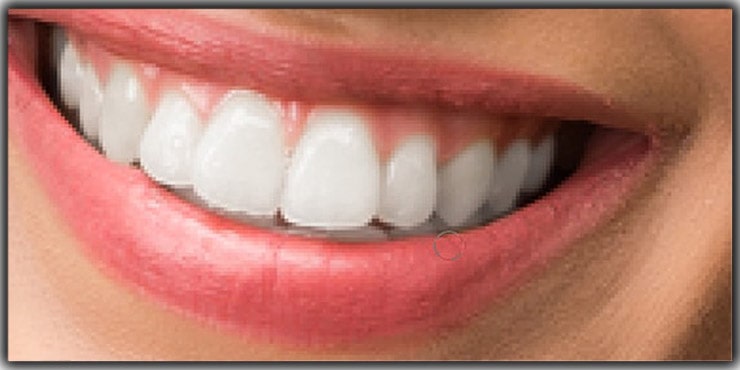
Final Image: Model Teeth is Whiten
Overview of the Teeth Whitening in Photoshop Tutorials:
The teeth whitening and brightening process of Photoshop is an effective way to change the color of the yellowish teeth. However, effects aging is the reason for teeth” yellow color.
With this effect, teeth in the photo would be more charming, and smiles would be brighter.
The intention to do this in the photoshop edit could be several. No matter what the color of your teeth is, teeth whitening in photoshop would make your smile sumptuous.
What Benefit Would You Get if You Learned This Process in Photoshop?
Well, here is the answer to this question: We took photos at every special event in our life. So we try to keep our moment alive with this photo. But in the group photo, everyone’s teeth color is different.
So, with the help of the teeth whitening technique, teeth color issues can be removed.
Hence, don’t worry about which event you are attending wedding, anniversary, birthday, or graduation- teeth whitening could make your smile stunning.
Similarly, if you are a fashion house photographer or want to publish a photo in a magazine, teeth whitening technique is compulsory.
Now let’s start the way of teeth whitening-
Whiten Teeth in Photoshop Step by Step Tutorial
Way of Whiten teeth in Photoshop CC 2022-
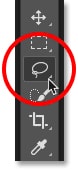
Step 1: Select the Lasso Tool Photoshop
Begin the illustration with a selection everywhere of the teeth. After that, use the lasso tool from the Toolbar.
Step 2: Selecting the Teeth with Lasso Tools
When editors try to whiten the teeth in the photo, they edit like two or more people. Because they try to whiten every person’s teeth in a single period, the quantity of teeth whitening differs from person to person.
So, it is impossible to do teeth whitening for more than one person in a single period. That is why we begin with the man on the left.
Now illustrate the selection everywhere of the teeth. Later it is possible to clean it if the selection is not perfect. First, however, select everywhere the teeth are and also be careful to stay close to the edges.
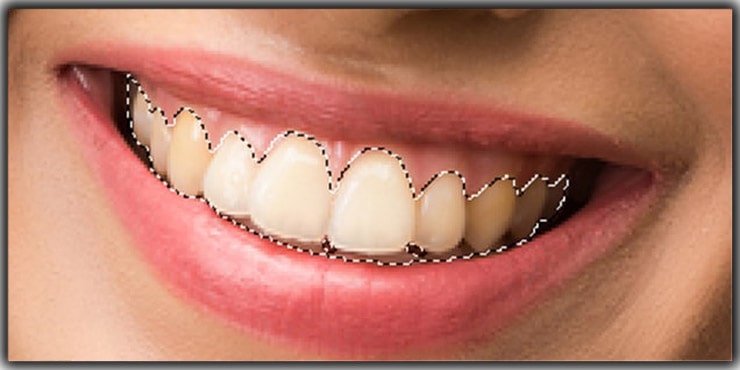
Using the lasso tool illustration of a selection outline is done around the teeth.
Step 3: How to Adjustment Hue/ Saturation Layer
Now open the layer, then click New Fill. Also, click on the Adjustment Layer icon at the bottom of the Layers Panel.
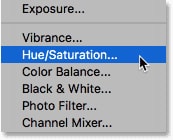
Choose hue saturation
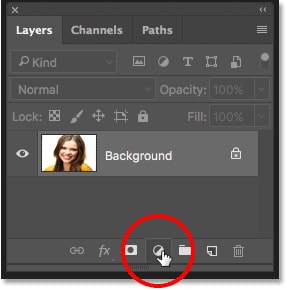
The procedure of clicking on the new fill/ Adjustment layer
After this step, the hue and saturation adjustment layer appears above the Background layer.
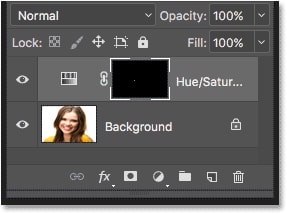
In the image, adjustment is added
Step 4: Transform the Option of Editing into the Yellows
In Photoshop’s Properties panel, there are control and options. For example, which is used for the Hue and Saturation adjustment layer? This layer influences the colors of the image quality, and that is why the edit option is added to the master.
Use the Master by default in the edit option.
In the teeth whitening image, editors need to edit only the yellow teeth. So, change the option of the edit to yellows.
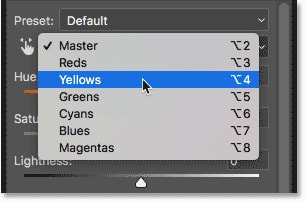
Transform the master into yellow in the edit option
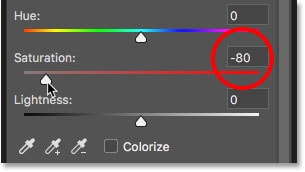
Step 5: Minimize the Yellow Saturation.
Open the saturation slider. And now, drag to the left. When you pull this, then the more yellow color will be desaturated. Now teeth in the image would be whiter than prior. However, in the natural teeth, there is some yellow color; they recognize it when saturating.
Therefore, when you transferred the slider of the saturation on the left when I was doing here:
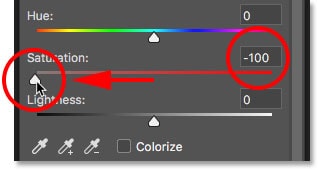
Using the saturation slider to move -100
But if anyone removes the yellow completely, teeth will be dull and inert.
Teeth which are grey and white are not healthy.
Therefore, look at the image in which the saturation level of yellow would look like a natural tooth. If the editor finds the perfect saturation level of yellow, fix the slider. For this image, a level of saturation is -80 would be good.
whiten teeth saturation controlling
Teeth whitened images should correlate with the original look. In this way, you can critique the overall outcome. There is a clarity icon in the layers panel. To hide the effects of the layer of adjustment, click it.
Then the adjustment layer would be temporarily hidden, and the original image can be found. To go back to the edited version of the whitened, click again on the alignment layer, and here the editor can view it…
Use the adjustment layer on and off by using the visibility icon.
teeth brightening closeup look
Step 6: Use the Edit Mode to Go Back to the Master.
After the teeth whitening, now teeth should be brightening. To do that, change the edit option. Then find the properties panel and change it from yellow to the master. In this way, the color arrangement of all colors would be feasible at once.
Use the setting and change it to master
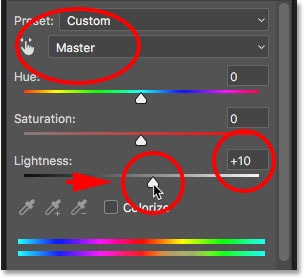
Step 7: To Brighten the Teeth Use the Lightness Slider.
Open the lightness slider and click it. Then start to shift towards the right. The more you move it, the more light it will be. Be careful when moving the slider; don’t brighten them abundantly in this image. Lightness +20 will work very well.
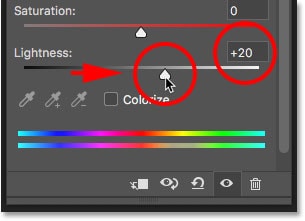
Use the setting and change it to master
Now teeth are brighter. However, it depends on the lasso tool. If the selection is accurate, an undesired problem of brightening is created. For example, in this tutorial, some lips and gums become brightening at the bottom of the teeth. This area could clean the following way.
There are areas around the teeth which are brightened.
Step 8: Use the Brush Tool
Built-in a layer mask is added in the adjustment layer feature of Photoshop. When editors edit, they see the layer mask thumbnail in the layers panel.
In this thumbnail, there is a hue or saturation adjustment layer. Most of the area of the thumbnail is black a few of the areas are white.
Adjustment layers are used on the white area, but the Black area is not affected. Also, the initial Lasso Tool selection is used in Photoshop for making the layer mask.
Hence, editors try to fill the selected area with white and another area with black. This color correction aids in fixing unwanted problems due to light reflection during photography.
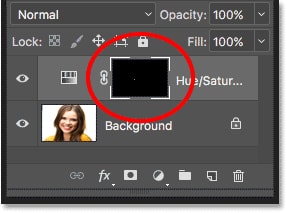
Using the layer mask thumbnail of the hue or saturation adjustment layer.
Use the brush for paint on the layer mask to clean up around the teeth. If you don’t find it, select it from the Toolbar.
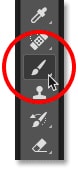
Brush tool selection
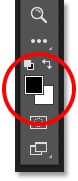
Step 9: Lock the Foreground Color to the Black
Some area in the photo is unwanted and demands to be painted black. The foreground color is the current color of the editors. This color is similar to the brush color and sets the foreground color to black. In the toolbar bottom foreground and background, the color swatches option appears. The swatch in the upper left is the foreground, whereas the swatch in the lower right is the background color.
You may reset the background and foreground color into the defaults by pressing the D letter on the keyboard. Hence, this would deliver the foreground color into white and the background color into black.
So, Turn the color and lock the foreground color into black. To do that, use the X on the keyboard.
The color of the foreground had better be black
Step 10: Clean Up the Area Using the Paint Around the Teeth.
If there is any difficulty in the photo, paint it around the teeth for cleaning up. Hence, this can solve with the soft edges brush. Also, adjust the size of the brush from the keyboard.
On the keyboard, there is a left bracket key ( [ ) and right bracket key ( ] ) for increasing and shrinking the brush. Use the left bracket key by holding a shift which will make the brush softer.
However, doing the same technique with the right bracket key brush edges will be hard.
Example: teeth washing around the area
In this article, I will paint the upper area of the lip and the gum line. From the above area of the teeth, the paint would help to remove the whitening and brightening. In the layer mask painting, editing is not done on the image.
For this, it is impossible to see the brush color as the paint. Nevertheless, the impact of the hue or saturation correction may go away…
Whiten teeth cleanup upper lip.
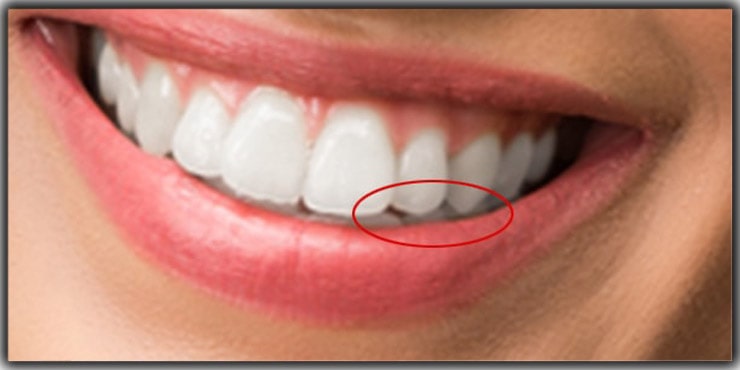
If there is a problem at the bottom of the teeth, paint the area so that you can exclude the whitening and brighten the lower part of the lip.
Whiten teeth cleanup lower lip
It is possible to exclude the error of the paint over the teeth. On the keyboard, press X to switch the background and foreground colors. When you do this, the color changes to white.
Now, paint the incorrect image portion and do the correction of whitening. Then, to go back to the black, press the X again and continue the editing.
Here paint the predicament areas on the left and right. The teeth are now whiter and brighter than the previous look. Also, the area around the teeth also normal.
Cleaning outcome of the nearby area of the teeth.
Precise Teeth Brightness Modification.
One area is not good in the photo of the teeth. In the image, shadows are cast on them, making them initially darker than the other three bottom teeth. These teeth would look tarnished and washed out when the brightening is done with the slider.
Some teeth are not natural light.
Use the lower brush opacity to adjust the layer on precise teeth. However, this can reduce the effect of the Hue or Saturation. In the options bar where you can find the opacity to command.
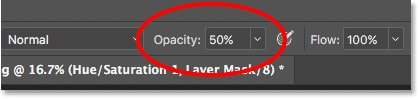
Brush opacity dropping.
After, the color should be black in the brush Photoshop. However, the painting could help the teeth restore brightness to the previous version. Finally, if the editing is finished, make the opacity 100%. Else, there is a possibility of getting a surprising result when you edit for the following time.
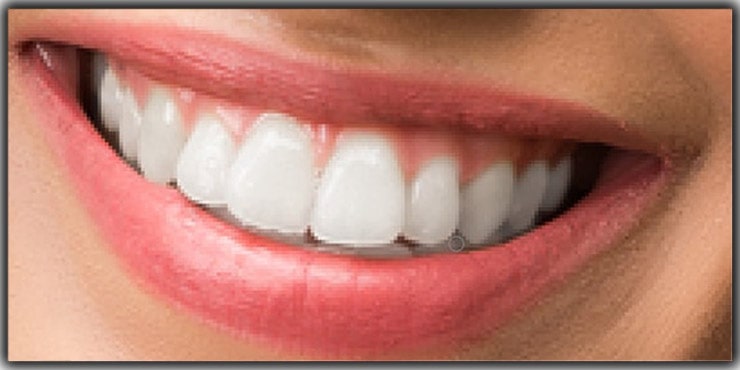
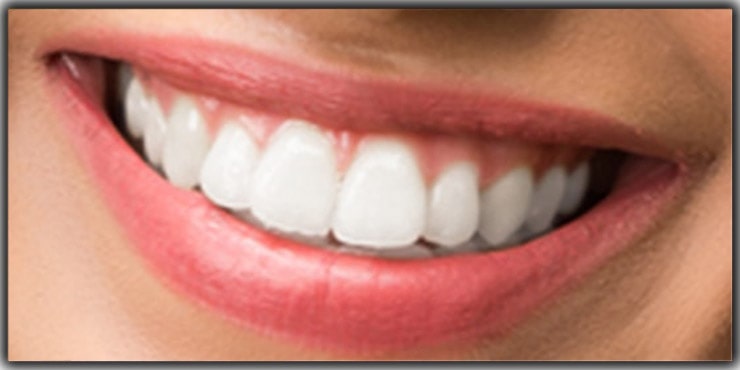
The result after editing of man teeth (whitening & brightening).
Now, zoom out the photo, and look at the final version of the editing. What is the result? Yes, it is good after all.
The Final Result of Whiten Teeth in Photoshop CC 2022
Therefore, follow the tutorial steps the above and get benefitted from it. No matter what event you go through, your smile is the game-changer in the photo.
Now, this tutorial on whitening teeth in Photoshop is quite long. Hence, this is not so easy to do. You must concentrate on learning and making them look naturally beautiful.
If you like this article, please share it with your friends. However, if you find it difficult, please let us know. We will be glad to hear from you.
You may read: