Do you dislike the background of your image and want to edit it? Or you want to edit the BG of your product to give it a professional look. The photo background may require editing for several reasons.
Happily, the process of editing a photo’s background in Photoshop CC 2025 is so simple. Even a beginner background changers can easily edit the BG with the steps described in this comprehensive guide.
Let’s learn background editing methods using Photoshop. Also, we discussed when BG editing is required and when not to use it. Continue reading.
What are the Different Ways to Edit Background in Photoshop?
There are many ways to edit photo backgrounds using Photoshop. Photographers or business owners want to Say goodbye to boring backgrounds and have different BG editing requirements.

Some like white or transparent BG or change the background, while others require a blurred background. Some want to change the background color of their original images and transport the subject to a whole new scene.
Here, I shared the different ways of photo editing magic to edit backgrounds in Photoshop. Whether you’re a pro photo editor or just a beginner, it must help you to become the best photo background changer.
Background Editing with Photoshop AI
You can achieve mind-blowing Background editing possibilities with Photoshop AI. All you need to do is input the prompts and Photoshop will customize the BG according to your preferences.
The best thing about Photoshop AI Generative Fill is it generates realistic BG by analyzing an image’s color, contrast, visibility and lighting.
- Maintains consistency in visual styles
- Minimizes manual errors
- Allows users to change the BG easily with expected accuracy
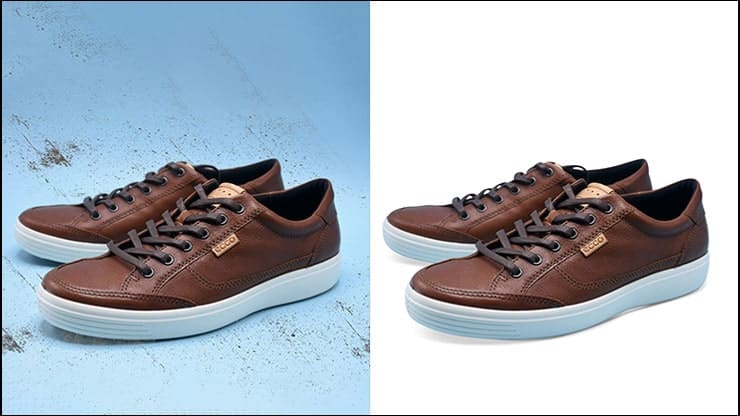
White Background Making
White BG is mainly used in product photography. Online store visitors want to see polished and eye-catching images of a product.
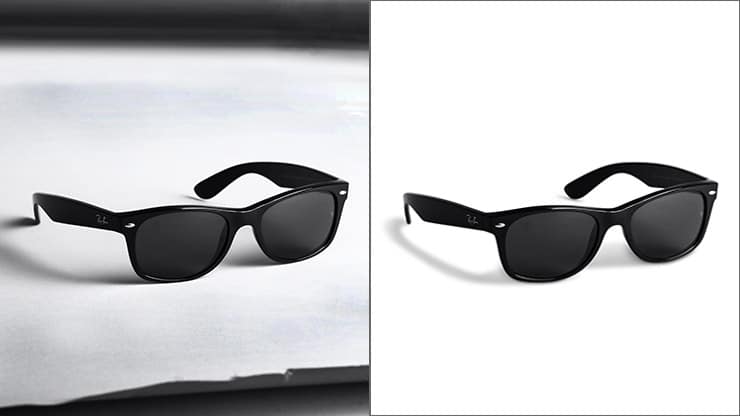
Otherwise, the elements in the Background may distract their attention. This way, an online store may lose a potential customer. In this case, white background editing is necessary.
Thus, the background remover removes the background from your photo with path or other selections and makes it white or solid color.
- The product stands out against the white Background.
- A clean and uniform Background creates credibility.
- White Background helps customers in decision-making.
Transparent Background Making
When you need to use the subject of a photo wherever you want, transparent BG comes in handy. That is why images with transparent Backgrounds are viral among online buyers.
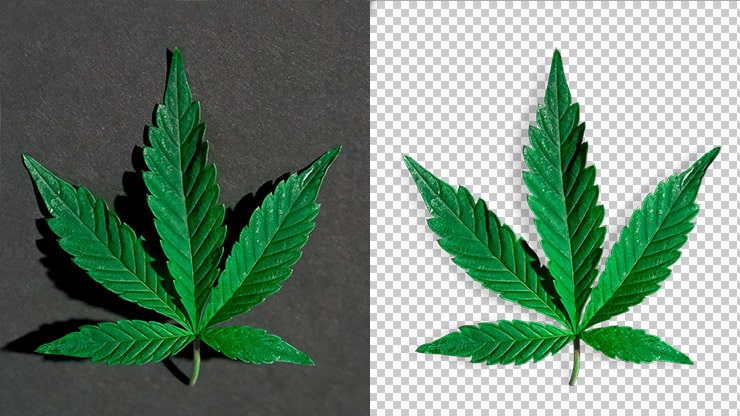
- Logos and graphics look polished with a transparent Background.
- Transparent Background maintains professionalism.
- Images blend seamlessly into any background.
Background Replacement
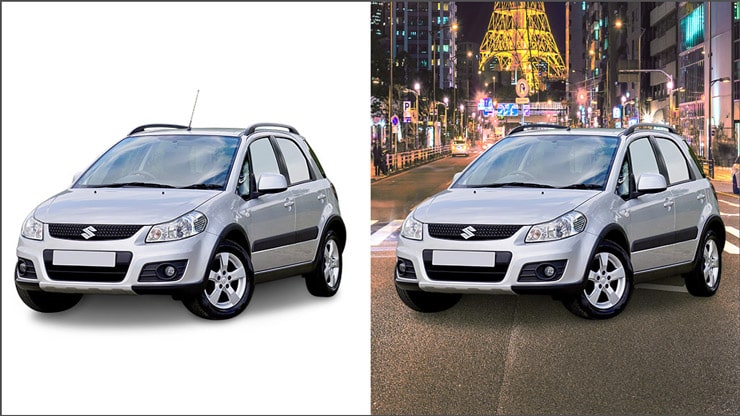
Photographers mostly require background replacement services. After capturing a product image, if the BG environment is incorrect, the BG will require replacement.
Photographers mostly require background replacement services. After capturing a product image, if the BG environment is incorrect, the BG will require replacement.
- Increases photo quality and overall appearances.
- Customize BG to meet specific themes or requirements.
- It makes the subject look better.
Background Blurring
Every photographer wants to take images of a product or model while keeping the background blurry. A blurred BG allows viewers to be attentive to the subject.
But making the background perfectly blurry is only sometimes possible. At this point, background blurring is required.
- Directs viewers to focus on the subject
- Adds visual interest to photos
- Minimizes BG distracts and ensures a clean look.
Background Merging
Background merging will be helpful if you want to add artistic touches to your excellent shot. It also gives a photo a more natural look.
- Background merging creates an outstanding composition.
- It makes a photo more compelling.
- Aligns subject with brand messaging or themes
Background Retouching
Contrast, shadows, exposure, and scratches may come in the Background of an excellent photo. In such cases, you will need background retouching.
If you don’t retouch the BG, the image will look dull. “Clone stamp tool” or “Spot Haling Tool” are the best options.

- Smooths out imperfections for professional-looking photos
- Highlights subject by refining background distractions
- Improves overall clarity and sharpness
When to Edit Photo Background?
You can achieve the best result if you know when to edit the Background of your photos. Here are scenarios where background editing services can be beneficial.
- For Uploading Product Photos Online: E-commerce giants like Amazon prefer product images with clean, white backgrounds. Editing backgrounds enhances product appeal, making them more attractive to customers.
- When the Background is Distracting: If it distracts from the photo’s main subject, editing or replacing it can refocus attention and improve the image’s original purpose.
- To Grab attention to a Specific Subject: Sometimes, photos require the subject to stand out. Background manipulation or removal can emphasize the subject, drawing attention where needed most and enhancing the overall impact.
- To Remove Unwanted Objects: Unwanted background elements can detract from the image’s quality. Skilled background editors can seamlessly remove distractions, improving the photo’s composition and aesthetics.
- To Modify the Background: Lighting and environmental factors can affect background quality. Editing allows for adjustments to brightness, color, and other elements, enhancing visual appeal while maintaining realism.

When not to Edit Photo Background?
While background editing can enhance photos, it’s unnecessary in specific scenarios. Here’s when to skip it.
- Background Perfection: If the Background aligns with your vision and isn’t distracting or unappealing, editing is optional.
- Subject Focus: Additional editing isn’t required when the subject stands out without background manipulation.
In these instances, avoiding background editing saves time and money. Trust your instincts and only edit when necessary.
Who Needs Background Editing Service?
Background editing services are required by various individuals and businesses seeking enhanced visuals. Here’s who benefits:
- E-commerce Business Owners: Background removal boosts product appeal, increasing sales and profits.
- Professional Photographers: Editing expertise ensures high-quality images despite time constraints.
- Print Media Business Owners: Swift expert editing services meet high-volume demands efficiently.
- Photography Website Owners: Quality visuals build trust and engagement with site visitors.
- Anyone Wanting Polished Photos: Whether for personal or professional use, background editing enhances image quality and appeal.
Consider employing background editing services tailored to your needs for seamless, professional results.
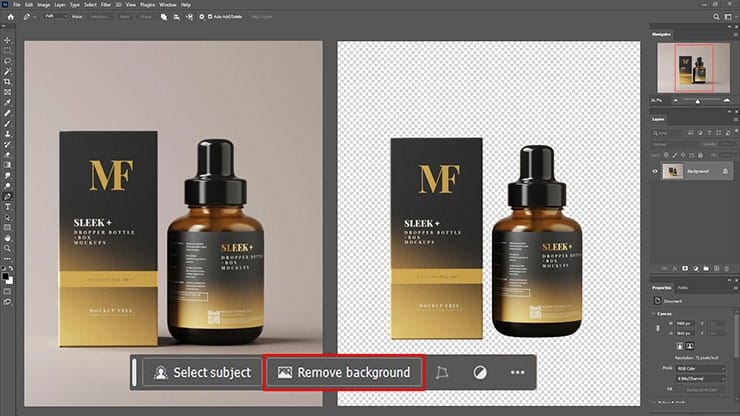
How to Edit Photo Background in Photoshop CC 2025
Here, we shared the process step-by-step to show you the easiest way to edit photo background. Read the steps meticulously to make your image eye-catching and appealing.
Step 01: Foreground Object Selection
Hover your mouse to the left-side toolbar and select Quick Selection Tool. You can also hit the “W” button on the keyboard.
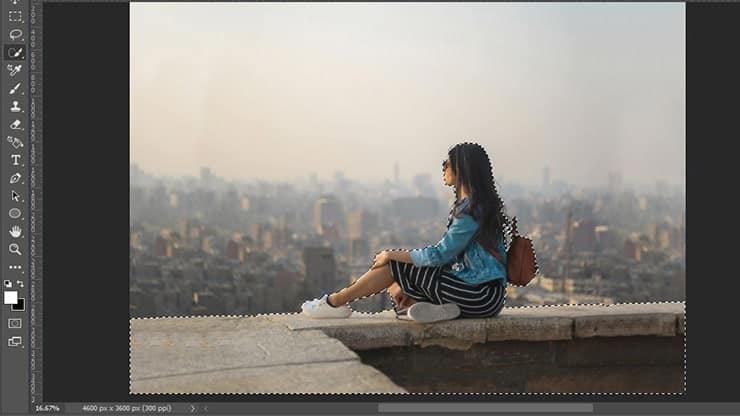
Now, left-click and drag inside the object you want to select. At this point, Photoshop will do guesswork and select the area you want to include depending on the image contrast levels.
Thus, hard edges and high-contrast areas will be selected precisely. On the other hand, soft edges and low-contrast regions need fine-tuning. Selecting the BG instead of the object can be easier for some images. However, we will work with the object for this tutorial.
Step 02: Adjust Your Selection
Our Selection requires fine-tuning. For this, zoom in on the photo. Then, press the left square bracket. Thus, the brush size will get smaller than before. Next, add part of the foreground object to the Selection by clicking and dragging. Do you need to remove any parts or areas from the Selection?
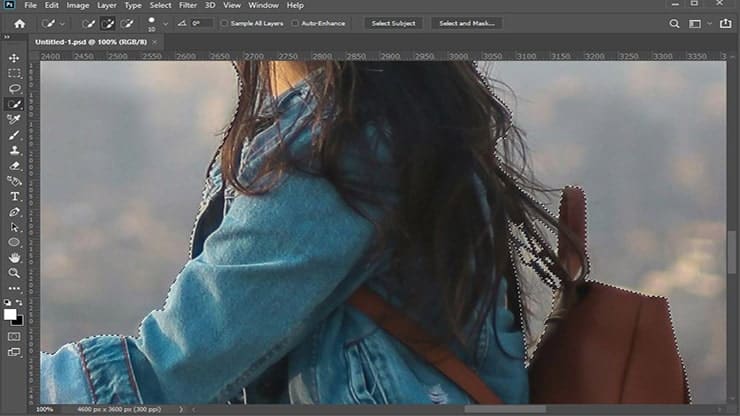
All you need to do is click and drag to those areas while holding the Alt button. Remember, all solid objects should be part of your Selection. However, don’t select each strand of the hair to make the process hard.
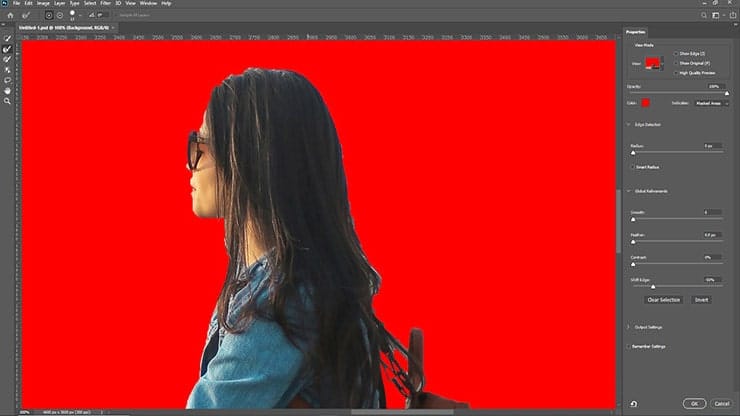
Step 03: Select & Mask
After that, hover your mouse at the top bar and choose Select and Mask. A screen will appear, and you can refine the Selection to change it to a Mask.
Then go to the Properties panel and choose View Mood. As a result, you can see how the Selection will appear. We recommend Overlay. This option allows you to select a color that contrasts with your photo.
Next, press the F button on your keyboard. This way, you will see different BGs. At the same time, any issues with your Selection will be highlighted.
Step 04: Selection Refining

In this step, we will be refining the Selection. There are many tools available in the left-hand toolbar. Let us tell you how they work.
- Polygonal Lasso Tool/Lasso: You can manually draw parts to remove or add to your Selection.
- Brush Tool: Using this tool is beneficial over harder edges.
- Refine Edge Brush Tool: This is suitable for use on hairs or smoother edges.
- Quick Selection Tool: We used the same tool in Step #01. The tool lets you quickly add or remove more significant parts of your image.
Now, check the edges of your Selection by zooming in the photo. More fine-tuning is optional. You need to identify the areas outside the selection area, wrongly selected, or with rough edges.
We used Brush Tool to refine our Selection.
Then, touch up the hairs by using the Refine Edge tool. This tool is available in the right-side panel beneath the Edge Detection. From the panel, TICK the box named Smart Radius. Thus, Photoshop automatically shows the soft and hard edges.
Increase the Radius a bit if required. Hit the P button to see the difference between before and after.
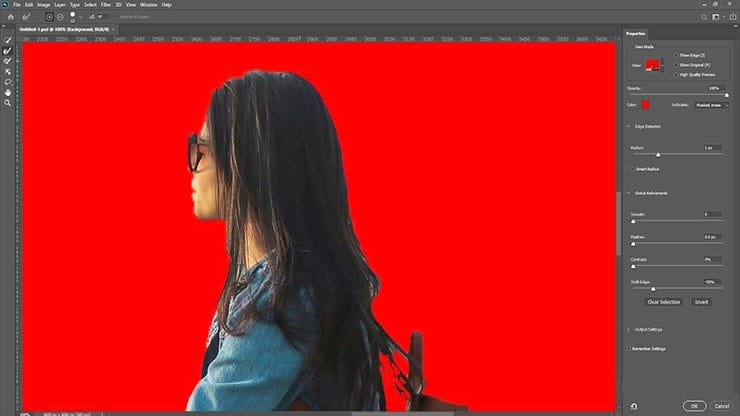
Start brushing on the hair’s outer edge by selecting the Refine Edge Brush tool. The hair strands will get into the Selection once you do so. If you are dissatisfied with the Selection, hit the Alt key.
Step 05: Settings Adjustment
We will not use all the Select and Mask options. However, here are a few references to keep in mind.
- Shift Edge: This lets you move the whole Selection in or out with the specified pixel number.
- Contrast: Selection edges get hardened as this option increases the contrast on the edge pixels.
- Feather: It softens the selection edge.
- Smooth: Removes jagged lines and smooths the selection edge.
Step 06: Color Fringing Removal
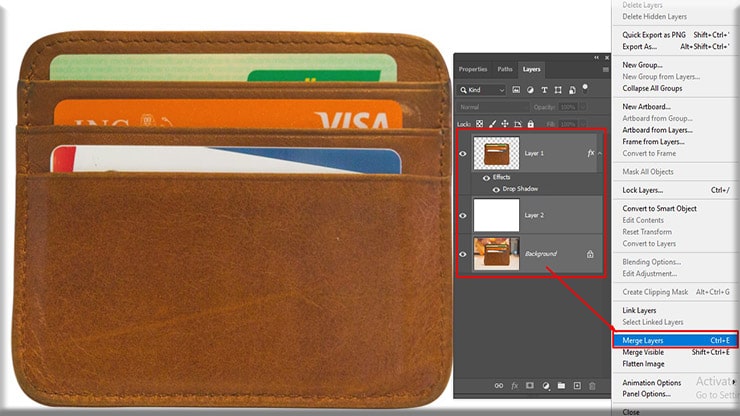
Once done, hover your mouse on the right-side panel and select Output Settings. Then, remove color fringing from your Selection by choosing Decontaminate Colors. Then, go to Output > New Layer with Layer Mask > OK.
This way, you will be redirected to your original photo while your Selection is added as a new layer. With these steps, the image BG is removed. We will edit, replace, or add a new BG in the following steps.
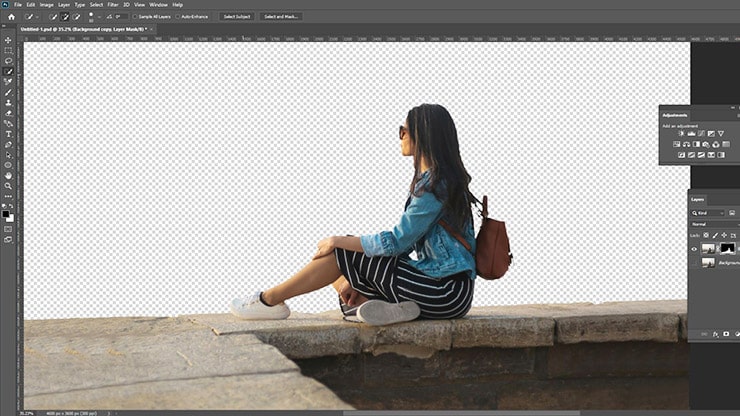
Step 07: Paste Your New BG
Paste the image that contains the new BG. Position it on the layer panel of the right-hand side under the layer having the foreground selection. Next, place the layer according to your preference with the Hand tool.
Do you need to resize the new BG?
The process is straightforward. Press Ctrl + T (Windows) and Cmd + T (Mac). The command will enable the Free Transform tool.
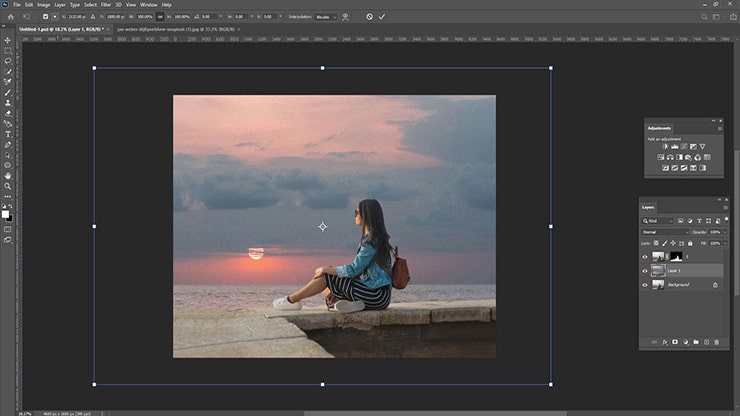
You will see handles on the sides or edges of the photo. Grab the handle and drag it inwards to the photo to make it smaller. Keeping the aspect ratio the same is crucial. So, hold the Shift key when working.
Step 08: Color Matching
We are almost done. We will be fixing the foreground colors.
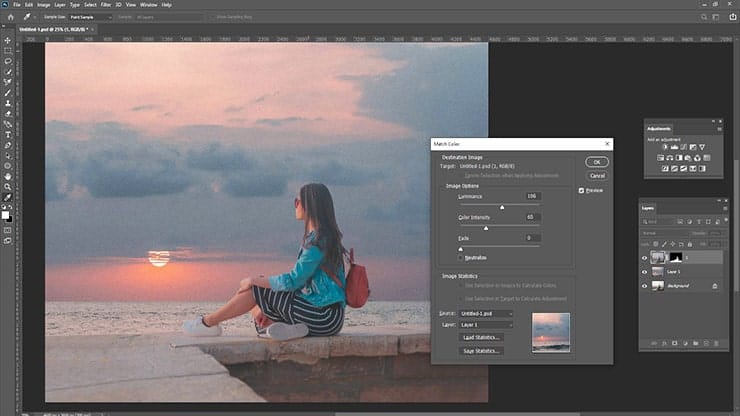
Select the image and the foreground layer. Avoid selecting the Mask. Then, follow Image > Adjustments > Match Color.
A new window will appear. Select Source and choose the photo we are editing. Then, click the layer that needs to be fixed. Color matching has two options: match the new background color to the foreground or vice versa.

After that, eliminate color casts from your selected layer by checking the Neutralize. Continue fine-tuning the Intensity and Luminance until the new BG and foreground color match.
Want to see the before and after status?
The preview option will help you toggle between the changes.
Step 09: Image Background is Edited
Pat on your back!
You successfully edit photo background using Photoshop CC 2025.
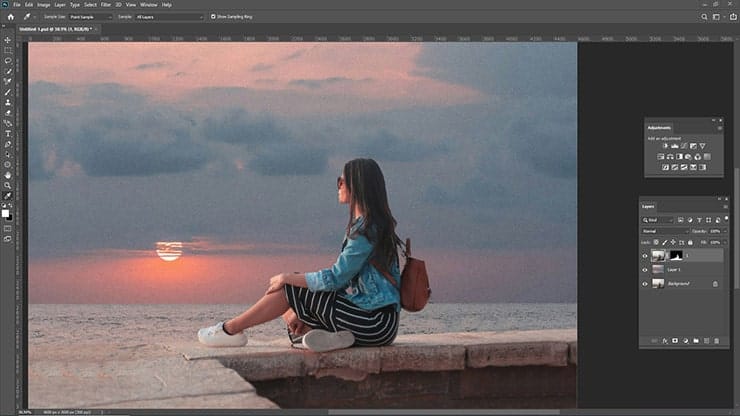
All the layer information will be preserved if you save the new image in PSD format.
You can also save the image in JPEG format to share it. Keep the PSD format safe, as it works as a backup.
FAQs
The best app to change the background of a picture varies based on user needs, but Photoshop CC 25 offers comprehensive tools for those who want to change a photo background, remove a background, or even add a new background with precision. Its background eraser and photo editing tools make it a strong contender.
Yes, you can easily change the background color of an image in Photoshop CC 25.
The best way to learn how to change photo background in Photoshop is by accessing online tutorials specifically designed for photo editing in Photoshop. These guides provide step-by-step instructions on how to use the software’s photo background changer and background eraser tools.
Yes, you can change the image background of photos taken with your smartphone. Using a background changer app or software, you can import your smartphone photos and use the tools available to change or remove the background as needed.
Wrapping Up
The process may come in handy if you know how to edit the background of an image in Photoshop CC 2025. How? You don’t need to rely on professional background changers. Thus, you can save valuable money.
However, learning is only sometimes necessary, but learning the method has benefits. We made this tutorial as easy as possible so beginners can edit photo background without any hassle.
You may read: