Learn how to get rid of shadows in Photoshop and get a stunning picture within a few minutes.
But shadows do a great job of adding interest and depth to the images. However, they sometimes appear harsh and distracting. You would want to either remove the shadow or reduce its brassiness in such cases.
Removing shadows with the help of different Photoshop tools is simpler than you can think. We will make things easier for you to understand in today’s article, where you will learn how to get rid of shadows in Photoshop. So, if you are ready, let’s walk you through the various methods and steps.
There are four methods to get rid of shadows in Photoshop. Try any of the following methods and see how magically the shadow in your pictures vanishes.
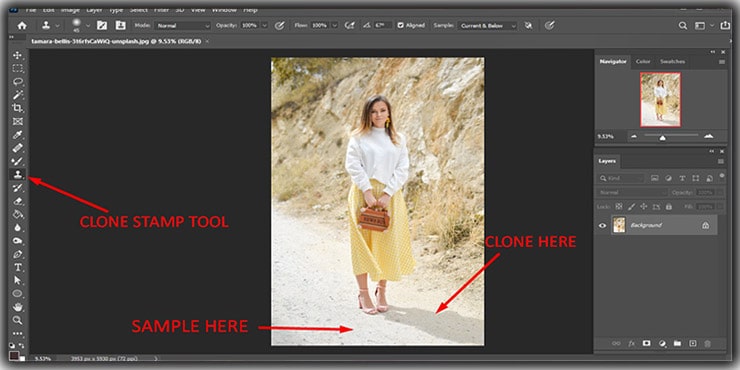
Method 01: Using Clone Stamp Tool to Get Rid of Shadows in Photoshop
The Clone Stamp tool of Photoshop is an excellent tool used to get rid of shadows from photos. The main purpose of this tool is to create clones of the object in a picture.
With its help, you can copy the same details from a certain area and use them in other parts of an image. However, it’s also ideal for removing anything, including shadows from pictures. It’s located at the left in the tools bar.
Step 1. Creating Duplicate Layer
For removing the shadow, a duplicate layer is necessary. So, create one by going to option File and clicking on “New.” Select the desired File you want to work on. The File shows up, and the background layer will open on the right side in the layers palette.
Put your mouse cursor over the background, right-click, and choose “Duplicate Layer” from the menu bar. The new layer will be displayed on the screen, rename it and click okay. If you are in a hurry, try a shortcut to make a duplicate layer by pressing Ctrl + J on Windows and Cmd + J on Mac.
Step 2. Selecting the Tool
Choose the Clone Stamp tool from the location we have mentioned. If the toolbar is missing on your screen, click on Window > Show tools, it will appear. You will see a brush icon; adjust its diameter. A slider will appear beneath the image where you can adjust the diameter of the brush.
If the image contains smooth edges and you want to eliminate the entire shadow, pick the soft medium size brush. Set its opacity to 100%. For reducing the shadow, set the opacity to 50%.
Step 3. Choosing the Source
It’s time to search for a clone source. This way, by using the pixels of that region, we can eliminate the shadow. Select an area with no shade and press Alt on Windows, Option on Mac. It will confirm the pixels of the chosen area. After the selection, you will see the cursor has turned into a crosshair.
Step 4. Removing Shadows
With the help of the brush, start painting over the place you want to remove shadows from pictures. For more accurate shadow removal, zoom in the areas and, with all your focus, keep painting slow and steady. Don’t worry if you make a mistake; the duplicate layer is there to help you recover it.
Method 02: Apply the Patch Tool to Get Rid of Shadows
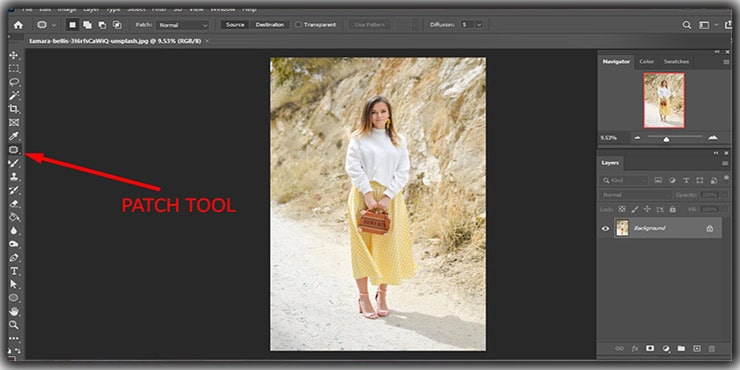
A patch tool is a great option for doing photo repairs as well as removing shadows. Its primary job is to restore larger spaces in an image. Through it, getting rid of different distractions in a picture is so simple. This special tool is also found in the main toolbar of Photoshop.
Step 1. Making a Duplicate Layer
Making a duplicate layer in this method is the same as mentioned in the previous method’s step 1. Follow the mentioned ways elaborated there to create the duplicate layer.
Step 2. Selecting Patch Tool
Pick the tool from where it’s located (on the left side). There is a menu where you need to change the Normal mode to Content-Aware.
Eliminating Shadows
Click over the area where you see unwanted shadows to select the place. Drag the chosen area to the part that appears to be similar. After removing the shadow, release the mouse button. The edited area will get a smooth view, leaving no shadows.
Allow us to give a tip to enhance the image view: select an option labeled as “Adaptation” in the Patch toolbar. Adjust the numbers to make the color and structure of the photo look clearer.
Method 03. Utilizing the Adjustment Layers to Remove Shadow from Pictures
The adjustment layer works as an enhancement tool. With its help, you can improve the photo by adding tone and color by adjusting while keeping the best image quality.
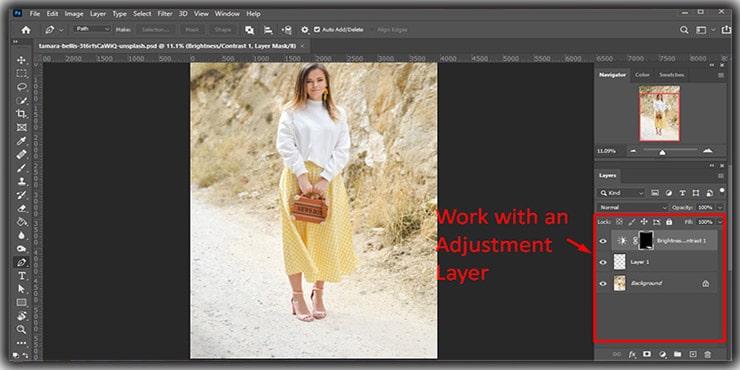
You will find this amazing tool in the “Layer” option. But you need to keep one fact in mind; it will not remove the shadow rather reduce its harshness.
Step 1. Selecting Shadow
It would be best to choose the shadow by selecting any selection tool from these:
- Lasso tool, Quick Selection tool, or Magic Wand tool.
- Make a selection and press the mouse button.
- Drag it on the shadow region to select.
Step 2. Copying the Shadow and Pasting on a New Layer
There is a menu at the top where you will see an option labeled “Edit.” Click it and click on Copy. Then click again over “Layer > New > Layer via Copy. A new layer will be added under the existing chosen shadow area.
Step 3. Adjusting Temperature and Brightness
It’s the final step of this method. The goal is to reduce the harshness of shadow by adjusting temperature and brightness. This enhancement will also bring a natural appearance to the image.
You can do it easily by clicking on the Adjustment Panel and choosing the icon that looks like the sun named Brightness/ Contrast. After clicking, it will open a window with two sliders, one for adjusting brightness and the other for adjusting contrast. By moving the sliders, adjust as you require.
Now again, click over the Adjustment panel and select the Color Balance. Set the option “Tone” to “Shadows.” Start adjusting the temperature using three sliders. To lessen the harsh appearance of a shadow, drag the slider “Yellow” to the left as you require.
Method 04: Operating the Dodge Tool to Reduce Shadow
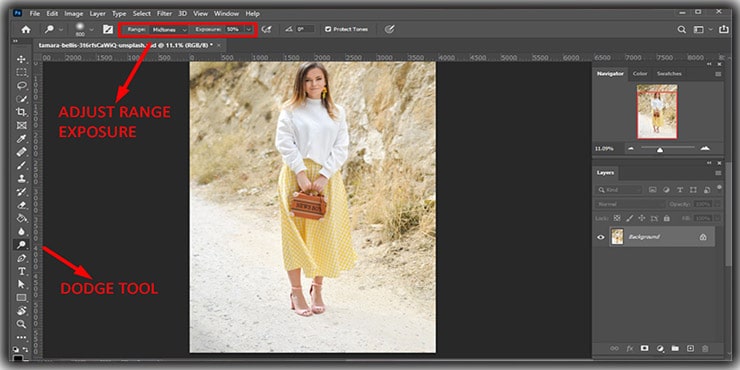
The Dodge tool does exactly what layers do. It only reduces the shadow instead of completely removing it. The Dodge tool is situated at the left corner.
Step 1. Generating Duplicate Layer
In the first method, we explained how to generate a duplicate layer. Check that and make the duplicate layer.
Step 2. Picking the Dodge Tool
Select the Dodge tool from the left toolbar. The icon looks like a filled magnifying glass. Go to the Dodge menu and select Range. Select shadow and click on Exposure; keep its percentage under 50.
Step 3. Painting on the Shadow
All you have to do is keep painting over the areas where shadow exists. The shadows will get softer with the touch of the brush.
FAQs
You should keep in mind some things for preventing outdoor shadows from Photography. These are:
1. Using a Neutral Density Filter
2. Using Shadows only when needed
3. Avoiding cloudy places
4. Using sun flare intentionally
5. Searching for an open shade for perfect Photography
6. Ensuring your camera flash is off
You can get rid of unwanted shadows in a few minutes. If you go through the right process removing shadows will not be a big deal. Use the Clone Stamp tool in Photoshop to open the photo and duplicate its background.
Second, choose the Clone Stamp tool. Third, select a place in the image to create a clone. Now choose a brush and brush the desired area for removing shadows.
Closing Remarks
Shadows are not always pleasing in photos. Sometimes you need to remove them to make the image look better. Hence, it would be best to eliminate the shadow when it seems unnecessary following any mentioned methods.
Now you know “how to get rid of shadows in Photoshop.” Experiment with different photos to become an expert and utilize the four different tools for various purposes.
You may read:

Salim Ahmed is the CEO of Graphic Experts India, with over 25 years of expertise in photo editing, clipping path, image retouching, and eCommerce image editing services.