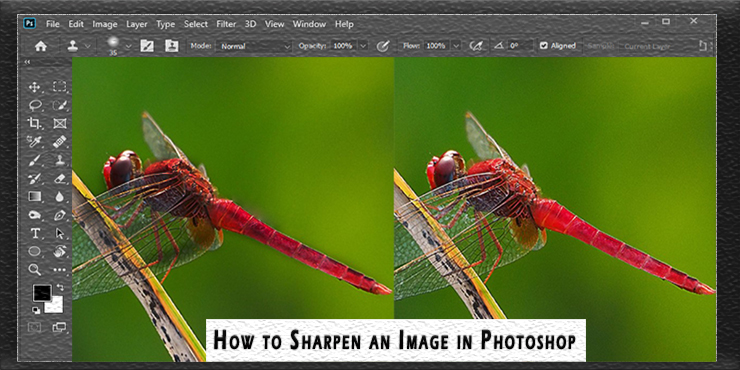
Know how to sharpen an image in Photoshop and sharpen the photo to increase its contrast. Get rid of all questions about the lack of sharpness in a photo.
Digital images lack sharpness nine out of ten times. When we capture an image, we do not get every subtle detail that the camera sees. It loses some when the camera converts what it sees into a digital image. Using some simple Photoshop tools, it is possible to sharpen images, and it is one of the basic features of Photoshop.
Photoshop adds contrast to the edges of the image, making it look more sharp and crisp. The process of how to sharpen an image in Photoshop is pretty straightforward and takes very little time. Let’s get familiar with the different image sharpening processes in Photoshop.
What is image sharpness?
Photoshop can do many things that may seem unbelievable but adding details to an image is one example. Photoshop can create an illusion of adding details, making the image look sharp to human eyes.
The part or parts of an image got more contrast than others looked more sharp and crisp. This is because Photoshop increases the contrast to the edges of the image, which makes the image look sharp. The idea of edges in Photoshop algorithms is the parts with sudden big changes in brightness than its neighboring pixels.
On these edges, Photoshop increases the contrast making the light areas brighter and dark areas darker. These more contrast edges look sharp to human eyes than previous low contrast edges. So Photoshop creates an illusion of adding details to the image to make it look sharper.
Types of image sharpening
Image sharpening is mainly of three kinds.
1. Capture Sharpening
When we capture an image, we lose some detail of that image and convert it into a digital format. In this sharpening process, we try to bring the sharpening you lost while capturing the image.
When you open a RAW image to Photoshop, you see that the sharpness level is 25% by default, but a JPEG file has 0% sharpening by default. So, your camera sharpens the image 25% when it converts the image into JPEG format, and you lose some detail.
2. Creative Sharpening
This sharpening effect adds an artistic intent to an image. A selective portion of an image gets sharpened, and the change cannot be very subtle or accurate to life.
3. Output Sharpening
The last step before output. After you have reduced the image size and finished it before exporting it as a JPEG or before printing the image, printing and downscaling an image can soften it and require some sharpening to bring back some details.
Things to Know Before Sharpening an Image
Sharpening an image makes the image look more crisp and detailed. But still, you should know some things about image sharpening.
Sharpening Limit
Every image goes through some process, and that causes the shape to lose its sharpness. So most digital photos need a different level of sharpening. But if you overdo it, your image will not retain its natural look. So, you must be aware of how much you can sharpen an image.
Noise and Halos
The intention behind sharpening an image is to make the image look good. But over-sharpened photos look terrible, and you can easily notice halos at the edges of the picture. Also, sharpening makes the noise more visible.
So you should not over sharpen an image and always use a noise reduction filter before starting the sharpening process.
Separate layers
One of the best features of Photoshop is that it allows working in different layers for different mediums. So, use different layers for a non-destructive image editing experience, and it will surely make things easy.
How to Sharpen an Image in Photoshop
An image can sharpen in various ways in Photoshop. All of these methods work fine, but some methods are slightly better than others. Let’s learn these methods one by one.
Camera RAW Sharpen Slider
One of the simplest and basic image sharpening methods in Photoshop is to use a Raw sharpening filter. When you open a RAW image file in Photoshop, it allows you to do some basic changes in that image using sliders.
The slider can make your image look sharp, but the editing control Photoshop gives you here is limited. So it is not advisable to use this method if you want full control over the image. Instead, you can adjust the sharpening slider to make the image look sharper.
Photoshop does all the tasks for you, and you get the final result. You cannot adjust anything here, and all it gets is an automated result generated by Photoshop. Most of the time, editors do not get expected results from this method. Nevertheless, you can give it a try, and by chance, maybe the sharpening result turns out to be good.
Using Lightroom, you can also apply this slider effect using the Camera Raw filter. To do so, click on Filter then camera raw, or you can press Ctrl+Shift+A. Again, if you find the sharpening result good, you can stick with the result, but if not, try other methods.
Duplicate the Background to Sharpen Image in Photoshop
If you are not with the result of the Camera Raw filter, it is time to try other methods. Before starting the sharpening process, open the image in Photoshop that you want to sharpen.
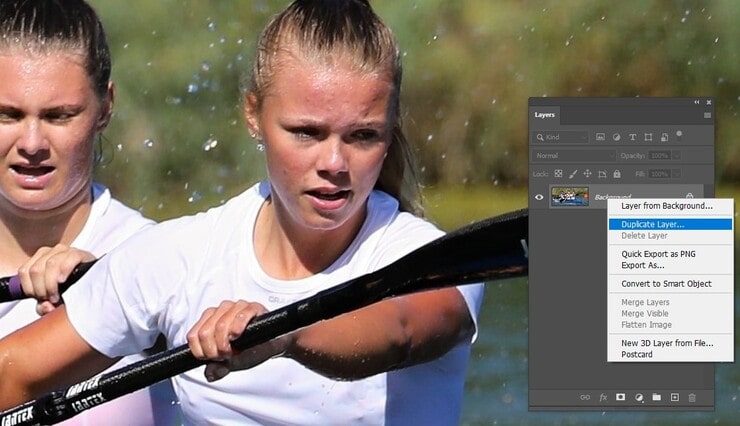
Create a duplicate layer of the original image so that you can always go back.
To create a duplicate layer right click on the Background layer and select Duplicate layer. You’ll see a new pop-up click ok on that. And on top of the Background layer, you’ll see a new layer.
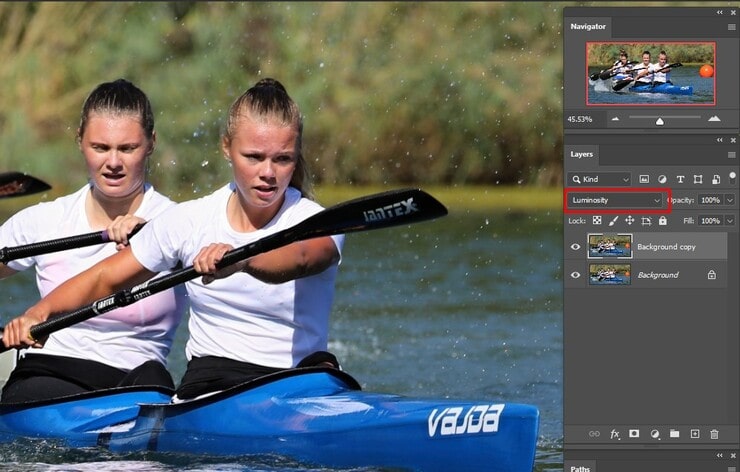
Now, set the new layer’s blending mood to Luminosity to make sure the images do not get color fringes on the edges.
Sharpening Effect
Among the various sharpening tools and techniques, the Unsharp mask is considered one of the best. The best thing about this Filter is that it can sharpen the image without increasing the noise, while most filters cannot.
Unsharp Mask to Sharpen Image in Photoshop
Ensure that you are on the background copy layer. Now use the Zoom tool from the toolbar and view the image at 100%. From the top bar, navigate to Filters the click on Sharpen; now select Unsharp mask.
You’ll see a pop-up dialog box on your screen. On that pop-up, check the Preview box. You can see the change in the workspace as well as the preview thumbnail.
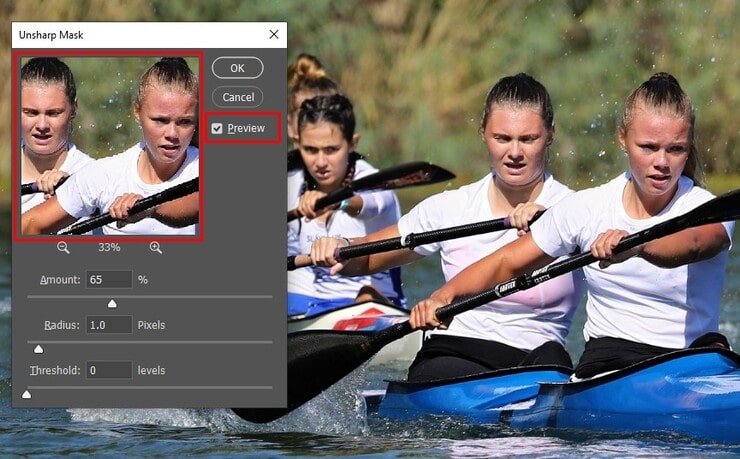
The Amount slider controls the image’s sharpness. As much as the value will be, you’ll get a sharper image. For example, if you want to save the image’s digital format, 60% sharpness is enough to make the image look crisp. But if you’re going to print the picture in a banner or something big, then set the amount between 100-200%.
The edges of the image get contrast, and the Radius sliders indicate how many neighboring pixels will get the same contrast as the edge. Keep the value of the radius between 1-3. It is critical to determine the ideal value of the radius as it varies from image to image.
If you set the amount valve higher than 100, you need to use the Threshold slider to ensure no change in the image’s color. Keep 0 if you are using a lower amount value.
After adjusting the slider, now click ok, and you should have a sharp and crisp image.
High Pass to Sharpen Image in Photoshop
Another proven method of sharpening images is high pass. It is very accurate and capable of producing high-quality, sharp images.
If you have applied the Unsharp mask, either undo the effects by pressing Ctrl+Z or delete the layer and create a new duplicate layer. Always make sure you are not using more than one Filter on the same layer.
Go to Filter from the top bar, then click on Other; now select High pass.
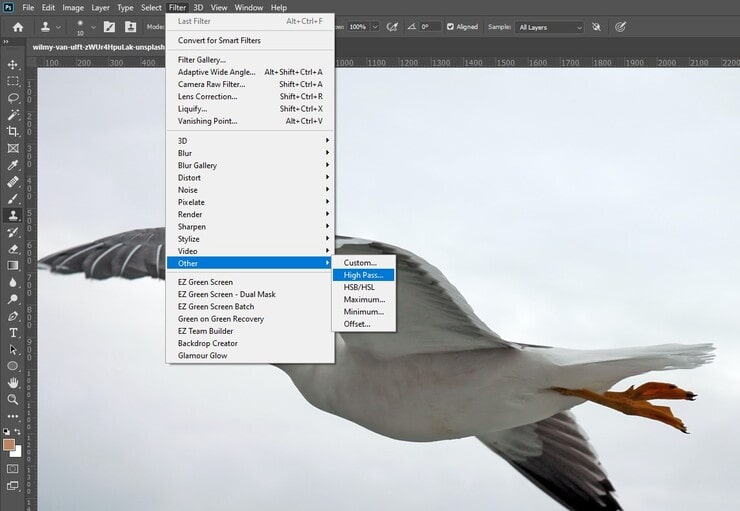
After clicking, you’ll see a pop-up box, and below it, there is a space to put the Radius value. Set the Radius scale value in between 1-3 pixels and click ok.

Your image should appear now in greyscale. So you can see the precise edge of the image’s subject. If not, then adjust the radius value again.
Now you have to change the Blending Mode to get the sharpened image. From the layers, choose the Blending mode from overlay, soft light, hard light, or linear light.
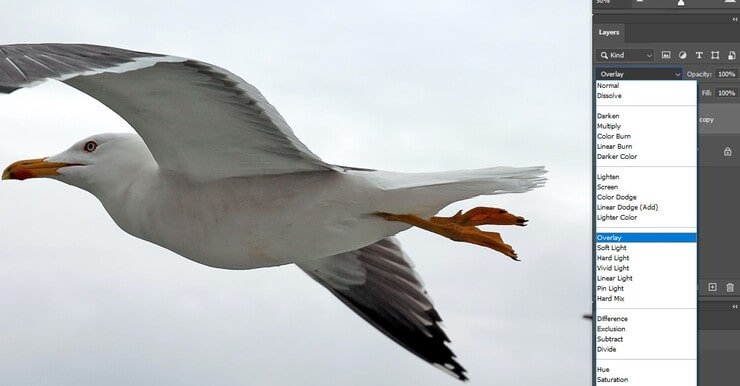
As you change the Blending mode, you should see the sharpened image.
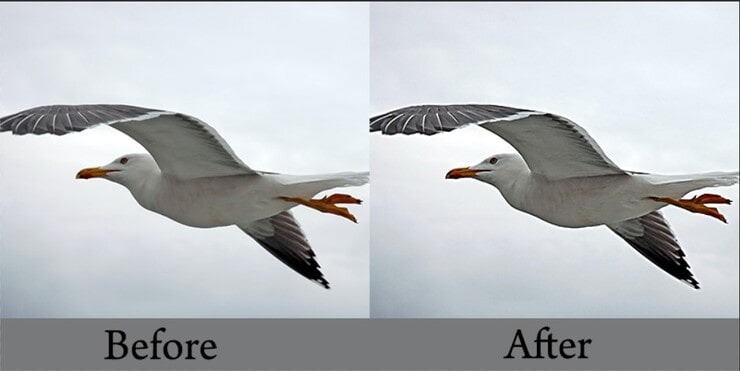
If the image does not seem ok to you, change the radius setting, and you should get a sharp image with contrast edges.
Smart Sharpen
If you are not happy with the previous three outcomes, try the Smart Sharpen filter, which will surely amaze you. This Filter is much more effective than any other sharpening filter.
If you have applied any filter, either undo the effects by pressing Ctrl+Z or delete the layer and create a new duplicate layer. Always make sure you are not using more than one Filter on the same layer.
Navigate to Filters, then select Smart Sharpen.
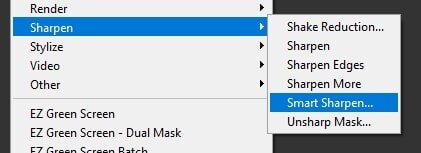
A small dial log box will open. Checkmark the Preview option and increase the size of that box to view the changes better.
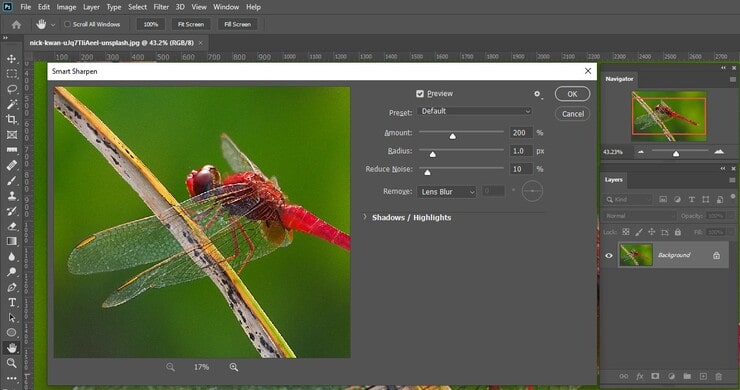
Now set the Sharpening Amount to 200. Depending on the image, you may have to set different values from time to time. Keep the Radius value at one and if you see noise in the picture, increase the Noise Reduction slider value to minimize those.
Now for betting sharpening results, set the Remove option to Lens Blur. This will sharpen the image and minimize halos. The Motion Blur option reduces motion blur that may have happened due to a handshake or the subject’s movement while capturing the image.

Unsharp Mask uses the Gaussian Blur effect, which cannot detect the edge as lens blur can detect edges of the image, producing a much better result with less noise and halos. Depending on your image type, choose the remove options and you’ll get perfectly sharpening images using this Smart Sharpen filter.
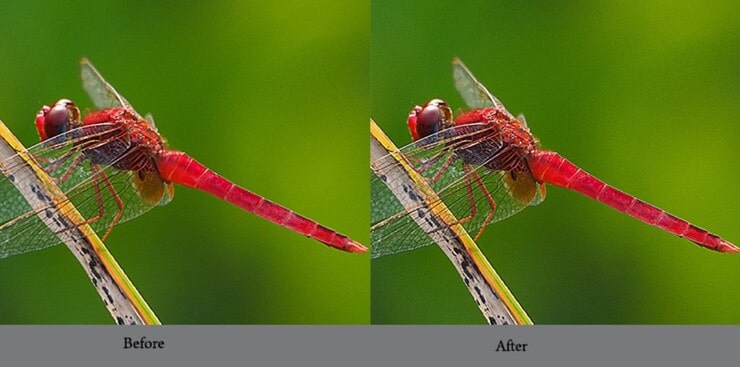
Play around with these settings until the result satisfies you and you get an image with perfectly sharp edges.
How to Sharpen Parts of the Image Selectively
Sometimes we do not want to sharpen the whole image but some parts of it. You can do selective sharpening in Photoshop, and there are several ways to do so. Let’s see.
Using Brush tool
Step-1: Open the image
Open the image where you want selective sharpening. Now create a duplicate background layer by right-clicking on the background layer.

Step-2: Apply sharpening filter
On the copy Background layer, apply any of the previously discussed sharpening filters.
Step-3: Add a layer mask
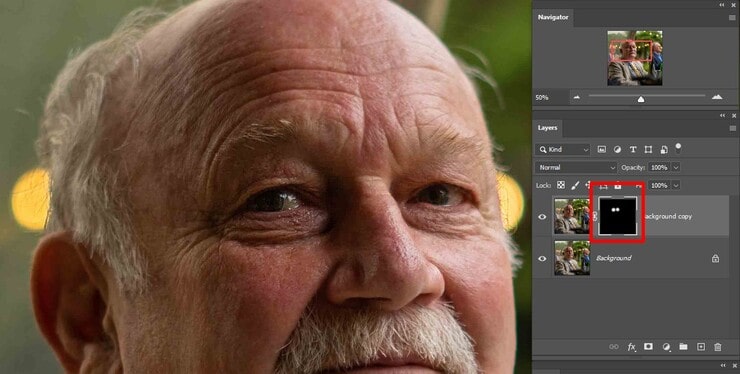
After applying the Filter, add a layer mask on the Background copy layer by clicking on the Add Layer Mask option.
You’ll see a white layer mask next to the original layer. The White color shows the sharpened areas of the image. So, now all the sharpened area of the image is visible.

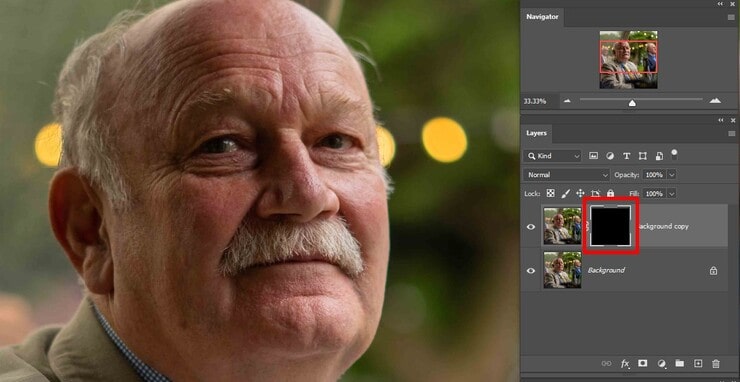
Step-4: Invert the sharpen layer
Press Ctrl+I on your keyboard, and this will invert the Added mask near. You can see the thumbnail color is changed to black. Black hides all the sharpened areas.
So we will add sharpness to the selective part of the image using white on the black.
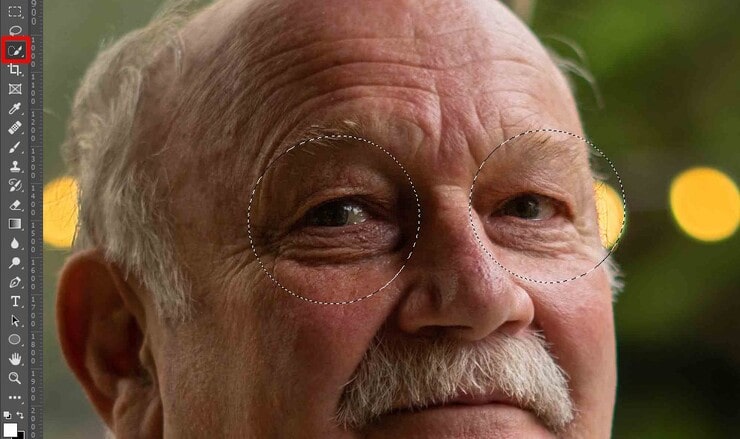
Step-5: Paint with white
Select the Brush Tool from the left toolbar, and it would be best to pick the soft brush option. Next, select white paint and draw over the areas you want to sharpen.
You have to draw over the image, not on the layer or thumbnail. So as you paint, you should see the image getting sharpened.
So using this method, you can very easily sharpen selective parts of an image. This sharpening method is widely used in the fashion photography industry as the model’s skin needs to look soft, but the eyes should look sharp.
Sharpening A Selection
Step-1: Draw a selection
On the Background copy layer, draw a selection over the area you want to sharpen using any toolbar selection tool.
If you select the area broadly, you may see a distinct line between the edge and the nourishing pixels. Here, you can use Refine the Edge option to get rid of this problem. Right-click on your selected area and select Refine the Edge.
Step-2: Apply sharpening filter
You can apply any of the sharpening filters you want. First, access Filter from the top bar then clicks on Sharpen; now select Unsharp mask.
Now, you’ll see the selected areas are sharpening on your image. Adjust the option of the Filter accordingly to get the perfect result.
Using Sharpening Tool
Another get method of selecting sharpening is by using the sharpening tool.
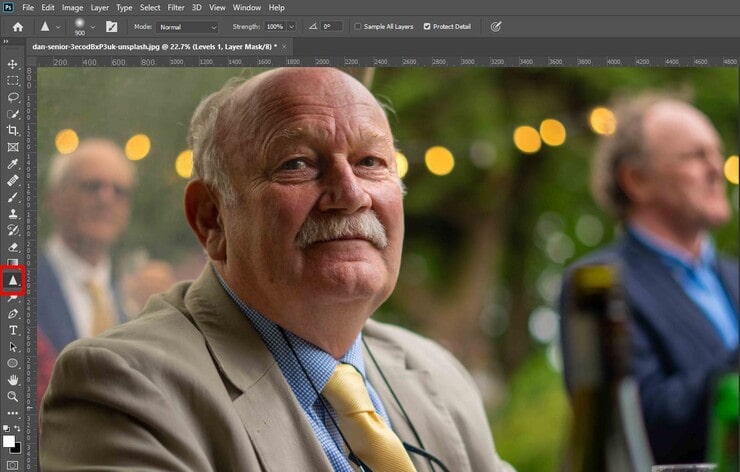
Step-1: Select the sharpening tool
Select the Sharpening Tool from the toolbar. In case it is not visible there, move your mouse cursor to the Blur tool, and the sharpening tool will appear next to it.
Step-2: Adjust the tool to sharpen an image in Photoshop
Set the hardness low and select the area and strength of the tool depending on how big the area you want to sharpen.
Step-3: Paint with the brush
Make sure you are on the Background copy layer. Now, paint over the areas with the brush you want to sharpen. If the result is not good enough, adjust the tool again for a more consistent result.
Using any of these three methods, you can very easily selectively sharpen an image.
FAQs on Sharpen Image in Photoshop
Yes, you can easily sharpen a pixelated image using the Unsharp Mask filter. First, open the image in Photoshop, then select the Unsharp Mask filter from the Filter menu. Now adjust the Sharpening Amount slider until you get a sharp image click ok, and you’ll make the pixelated image sharp.
Unsharp Mask and Smart sharpen both are quite good when it comes to sharpening images. But the Smart Sharpen filter is capable of noise reduction and edge detection, so it got more advantages over the Unsharp Mask filter. So for perfect sharpening, it is advisable to use the Smart Sharpen filter.
Various methods of Photoshop allow us to sharpen images selectively. All of these methods are capable of producing excellent results and are easy to do as well. For example, an unsharp mask and the Sharpening tool of Photoshop can easily sharpen selected image parts increasing the contrast in those areas.
Final Words on Sharpen Image in Photoshop
Though every digital image needs sharpening, the amount varies. So having proper knowledge about how to sharpen an image in Photoshop is very necessary for photographers. It is possible to make the image look sharper and crisper to human eyes.
Some sharpening filters help sharpen an image in Photoshop, and adjusting the filters option correctly can make the image sharp. Hopefully, this guide will help you in the process of image sharpening in Photoshop.
You may read:
- Outsource Photoshop Editing Services (15 Secrets)
- Wedding Photo Retouching Services from Best Photoshop Editors
- How to Smooth Edges in Photoshop – A Step by Step Guide
- Real Estate Photography Tips For Beginners
- Photo to Color Pencil Sketch with Photoshop CC: Tutorials
- How to do Double Exposure in Photoshop

Salim Ahmed is the CEO of Graphic Experts India, with over 25 years of expertise in photo editing, clipping path, image retouching, and eCommerce image editing services.