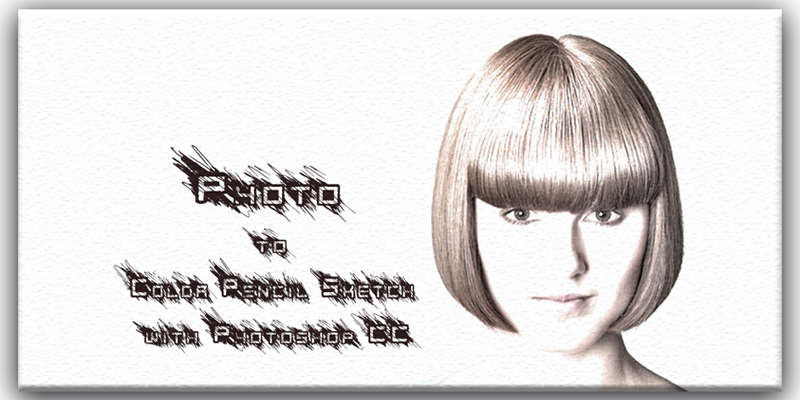
Photoshop is fun as well as an effective tool to create unique images following its different techniques. Among many techniques in Photoshop, photo to color pencil sketch with Photoshop CC is one of them which has much popularity.
Following this turn photo to color pencil sketch technique, you can surprise your friends and family. Also, it will improve the charm of your e-Commerce website or blogs, undoubtedly.
Converting an image to a pencil sketch can be achieved in several ways. Here, in this article, we have covered the simple ways to get the best outcome.
Now,
How to Turn Photo to Color Pencil Sketch with Photoshop CC?
Well, today I am going to share the technique of photo to color pencil sketch with Photoshop CC. Actually, I will show you 4 versions of creating a sketch effect.
Versions are
- Black & white.
- Photo to color pencil sketch using the original color.
- Colorized using any single color.
- Colorized with gradient color.
So, let’s start playing.
Step 01: Background Layer Duplication.

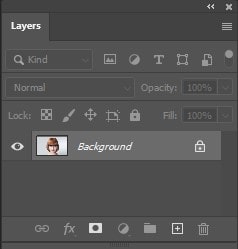
As your photo newly opened in Photoshop, if you look at the Layers Panel, you will find the image positioning in the Background Layer. Note, this is the single layer in the document right now. (Know Photoshop Layers.)
We need this original image later when we will do sketch colorization. It means you must not do any modification to this original image, don’t do anything with the original image. To ensure, we need to create a Duplicate Background Layer by copying the original image.
Doing this is so simple.
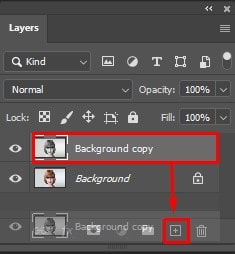
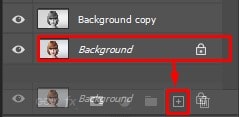
Firstly, hover your mouse on the Background Layer, right-click, drag it down into the New Layer icon which is placed at the bottom of the Layers Panel.
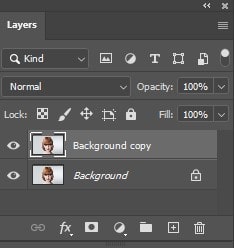
When you will see the hand cursor is directly placed on the New Layer icon, release your mouse button. The Background Layer is copied by Photoshop. It would be best if you give a new name to the Layer of the Background Copy.
Let’s say the name you gave is “Background Copy.”
Step 02: Layer Desaturation
In this step, we will work on the Background Copy. Removing all colors from the image is the main task in this step. Desaturate command will allow us to accomplish this step quickly.
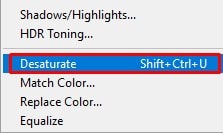
For this, go to the Image option from the Menu bar option. Select Adjustment and next Desaturate.
Following the Keyboard shortcut option is another method of completing this task. For Windows: Shift + Ctrl + U and for Mac: Shift + Command + U.
Once the image becomes Desaturated, you will get a Black and White version of the image.

Step 03: Desaturated Layer Duplication
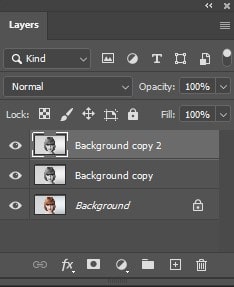
Next, we need to duplicate the Desaturated Layer. For this, click on the Background Copy Layer, which is already Desaturated. And follow the same procedure that we did in Step # 1.
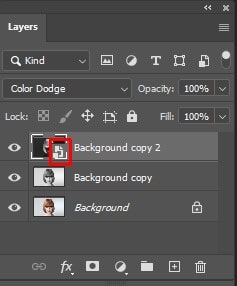
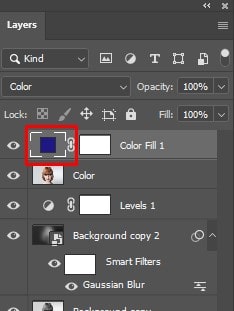
After creating a copy, remember to give a name to this layer too. This time you should give “Background copy 2” as the name of the Duplicate Desaturated Layer.
Step 04: Inverting the Layer
In this layer, we will Invert the brightness level. We will give a dark look to the light area and a light look to the dark area. Photoshop Invert command will assist us in doing this.
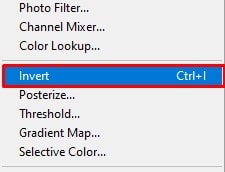
Again go to the Image option in the top Menu bar, click Adjustment and select Invert.
The keyboard shortcut key is, for windows: Ctrl + I and for Mac: Command + I.
This way, the image will get a film negative view.
Step 05: Altering the blend mode to color dodge
Now, we will alter the Blend Mode of the Layer. Do you know where the Blend Mode is placed?
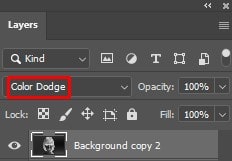
It is placed at the upper left portion of the Layer Panel. You will always find the Blend Mode function in the Normal option. It is actually, by default.
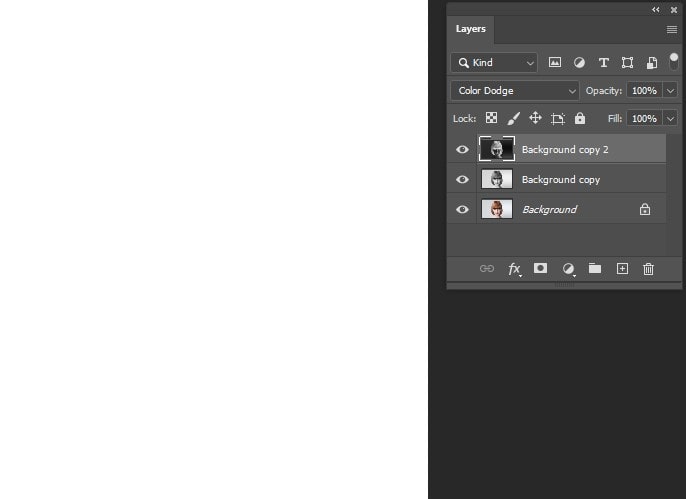
To alter the blend mode to color dodge, right-click on the “Normal” word and a menu will appear and from there select Color Dodge from the list.
Once you do this, the whole document will turn into white, don’t get worried looking at a full white document. (You may find a few scattered black spots on the document)
Step 06: Making a small subject by converting the layer
Now we are at the foremost step of creating a sketch effect. To accomplish this, you need to make a blurring layer using Photoshop Gaussian Blur Filter. But it would be best if you apply Gaussian Blur as a smart filter instead of applying it as a typical filter.
Now one question popped up in your mind, which I believe.
What is the definition of a smart filter? How can I differentiate between Smart and Typical Filter?
Generally, the small filter is similar to the typical filter in Photoshop; the only difference is, it is “smarter.”
A Smart filter creates a non-destructive and editable filter, whereas a typical filter creates static results (stable changes in the pixels) of an image.
Following the smart filter option, you can change the filter settings option any time, and don’t worry about the image quality while doing so because image quality will be fully secured.
The main purpose of applying Gaussian Blur using the Smart Filter option is, we can go back and adjust the sketch effect later.
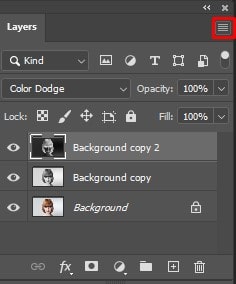
To do this smoothly, first of all, we need to make a small object, converting the layer.
Why do small objects need to be made, converting the layer?
The reason is, when you apply a filter to a regular layer, it will work as a static layer.
In fact, when you will apply the same filter to a Smart Object, the smart filter will automatically convert.
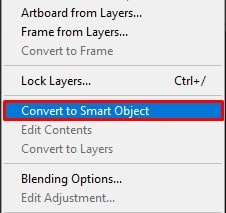
So, to do this task, right-click to select the Small Menu icon, which is positioned at the top left corner of the Layers Panel.
A menu will appear and from there choose “Convert to Small Object.”
You may feel like no changes have been made. But if you give an intent look in the Layers Panel, you will find a Small Object appears in the Background Copy 2 layer at the bottom right corner. It means the layer is now converted to a small object.
Step 07: Applying Gaussian Blur Filter
As already the layer has been converted to a small object, let’s apply Gaussian Blur Filter.
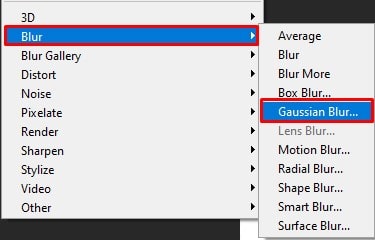
Go to the Filter option from the Menu bar, select Blur, and then Gaussian Blur.
You will land into the dialog box of Gaussian Blur. To get the required sketch effect, some blurring needs to apply in the Small Object layer. Controlling the amount of blurring is straightforward if you use the Radius slider which you will find at the bottom part of the dialog box.
The more you drag the slider to the right side, the radius value will increase, and the blurring will appear stronger.
If you apply a lower radius value, we will get fine and thin lines. Larger radius values will give us a more realistic effect.
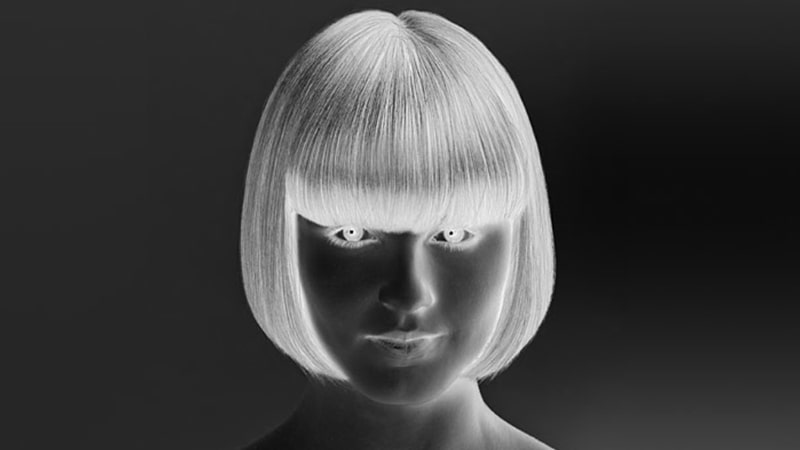
Let me give an example. If I select a lower radius value of 10.1 pixels, we will get the below image result.
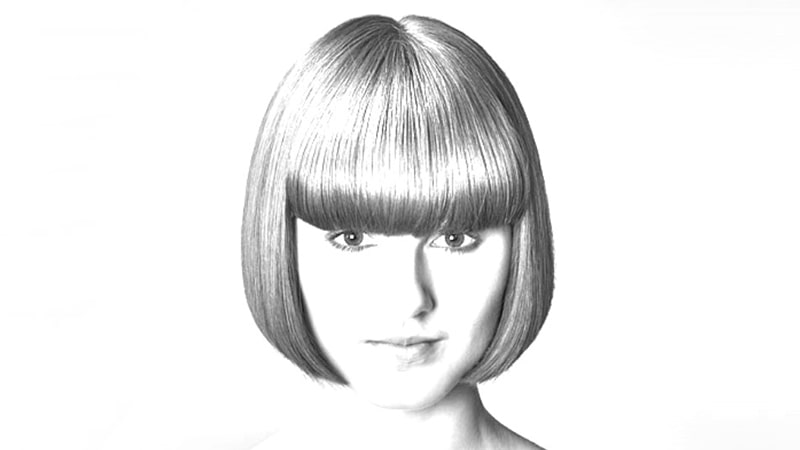
If I increase the radius value to 45.8 pixels, we will end up with a more realistic view of the original image.
The exact value of the radius which you are looking for depends on the photo and the type of effect you want.
So, it would be best if you keep your eyes on the image while dragging the slider and check what result you are getting.
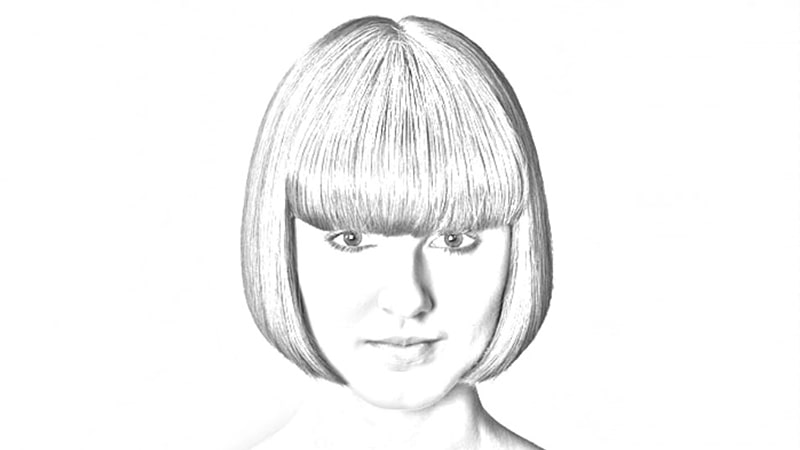
If you think about the example, you will find the 2nd option is providing a more realistic look than the 1st image.
So, to proceed to the next step, we will go with the 2nd image and. Once you are done, click OK thus the Gaussian Blur Dialog box will be closed.
Now, we have created our main sketch effect following the Gaussian Blur Smart Filter option.
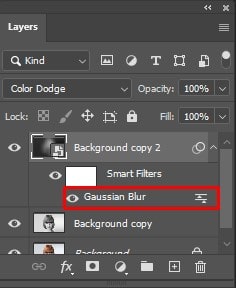
Smart Filter Option
As I stated earlier, the Smart Filter option is fully editable. This option will allow us to go back to the previous filter setting option, and if required, we can change it too.
How will we do that?
Look at the Layers panel area, you will find that the smart object is on the above portion and the Gaussian Blur takes its position below. At any point, if you think your sketch needs more fine-tuning, simply click twice to the right button of the mouse putting the cursor on the Gaussian Blur words. This way, the Gaussian Blur dialog box will reopen, and you can drag the slider to give your image a more realistic look.
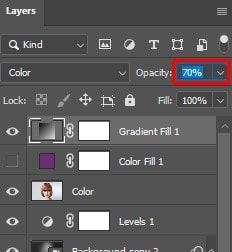
Step 08: Add a Levels Adjustment Layer in the Layers Panel
You may think your image has become more light after creating the main sketch effect.
No worries.
By adding a Level Adjustment Layer, we can effortlessly make the image a bit dark. To complete the job successfully.
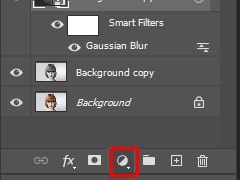
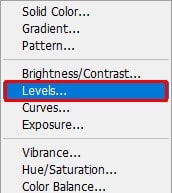
Take the cursor on the New Fill or Adjustment Layer icon positioned at the down portion of the Layers Panel.
After then you will get a list from where you need to select Levels.
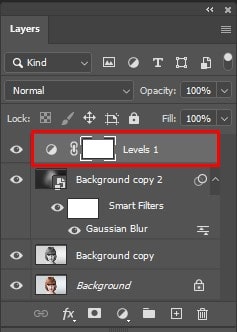
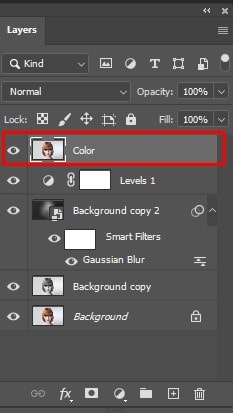
Photoshop will add a levels adjustment layer, Give a name to the layer as “Levels 1.” Place this layer at the top portion of all layers in the Layers panel.
Step 09: Alter the blend mode from normal option to Multiply
You can control the Layer Adjustment Panel from the Properties Panel. But honestly, we don’t need to do anything with this option.
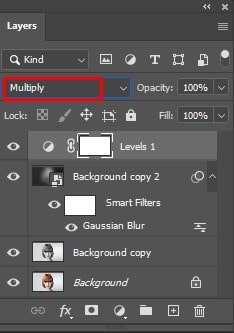
Darkening the sketch will be unnecessary. Look at the blend mode of the Levels Adjustment layer, you will find it as Normal. Now, change it to Multiply.
Do you know, multiply blend mode is one of those options which makes any image darker? Once, you change the blend mode to the multiply option; you will see the result automatically. Now the image has become much darker than before.
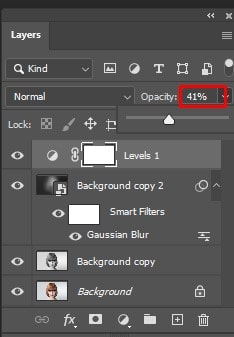
Moreover, if you think the process which I followed, thus the image becomes much darker than your expectation, you can adjust the dark too by changing the opacity from the Levels Adjustment Layer.
The Opacity level is placed at the top right corner of the Layers option.
Drag the slider right or left to get the desired darken level. Here, I have selected the level to 40%. But it is advisable to keep your eyes on the image while adjusting the opacity.
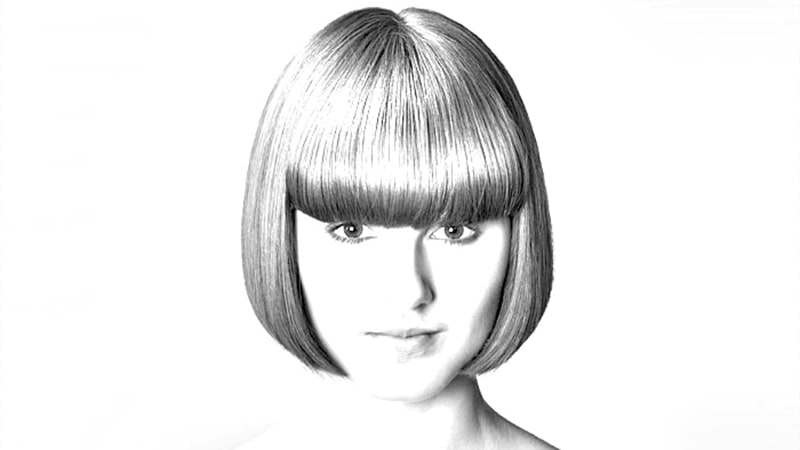
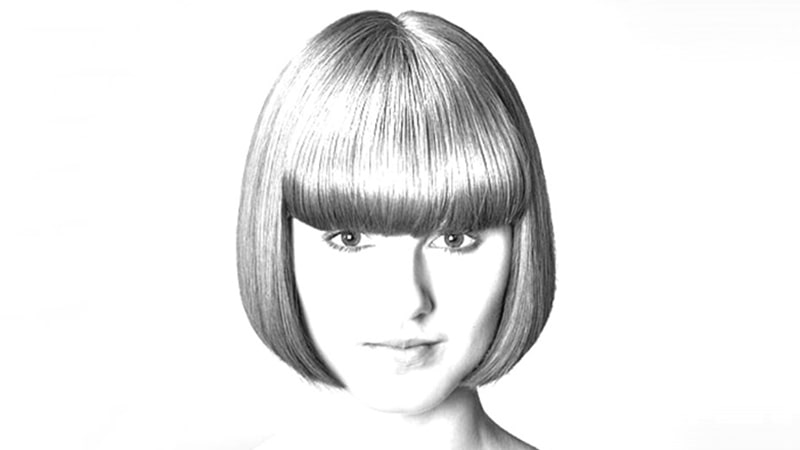
Find the below image. Don’t you think the brightness level is much better now?
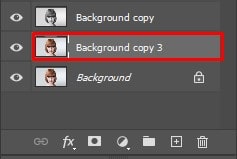
Step 10: Background Layer Duplication again
The good news is, we have got our Black and White color pencil sketch.
Now we will go for the next option, which is, colorized using the original color of the photo. (Know more about color changing in Photoshop CC.)
For this, another copy of the background layer is necessary. So, choose the original background layer and follow the same process which we have done just a couple of steps earlier. Give “Background Copy 3” as the name of this layer.
Step 11: Providing a new name to the new layer
Till now, we have created many copies of the Background layer. Although we have given them a separate name, the Layers panel is getting cluttered.
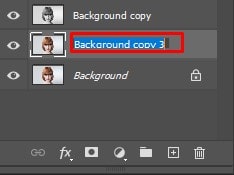
Also, by looking at the names (Background copy, Background copy 1, Background copy 2, Background Copy 3), we can’t easily identify which layer is being used for what reason. I want to break the names and rename them.
As Background Copy 3 Layer is going to represent Colorized Photo Sketch so let’s give it a more precise name. To do this,
Double-click on the name directly and the name will get highlighted.
Let’s presume, the name of this layer is “color.” So, with the name highlighted type “color” and press “Enter” for windows and “Return” for Mac.
Thus the name will be changed.
Step 12: Place all the other Layer at the bottom of the “Color ”Layer
As we will use the Colorized layer for sketching now, we need to move all the other Layers at the bottom of the Color Layers panel. In other words, give it a place at the top position at the Layers panel. You can do it simply by clicking on the Color layer, dragging it to the top position.
But let me share a new process to accomplish this step. Learning is always great, right?
To give the top position to a layer, make sure you have selected the layer to do so. Then in the keyboard press and hold Shift + Ctrl (for Windows) or Shift + Command (for Mac). And at the same time press the right bracket key “]” on the keyboard.
This way, the selected layer will jump to the top position instantly.
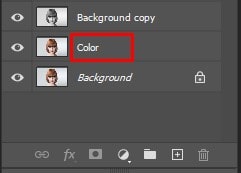
Step 13: Alter the Blend Mode to Color
The Color layer is the top layer in the document now; your original image will appear again with the Color layer in the document, blocking the other layers below from view, which is definitely not our mission.
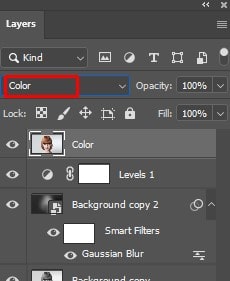
All we want is to mix color from the main image with our sketch.
For this, the process is pretty simple. You will find the blend mode of the color layer as “Normal”. Simply change it to “Color.”
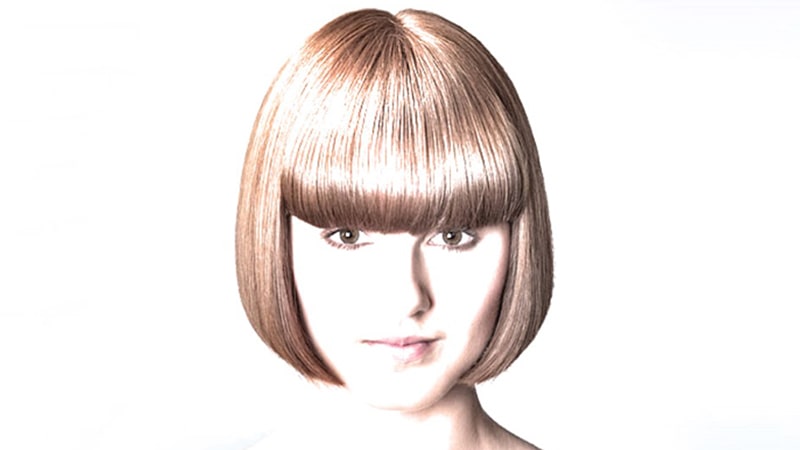
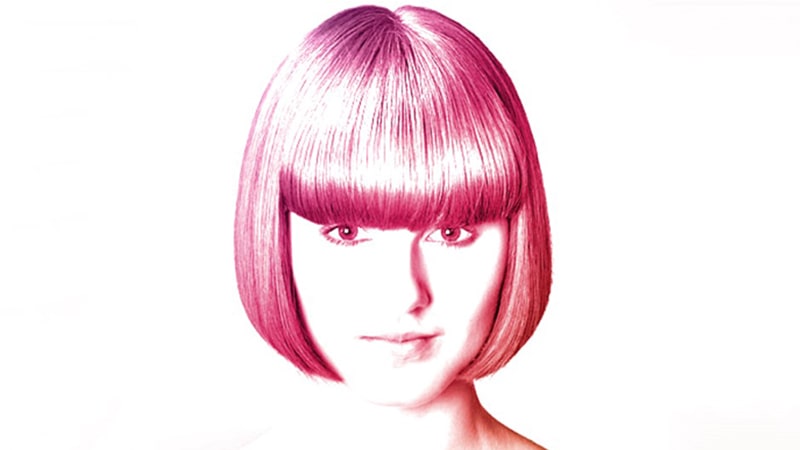
This way, you are giving a command to Photoshop to mix the color from this layer and pay no attention to all other colors. Look at the below image; this is now colorized.
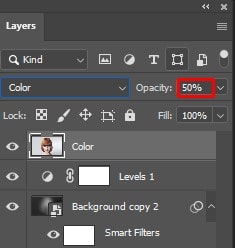
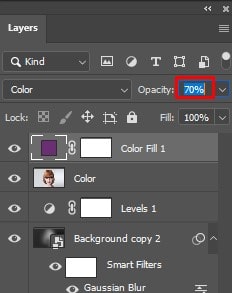
If you feel the color is too strong in the image, reducing it is not that much difficult. Color Layer opacity level needs to reduce at this point. In this tutorial, I kept the opacity level of 50%.
Now, the color of the image is more stable.

Step 14: Switch the Color Layer off
If you love your Colorized Sketch which is using the color of the original photo, you should not proceed more now.
Otherwise, let me share another way of making a photo to color a pencil sketch.

This time, I will show you how to make a photo-to-color pencil sketch using a single color.
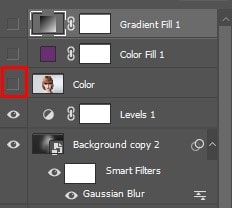
Before we are proceeding to this step, let’s switch the color layer off. Click on the “eyeball” icon which is also known as the visibility icon from the Layers panel.
Now, you will get the black and white version of your image.
Step 15: Colorizing the Color Fill Layer with Solid Color
In this step, we will give a solid color to the sketch.
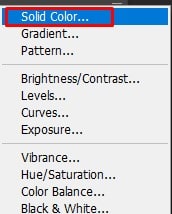
At the bottom part of the Layers Panel, you will have the New Fill or Adjustment Layer icon. Click on it.
A list will appear, and you will find the Solid Color option at the top, choose it.
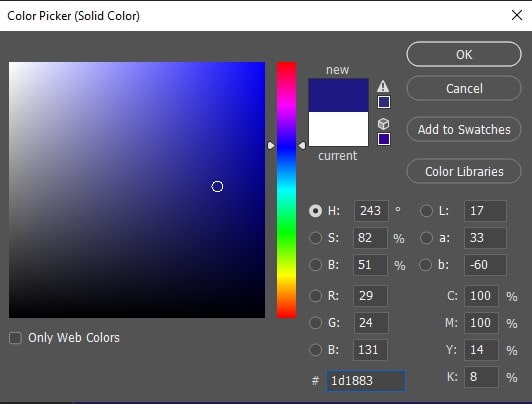
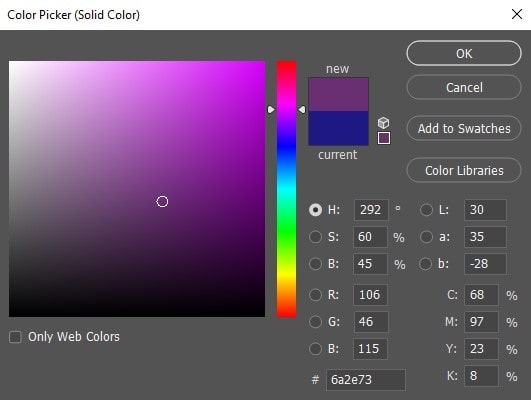
Once you have selected the Solid color option, a new window will pop up named Color Picker (Solid Color). From this new window, you can choose your required color. Don’t worry if you select the wrong color because you can return to this stage if you make any mistake. Pick a dissimilar color. In this tutorial, I choose a blue shade.
Step 16: Alter the Blend Mode Option Normal to Color
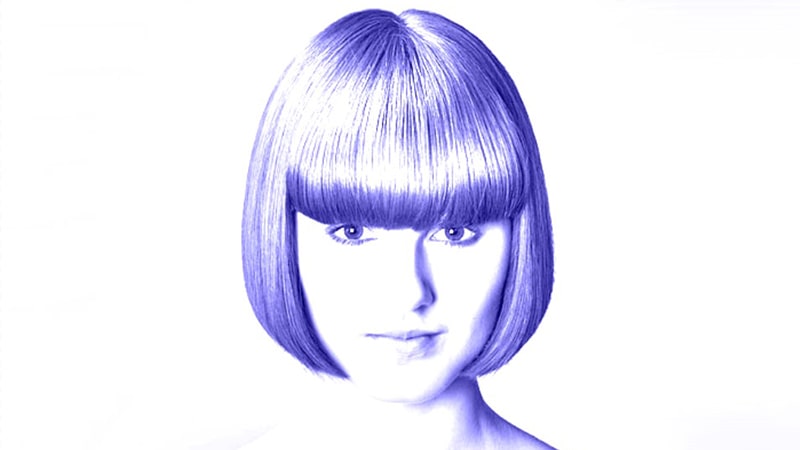
After you have picked a color, click OK to close the Color Picker window. The selected color will temporarily be filled up with the new color. A new layer has already been created which name is “Color Fill 1” which takes its place at the top.

To mix the color with the sketch, by default, the color layer of the blend mode is “Normal”. Simply change it to “Color.”
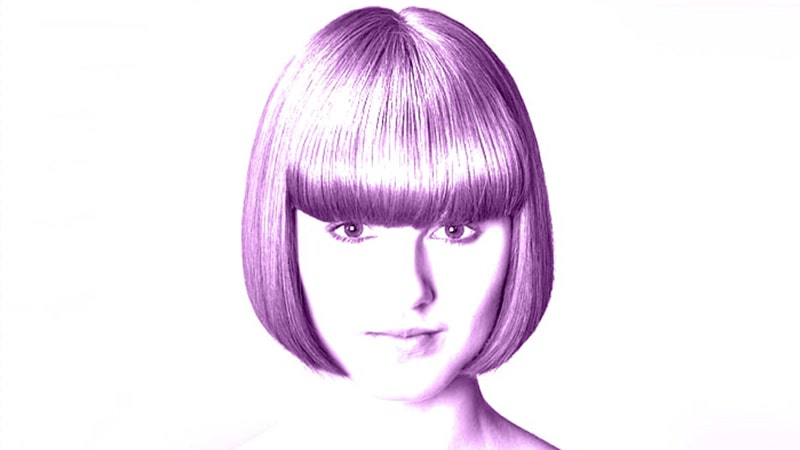
And now, you will have a colorized pencil sketch. And here it is blue.
If you want to go with a different color, you need to give right-click twice on the color swatch option which is placed in the Layers Panel.
This way, the color picker window will reopen, and from here, you can select another different color except for blue. Let’s pick a pinkish-purple color at this moment.
Once you click OK, the Color Picker window will disappear, and you will find the sketch with new pinkish-purple color.
Following this process, you can give as much as a different color to your sketch until you find the best-colorized pencil sketch.
If you want, you can reduce the intensity of the color too. Drag the opacity slider until you find the required intensity level.
Step 17: Switch the fill layer off again
At this step, I will use another process to colorize the pencil sketch. This time I will use the Gradient process.
Firstly, the fill layer needs to be turned off. For this, click on the eyeball icon of the Color Fill 1 layer.
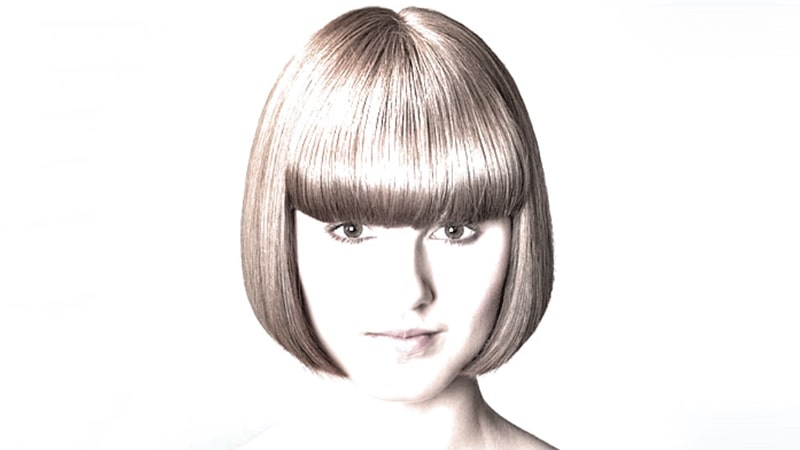
Again, you will have a White and Black version of your image.
Step 18: Adding Gradient Fill Layer
As I said earlier, I am going to sketch this time with Gradient; then I have to use a Gradient Fill layer.

Click the New Fill or Adjustment Layer sign once again.
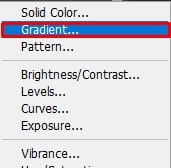
This time, you need to select the Gradient option from the list.
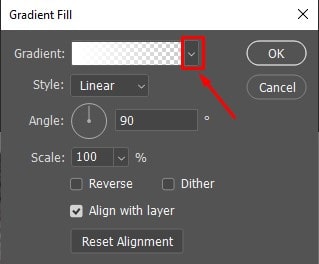
The dialog box of Gradient fill will pop up. From the gradient box, click on the drop-down menu. Remember not to click on the color swatch; if you mistakenly click on the color swatch option, Gradient Editor will appear which is not a part of this tutorial. Make sure; you have clicked on the right option mentioned in the image.
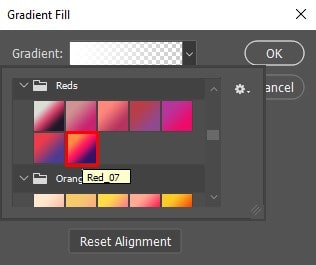
Thus, the Gradient Picker window will appear. In this window, many preset thumbnail options will come from where we need to choose the gradient color. Hover the cursor to any gradient option, give right-click twice. Following this way, you will select a gradient option, and the gradient picker will also be closed. In this tutorial, I choose the spectrum gradient, mentioned in the image.
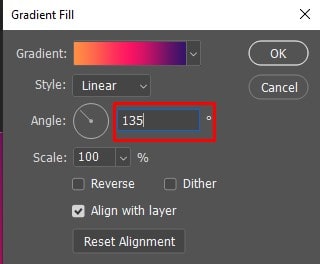
Now we are back to the Gradient Fill dialog box to change the Angle option. By default, the option will show 90°. I will change it to 135°. This way, the image will become interesting to look at. Click OK and this way the dialog box of the Gradient fill will be closed.

Now, your document is temporarily filled with the Gradient color.
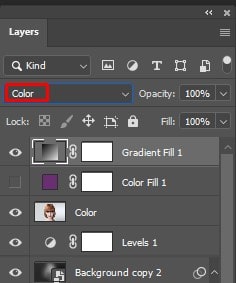
Step 19: Alter the blend mode from normal option to Color
Now you will see the Gradient Fill 1 Layer is sitting at the top position in the Layers Panel.
As we have accomplished altering the blend mode from normal option to color a couple of times in this tutorial, so it will not be a challenging task to do this again.
You will find the Gradient Fill layer blend mode as “Normal”. Simply change it to “Color.”
Then as per requirement, adjust the color intensity by dragging the slider left or right.
Below is the image when you use a gradient spectrum.
So, the tutorial is over with all the 4 processes which I have discussed at the beginning of the article.
How to Choose One of the Previous Color Views
Now as we have colorized the pencil sketch with gradient option, how will you see the previous version? Or what will you do if you want to go back to the Black and White version? How to return?
It is so simple.
Firstly, the Gradient Fill 1 layer needs to hide. Click on the visibility icon of the gradient fill layer to protect it.
Now all 3 colorized layers are switched off. And you will be returning to the Black and White version.
To get the single colorized version, click on the visibility icon of the single color fill layer in order to switch the layer on. Or to get the photo’s original version, click on the visibility icon of the color fill layer in order to switch the layer on.
And below is the pencil sketch with the original photo color.
FAQs
The tutorial walks through four distinct versions — a black and white sketch, a colorized version using the photo’s original colors, a single solid color version, and a gradient-colorized version. Each one builds on the same foundation, so once you understand the core process, switching between color styles becomes a matter of toggling layers rather than starting over from scratch.
The original background layer is needed later during the colorization stage, so modifying it directly would cause problems down the line. Duplicating it first keeps the original untouched and available whenever the process calls for it. It’s a basic but important habit in Photoshop — working on copies preserves your options and protects you from irreversible mistakes.
Desaturate strips all color information from the layer, converting it into a black and white version. You access it through Image > Adjustment > Desaturate from the menu bar. On Windows, the keyboard shortcut is Shift + Ctrl + U, and on Mac it’s Shift + Command + U. This step is what sets the foundation for the pencil sketch look.
A regular filter bakes its changes permanently into the layer — once applied, you can’t go back and tweak the settings without undoing your work. A Smart Filter stays editable, meaning you can double-click Gaussian Blur in the Layers panel at any point and adjust the radius slider to fine-tune the sketch effect. Converting the layer to a Smart Object before applying the filter is what makes this non-destructive editing possible.
Lower radius values produce finer, thinner lines that feel more like a light pencil drawing. Higher radius values create a stronger, more realistic sketch effect that more closely resembles the tones of the original photograph. The right value depends entirely on the image and the style you’re after, so keeping an eye on the canvas while dragging the slider is the most reliable way to judge it.
Changing the blend mode of the inverted desaturated layer to Color Dodge is the step that creates the actual sketch illusion. It essentially lightens the layer based on the colors below it, and when combined with the Gaussian Blur filter, it produces those characteristic pencil-stroke lines. When first applied, the document turns almost entirely white — that’s expected, and the sketch effect only becomes visible once the blur is added.
After turning off the color layer, you add a Solid Color Fill Layer through the New Fill or Adjustment Layer icon at the bottom of the Layers panel. Pick your preferred color from the Color Picker that appears, then change the blend mode of that fill layer from Normal to Color. If the color feels too intense, simply reduce the opacity until it reaches a level that looks balanced. To try a different color, double-click the color swatch in the Layers panel to reopen the Color Picker.
Yes, and that’s one of the smartest parts of this workflow. Each colorized version exists on its own layer, so toggling between them is as simple as clicking the visibility icon — the eyeball — next to each layer. Turning one off and another on instantly switches the view. Turning all color layers off brings back the original black and white sketch. Nothing gets deleted or redone; the versions coexist in the same document the entire time.
Conclusion
Don’t you feel, photo to color pencil sketches with Photoshop CC is fun?
Also, the processes are pretty simple. Do practice and thus you will be able to be a PRO in making a color pencil sketch with Photoshop CC.
You may also read:
- How to Make Background Transparent in Photoshop
- A Guide on How to Extend Background in Photoshop
- Smooth Skin by Using Adobe Photoshop
- How to Resize Image for Amazon in Photoshop
- Add Image to an Existing Layer in Photoshop?
- Beginner’s Guide to Photoshop CC 2020 | Photoshop Tools & Toolbar
- Remove White Background Using Photoshop Tools

Salim Ahmed is the CEO of Graphic Experts India, with over 25 years of expertise in photo editing, clipping path, image retouching, and eCommerce image editing services.