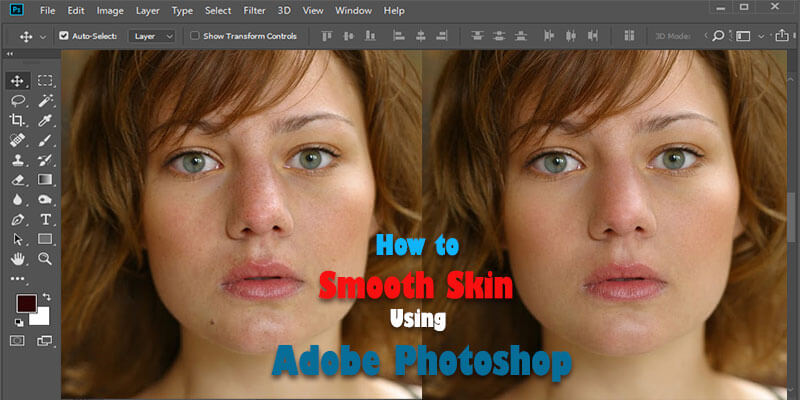
Do you know how to smooth Skin in photoshop? If you don’t know perfectly, then I am here to share with you how to enhance your photo by using photoshop. By using a spot healing brush we will learn how to cut off pimples, spots, and minor skin stains.
After the cleanup, we will pursue how to smooth Skin without losing image quality, like the subject’s hair, eyes, and skin texture.
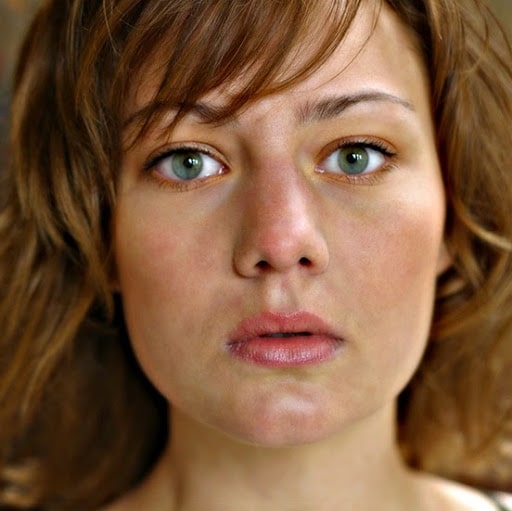
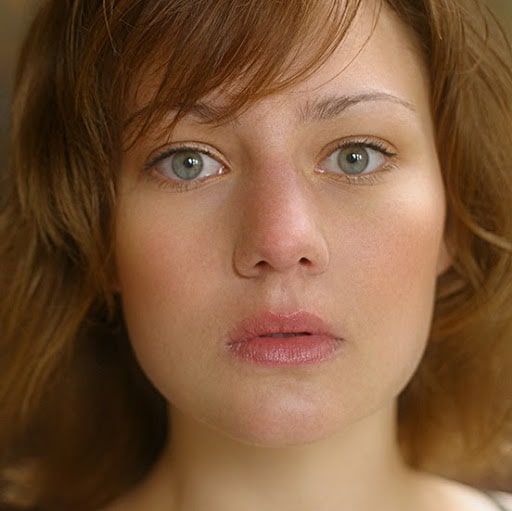
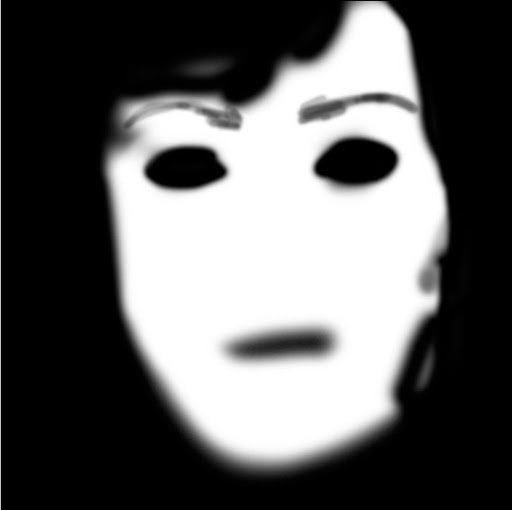
For learning, you can use an easy image as I used in this tutorial.
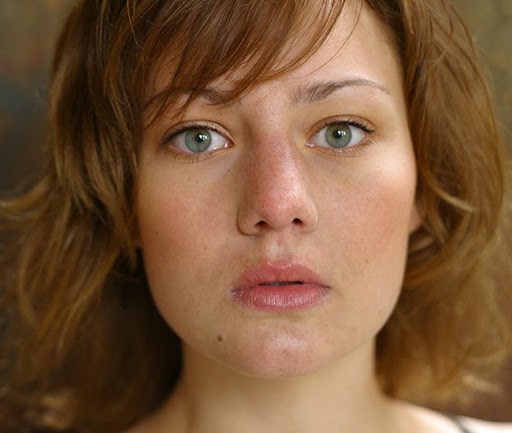
Fig: Take a raw image
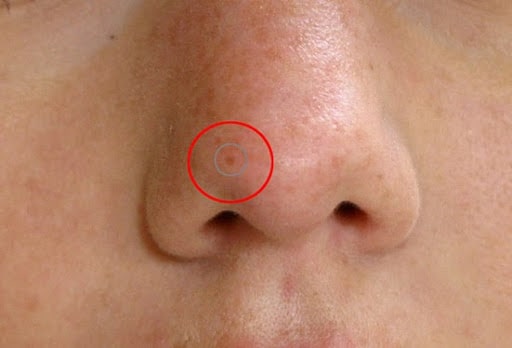
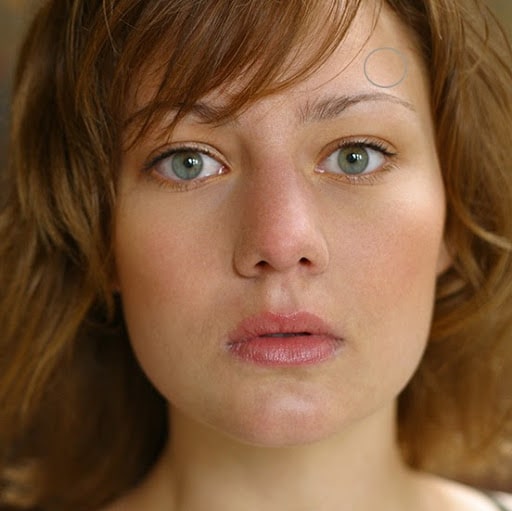
Here I’m zooming the image for showing you what the lady’s Skin looks like. I mean, how many stains she has.
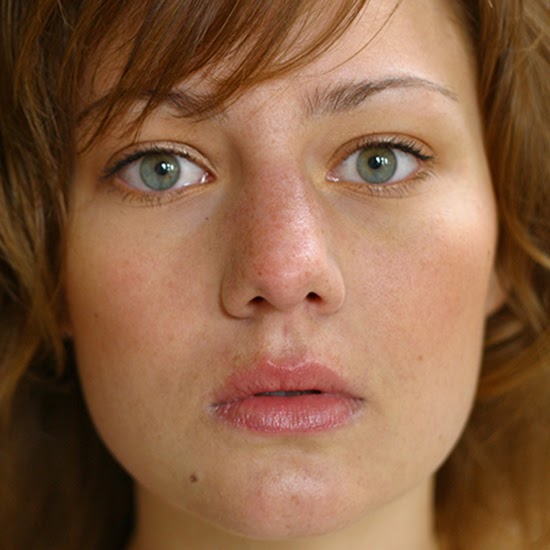
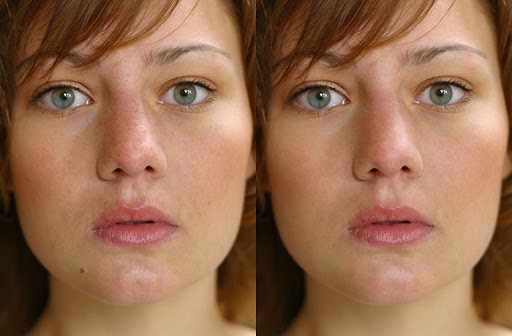
Look at this picture, After smoothing her Skin how beautiful she looks like.

The result of final skin-soften
How to Smooth Skin – Step By Step Photoshop Tutorial
In this tutorial, I’m using Adobe Photoshop for making smooth Skins. You can also learn Smoothing Edges in Photoshop.
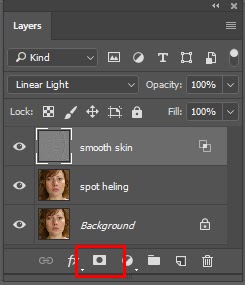
Step 1: Make a Copy Of The Image
After taking an original image in photoshop, You can see the layer panel, which illustrates the Image on the background layer. During smoothing the Skin, you need to remove all unnecessary things from the Skin.
You can work on a different layer for protecting your raw ImageImage. To create a copy of the background layer by holding the “Option” for “Mac”/ Alt for the “Win” key on your pc/laptop’s keyboard.
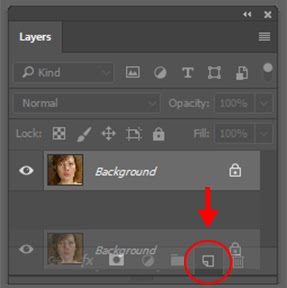
Duplicate the Background Layer
After opening a duplicate layer in the dialog box, name the layer “Spot Healing.” Then press the OK button.
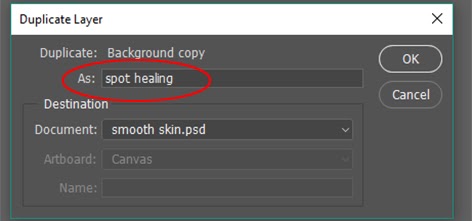
Layer name, “Spot Healing.”
See another image copy opened on a Spot healing layer above the main image layer.
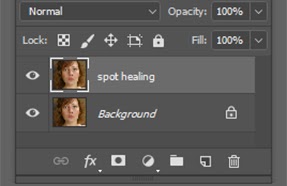
Now skin cleanup will be done on the new layer
Step 2: Spot Brush Healing Selecting
You need to select the “Spot Healing Brush” from the Toolbar.
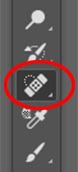
Healing brush tool selected
Step 3: Put The Spot Healing Brush To “Content-Aware”
You must ensure that the “Content-Aware” option in the options bar must be chosen.

By default, content-aware should be selected.
Step 4: To remove the skin blemishes click on them
By using Spot Healing Brush, you can remove unwanted blemishes on the skin. So “Click” on any unnecessary blemishes on the Skin. Immediately the photoshop will clean all the objects from the Skin. You need to allow the Brush slightly larger than the objects for getting the best result.
To change the brush size, Click the Right Bracket Key to create the Brush larger or the Left Bracket Key to create the Brush smaller. If the objects haven’t clearly gone on the first time, then press Ctrl+z for “Win”/ Command+z for “Mac” on your keyboard.
If you need to resize your Brush, then resize it and press on the same blemish.
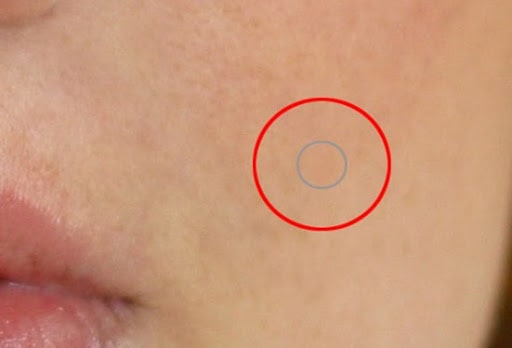
Example: Erase skin blemishes/pimples by using the spot healing brush.
In this ImageImage, you can see a larger pimple on the woman’s cheek. I’m going to place the spot Healing Brush through it, and I’m going to make my Brush a little bigger than the pimple itself:
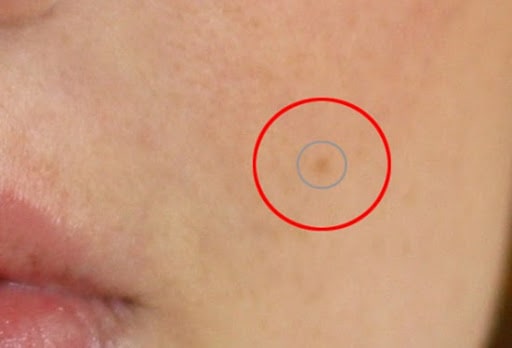
Place the Spot Healing Brush through the pimples
To erase the pimple, I’m going to press on it with the Spot Healing Brush. Photoshop analyzes the area that I pushed on, identifies the surrounding area’s good skin texture, and then combines the great texture with its original tone and color. Then the pimples/blemishes are gone:
Pressing to clean the pimple
For another pimple, I’m doing the same thing again on her cheek. Put the spot healing brush on the pimple to clean the area.
The spot healing brush is placed over a second pimple.
I’m going to click on the pimple, and Photoshop automatically eliminates it again:

The second pimple is gone.
Only a bunch of clicks to clear up the rest of the pimples on her forehead with the Spot Healing Brush, And look at her Skin which is smoother than before:
The rest of the pimples were removed.
Erase the pimples, not Features
While you are retouching the Skin, make sure that the blemishes are erased just temporarily, It is typically not adequate, because these are parts of what make people remove significant elements such as moles or some scars. However, the purpose of image retouching is to help people not seems like someone else.
Finalization of specific skin cleansing
Continue working over the person’s face to extract any other pimples. Here I’m showing you side by side differentiation of the woman’s Skin. The left side of the picture’s face is looked real but the right side of the picture’s face has few blemishes though I did their quick retouching by spot healing brush. Most of the pictures need only a few minutes to clean up the Skin.
I’ve covered here easily the Spot Healing Brush, but in the skin Blemishes With the Spot Healing Brush guide, you will learn more about it:
Here’s a difference between the initial skin retouching before (left) and after (right).
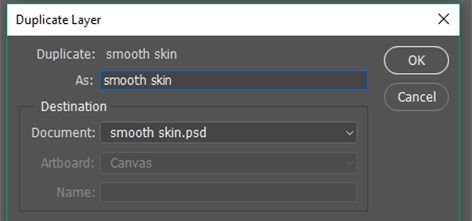
Step 5: Take a copy of the “ Spot Healing” Layer
We are prepared to smooth the Skin with the pimples erased and it is best to work with a separate layer again. I’m just going back in the layers panel and take a copy of the spot Healing layers by clicking and holding the Alt “Win”/ Option “Mac” button on my keyboard. Then press the layer “Spot Healing” and drag it to the icon of the new layer:
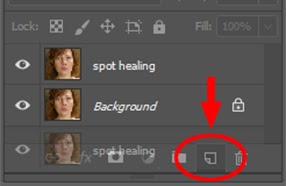
Make another layer of Spot Healing.
In the Duplicate Layer which is in the dialog box, So rename it as “Smooth Skin” and tap OK:
Make another layer of Spot Healing.
Now we have the original image on the background layer, spot healing layer, and smooth skin layer above them.
The Smooth Skin layer arrives above the Spot Healing layer.
Step 6: Use the High Pass Filter
I use the high-pass Filter from photoshop to get the smooth skin. I’m just going up to the Filter menu, which is in Menu Bar, then select the other, and finally select the “High Pass” from the drop-down menu.
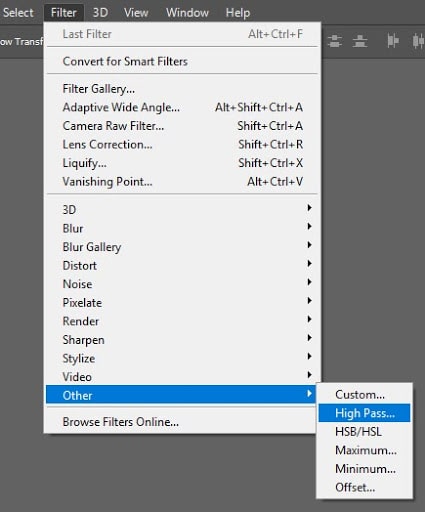
Go to Filter> other > High pass.
Why The High Pass Filter Is Great For Smoothing Skin
If you already know about the High Pass Filter, It is probably because you used the High Pass filter to sharpen images in Photoshop. Although I’m going to use High Pass for smooth Skin, not for sharpening, several of the processes are the same. Try to find the edges and highlight them with high-pass filters.
The edge is a region where the lightness or color of the surrounding pixels suddenly changes a lot. In portrait photos, the edge is typically along with the eyes of the person, ears, hair, and so on. On the other side, the skin texture has relatively small amounts of detail and far smoother transitions.
The High Pass filters do not find these areas an edge and thus fill these areas with neutral gray rather than underlining them.
If the High Pass filter sharpened the ImageImage, the edge (details) could be sharpened without affecting the Skin. Nonetheless, I use High Pass for smoothing Skin for the exact reasons.
We will not identify the edges so that we can sharpen them but so that anything other than the edges can be smooth and soft. Let’s see what it’s all about.
The Radius Value
The High Pass filter identifies edges and highlights them, and “the thickness” of the edge controlled by the radius option at the lower part of the High Pass dialog box. In other terms, the radius value shows how all those pixels on each side of the edge to include when photoshop has defined an edge.
Low radius values only show the finest information in the pictures. But to ensure that this important information is not blurred. We need to specify the areas surrounding them properly, which means that we need a wider radius value. A radius of 24 pixels fits well for a typical portrait shot:
Set the 24 pixels radius size.
If you look back at the ImageImage, it is easier for you to work on a less resolution image with a Radius value of 18 or even 12 pixels. Do you know why the particular values?
Because you choose a Radius that is easily split by 3, it is necessary for the next move. For instance, 24 split by 3 is 8, 18 split by 3 is 6, and 12 splits by 3 is 4. Again, in the next step, we will see why.
Press OK because when you want to close the High Pass dialog box. Your pictures mostly turn gray. High gray areas like the Skin are not very detailed, while big, contrasting halos underline the edges:
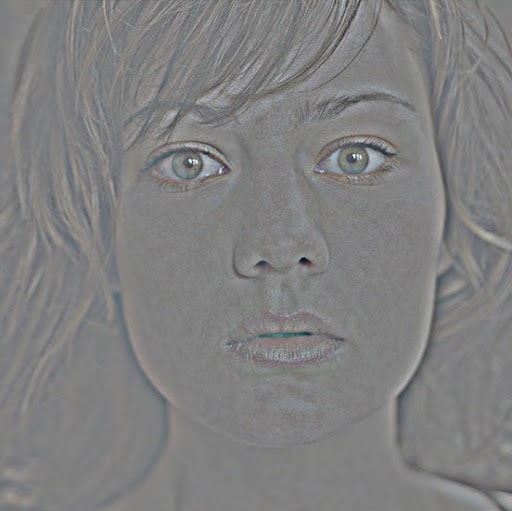
This is the outcome when the high pass filter is applied.
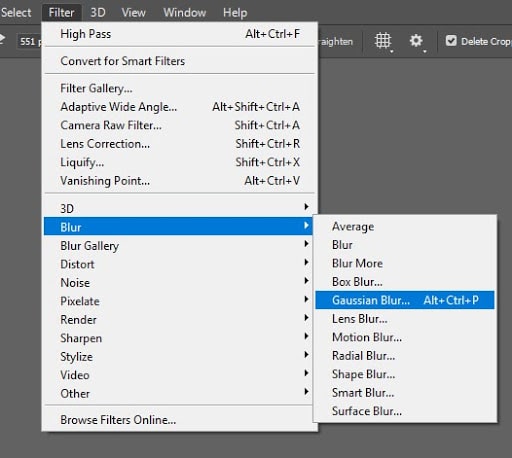
Step 7: Apply The Gaussian Blur Filter
The high Pass filter effect must be blurred. The blurring may seem counter-intuitive
That helps to produce a better texture in the Skin. Click on the filter menu, select Blur, and then click on the Gaussian Blur.
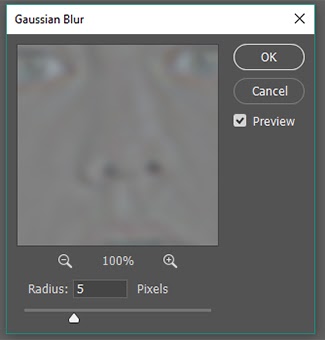
Fix the Radius value to radius one-third of the range for a high-pass filter in the Gaussian Blur dialog box. I have changed the radius to 24 pixels for the high pass, and I have set the radius to one-third of the Gaussian Blur, which is 5 pixels. Click OK to leave the dialog box:
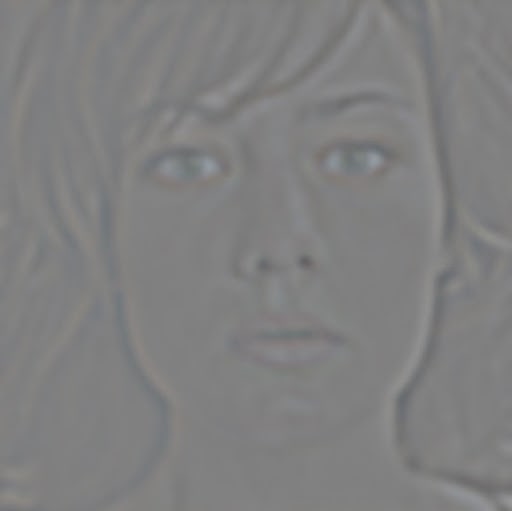
The High Pass effect looks softer and less detailed with the blurring applied:
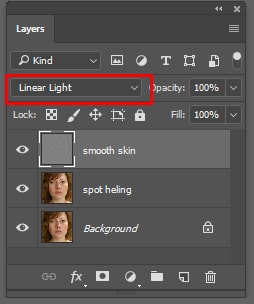
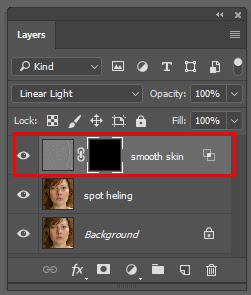
Step 8: Alter The Layer Blend Mode To Linear Light
Adjust the “Smooth Skin” layer blend mode from normal to linear light in the Layers panel:

It blends the High Pass result with the picture producing an over-sharpening effect in high contrast. It looks horrible, but don’t be upset. In a moment, it will look poor.
Step 9: Invert the layer
Click on the Image menu, select Adjustments, and then select invert.
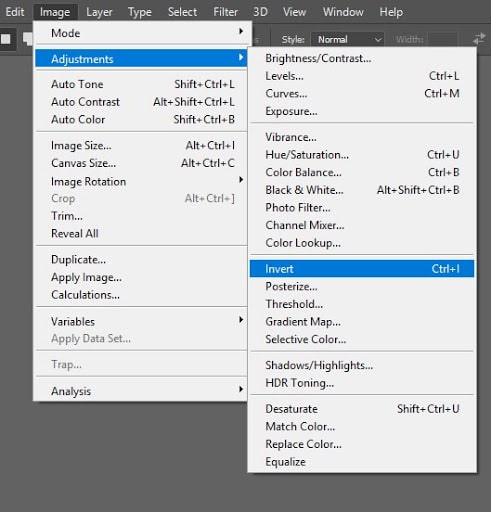
First, enter the Image menu > then going for Adjustments> Invert.
After getting the layer inverted, the picture will be over-sharpen and looks like a strange blurred mess with huge ugly halos all around:

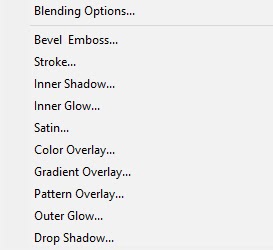
Step 10: Open the Blending Option
For decreasing the halo effect, Press the Layer styles icon at the lower side of the layers panel:
From the top of the list, you need to select Blending Options.

Step 11: Drag The “Blend If” Sliders
The “Blend If” sliders are displayed at a lower point in the layer dialogue box. There are two types of sliders, the Upper layers named “This Layer,” and the next layer’s name is “Underlying Layer.” So we need to choose the upper layer, which name is “This layer.”
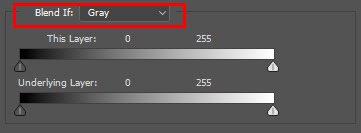
Remember the slider below the end of the gradient bar. These sliders regulate that the “Smooth Skin” layer blend with the ImageImage below it depending on the layer’s brightness level. The left-hand slider combines the darker parts of the layer, and the right-hand slider blends the lights:
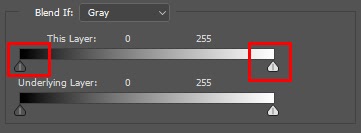
Decrease the Light Halos
Lighter halos begin to decrease. Keep the Alt button “Win” and the “Mac” option button on your keyboard, push the button on the right side, and move it towards the left.
Holding the Alt for win and option for Mac button tells photoshop to divide the slider in half so that as you’re dragging, only the left-hand side of the slider moves when the right-hand side remains in place.
Look at your photo as you move the slider and see the lighter halos fading away. Drag the slider as far as possible to the left to eliminate it:

That’s the result after you have adjusted the first slider. Most of the brighter halos have disappeared or are much less visible at least. There are just the darker halos:

Decrease the Dark Halos
To decrease the dark halos, click and hold your Alt for win and Options button for mac, press the slider on the left-hand side and move the right half of it towards the right-hand side.
However, You will have to move all the way to the right for most of the dark halos to invisible. Press OK while you’re done to close the layer style dialog box:
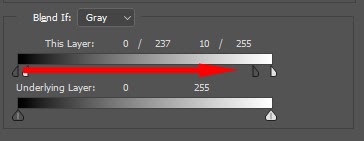
And here’s my photo after both sliders have been dragged. Her skin looks smooth, but the ImageImage looks so flat. First, we’re going to fix:
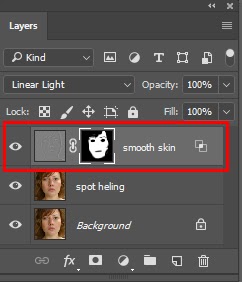
Step 12: Use a mask layer
Add a layer mask for a smoothing effect to the Skin. Go back to the Layers panel, click and hold the Alt for Win and Option for Mac button on your keyboard and press the Add layer mask icon.
On the “Smooth Skin layer, there is a black-filled layer mask thumbnail. This covers the smoothing effect from sight so that we can only paint it back in only if we need it:
Step 13: Choose the Brush Tool
You have to choose the brush tool from the toolbar:
Step 14: Set the color of your brush white
Ensure that your Foreground Color is set to white. In the color swatches close to the bottom of the Toolbar, you will see the background colors and present foreground. The swatch is the foreground color on the top left corner. If it’s not adjusted to white, click D on your keyboard so that colors can be easily reset to defaults:

Step 15: Paint the rest of the skin
Test your brush options on the Options Bar when you start painting. Ensure the mode is set to normal that the opacity rate is 100% and that the flow level is 100%:

Then paint on the Skin to show the smoothing effect. A soft-edge Brush does good work. We know that we can adjust the brush size on the keyboard with left and right bracket keys. To change the brush solidity, add the Shift button.
For making the Brush softer, you need to click on the shift button and the left bracket button. Or For making the Brush harder, you need to click on the right bracket button.
Example: To show the smooth skin Painting.
I’m starting to paint on her forehead. Because we paint on a layer mask, and not on a layer actually, the brush color is not noticeable as we paint it. We show the smoothing effect in the areas where we paint:
After that, I will paint on her nose, her cheeks, and her eyes to show the smoothing Skin. Change the size of your Brush as you go to avoid painting over the details and make the Skin sharp.
If you slip and paint across the wrong field, Click on the X button on your keyboard to set the black paint and to cover up the smoothing effect. Press X again to reset your brush color and start to paint your Skin effortlessly and softly:

Eventually, I’m going to paint these areas all over her cheek and her chin to smooth, and at the same time, you need to avoid her lips:

Viewing The Layer Mask
Click down the Alt(Win)/Option(Mac) key to see where you have painted and then click on the thumbnail layer mask on the Layers panel:
It transfers your view from the photo to the mask of the layer. You have colored the white areas of the mask to recover the smoothing of the Skin. Black areas are when the effect of smoothing is covered up. It looks a little bit dark, but looking at the mask is a good way of making sure you’re not missing spots, and if required, you can paint on the mask specifically.
Press Alt (Win)/Option (Mac) to change back to your picture and press the Layer Mask thumbnail:
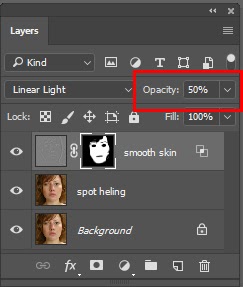
Step 16: Opacity of the lower layer
We have softened the Skin in this stage, but the effect is too strong. To reduce the “Smooth Skin” layer, decrease the Opacity. The Opacity of 40 to 60% normally works best, but depending on your ImageImage. At 50 percent I’ll set myself:
Finally, We’re done with that! Here, my final result with its Skin now looks great, after reducing the layer opacity:
Other Photoshop Tutorials:
- Headshot Photo Editing and Retouching Services
- Photo to Color Pencil Sketch with Photoshop CC: Tutorials
- Make Background Transparent in Photoshop
- Add a Drop Shadow in Photoshop (Step by Step)
- How to Whiten Teeth in Photoshop (A Helpful Guide)
FAQs
The most effective approach combines the Spot Healing Brush for removing blemishes with the High Pass filter technique for overall smoothing. Working on duplicate layers throughout the process means your original image stays untouched, and you can dial back the effect at any point by simply adjusting the layer opacity.
Working on a copy protects your raw image from permanent changes. If anything goes wrong or the result looks unnatural, you can simply delete the duplicate layer and start fresh. It’s one of those habits that saves a lot of frustration, especially when you’re still learning.
The High Pass filter identifies edges in your image — areas like the eyes, hair, and lips — and highlights them, while filling smoother areas like skin with neutral gray. When you invert this effect, those flat skin areas become smooth while the sharp details stay intact. It’s a clever workaround that gives you softness without that over-blurred, plastic look.
Because the next step requires setting the Gaussian Blur radius to exactly one-third of the High Pass radius. For example, a High Pass radius of 24 pixels means a Gaussian Blur of 8 pixels. Keeping these values in a clean ratio produces a much more natural-looking result.
Change it to Linear Light. This blends the High Pass effect into the photo in a way that creates contrast — it’ll look strange at first, but that’s expected. Inverting the layer afterward and then adjusting the Blend If sliders brings everything together and removes the unwanted halos around edges.
After setting up all the layers, add a black-filled layer mask to hide the smoothing effect entirely. Then use a white brush to paint the effect back in only on the skin areas. This gives you precise control — if you accidentally paint over a detail area, just switch to a black brush to cover it back up.
Not necessarily. The goal of skin retouching is to make someone look their best — not to make them look like a different person entirely. Temporary blemishes and pimples are fair game, but permanent features like moles or distinct scars are part of what makes someone recognizable and should generally be left alone.
Somewhere between 40% and 60% tends to give the most realistic result. The full effect at 100% opacity often looks too smooth and artificial. Pulling it back to around 50% keeps the skin looking genuinely clean while still retaining enough natural texture to look like a real person rather than a digital illustration.
Conclusion
That’s the full process of how you can smooth and soften Skin in adobe photoshop. To edit photos in Photoshop and to see more photoshop tutorials, visit our Blog section.

Salim Ahmed is the CEO of Graphic Experts India, with over 25 years of expertise in photo editing, clipping path, image retouching, and eCommerce image editing services.