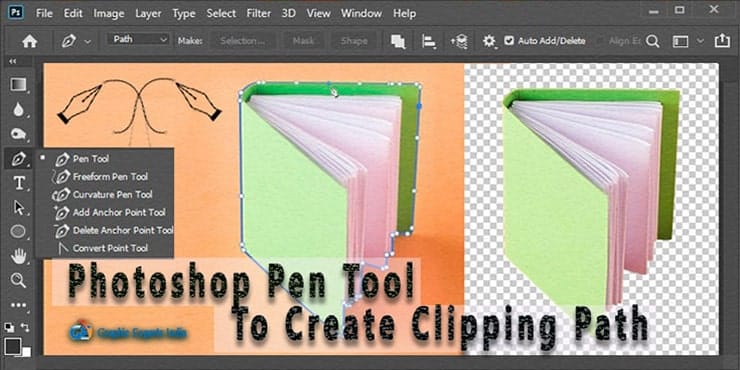
Photoshop pen tool is used to create a clipping path. The pen tool allows editors to create smooth, curved lines and sharp corners, draw paths, and make selections with control. It is essential for photographers, photo retouchers, or those who need pixel-perfect selections for Photoshop editing services.
The Pen tool is used to create a path around an object, designers can easily remove the background or adjust and change the selected area without affecting the rest of the image.
Photoshop makes it easy to access the pen tool as it is conveniently located in the toolbar. But, you need to learn how to use the Pen tool in Adobe Photoshop CC. Unfortunately, most people who want to learn, find drawing with the pen tool complicated and confusing. That is why they don’t show interest in working with this tool.
This article will discuss the basics of the Pen tool in Adobe Photoshop. And you will find it easy after learning.
So, let’s start learning.
What is the Pen Tool in Photoshop?
The Pen tool is a selection tool that has a wide range of applications. We can use this tool to create easy to complex shapes by creating a set of anchor points.
When you learn about Photoshop, the Pen Tool is the first thing you will touch. The working area of the Pen Tool is vast. It is the most used and powerful in Photoshop.

The first task, the Pen Tool can do is to create clipping paths and shapes with the artboard and wherever needed. Then, those shapes and paths can be duplicated and manipulated. By duplicating and manipulating those shapes and precise paths, one can easily create complex selections, masks, and objects.
The brush and pencil tools can only draw pixels over the image. But the Pen Tool is different from them. It is different and vast from those two tools. While using the pen tool, it always creates a vector path on the artboard.
When you see the path panel, the vector path will either appear as the work path or as the shape path. As you will use the Pen Tool primarily for freehand art, it is the most needed and used tool.
Types of Pen Tools
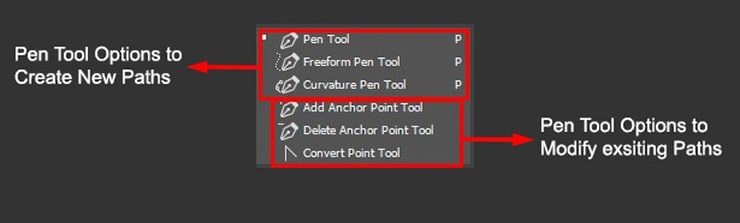
If you want to create a new path, you will find four different Pen Tool options in the Photoshop version CC. They are:
- The Basic Pen Tool
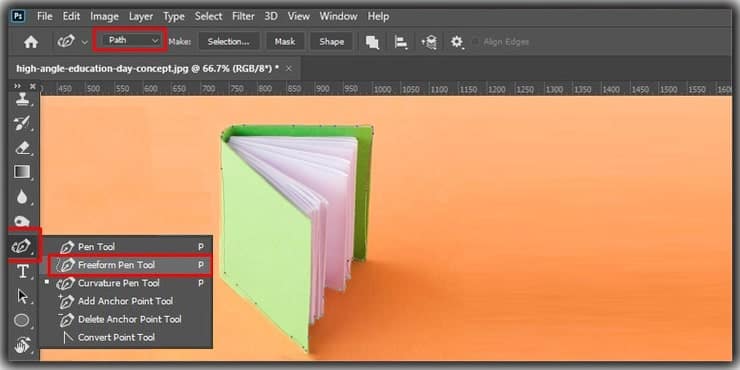
- The Freeform Pen Tool
- The Curvature Pen Tool
- The Magnetic Pen Tool
Overview of the Pen Tools
The Magnetic Pen Tool will be visible when you adjust the settings options of the Freeform Pen Tool. You may have a question about using the other three Tool options in the path panel. Like Add Anchor Point Tool, Delete Anchor Point Tool, and Convert Point Tool.
However, they are different from the four pen tools above. Rather, you can use these three tools to change or modify any existing path or shape.
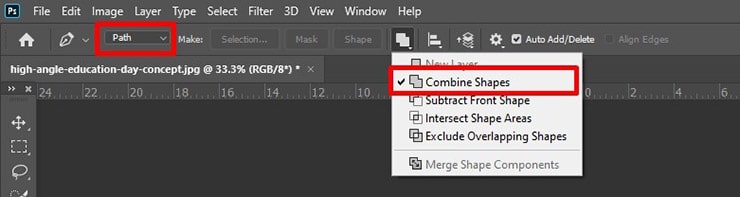
When you use any of those Tools, you will see an option bar on the top-left corner of your screen. For example, there will be two options: the path’s shape. You can change that setting to either, as you will need it for your work in Photoshop.
When drawing anything over the artboard, select the Clipping path. That creates a new work path over there. That work path will appear on the Paths Panel on your screen. On the other hand, you can draw on the artboard using the Photoshop Pen Tool while the shape is selected. It will create a new shape path.
Unlike the clipping path, this shape path will appear on both the Paths and Layers Panel. You will see that on the bottom-right corner of your screen. When you are working while the shape option is selected, you can change some settings options.
For example, change that shape’s fill color, shape color, and stroke thickness from the settings. But we will talk about that in the latter part of this Photoshop tutorial. When you are working in Photoshop and choose the path option, you will notice an icon on the right side of the shape or path option. That icon will look like two small square bars overlapping each other.

You will see this icon when you’ve already begun drawing your path with the shape chosen. On that newly popped panel, you will find a total of six options when only four of them are available. You have to set any of the options as your work manual needs. You can use the Combine shapes option if you want an initial path to becoming a selection.
Freeform Pen Tool
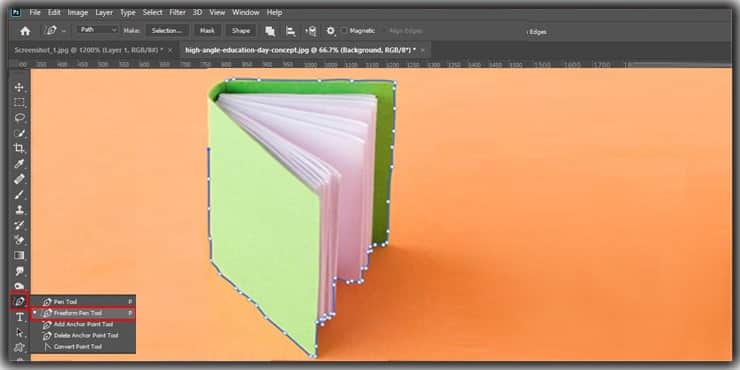
You will find the Freeform Pen Tool right under the Basic Pen Tool. This tool’s name represents the entire tool’s nature, as you can see on the name containing “Free.” You can art freely on the artboard using the Freeform Pen Tool.
This Tool is similar to the Brush and Pencil tools. However, you can click only a few times. Instead, click at the beginning and draw as you want by moving and dragging the mouse. It will automatically create the path with anchor points. But this Tool is pretty tough to control. The clipping path created may need big modifications as well.
Curvature Pen Tool

The third option on the Pen Tool Panel is the Curvature Pen Tool. Select the Path option as usual. You can use that tool where you need the path to create a curve.
When you use this tool, it will not create any handle. This tool is capable of following any uniform shape. You can even change and modify the whole shape and path. The modification process is the same as the modification process of the Basic Pen Tool.
Though you will only use the Curvature Pen Tool, you will sometimes need this tool for your assistance.
Magnetic Pen Tool
The fourth option on the list is the Magnetic Pen Tool. You can access the Magnetic Pen Tool from the Freeform Pen Tool. You will see an option on the above called “Magnetic.” Select the option by ticking on the box beside the option.
While using this Magnetic Pen Tool, it will attract the object and will automatically create the anchor points. Then, when you move the mouse, the Magnetic Pen Tool will do the job independently. But the thing is, the Magnetic Pen Tool is only that accurate in some situations.
The Common Uses of Photoshop Pen Tool
Using Photoshop Pen Tool, you can re-shape, modify, store, and reuse the paths and shapes you created. It can be your primary weapon in many sectors. For example, you might need to remove the background from a product image. The Pen Tool is necessary for that.
Sometimes, you must select any part or portion from any product image. Then, please change the color of it and do that with the help of the tool. It is also capable of creating multiple paths within any image.
Using the Pen Tool in Photoshop, you can also create multiple clipping path segments within any particular path. You can also create custom shapes with the help of the shapes and paths that you created before. As a result, you can mark any particular area of the image using it.
Here are some common uses:
Creating Paths and Shapes
The primary use of the pen tool is to create a closed path and shapes. You can click to set the first anchor point to the last anchor point, and by adjusting the direction handles of these points, you can create curves and lines that form the desired shape. Once the path is closed, you can turn it into a selection or a shape layer.
Make Selections
The created paths can be converted into selections. You can use this selection for editing images part-by-part in Photoshop. When magic, quick selection, lasso tool, or others fail to select the complex or intricate edges, the pen tool selects them perfectly.
Vector Graphics in Illustrators
The Pen Tool plays a vital role in illustrators creating vector graphics for designs, logos, illustrations, and more.
Cutting Out Objects
When isolating an object from its background, you can use the standard Pen Tool to create a path around it. This path can then be converted into a selection, allowing you to remove or manipulate the background while keeping the object intact.
Editing Paths
This tool helps you to edit existing paths by adding new anchor points, moving, or deleting, as well as adjusting their direction handles.
Creating Clipping Paths
Clipping paths are commonly used in graphic design and desktop publishing to control how images are displayed within a layout. The pen tool helps a lot to draw a path that determines the visible area of an image.
Layer Mask
Paths created with the standard pen tool can be converted into layer masks. It helps you to apply non-destructive adjustments.
Creating Complex Curves
The pen tool in Photoshop makes smooth and complex curves making it invaluable for creating typography with custom curves, drawing intricate shapes, or creating smooth transition areas in retouching.
Creating Custom Shapes
While Photoshop offers a library of basic shapes, the pen tool works well to create custom shapes with unique curves and angles.
Creating Paths for Animation
In video editing and animation software, paths created in Photoshop can be imported and used as motion paths for animations.
Retouching and Manipulation
The Pen Tool can also be used for advanced retouching tasks, such as creating precise selections for retouching skin, removing objects, or altering specific areas of an image.
Where is the Pen Tool Located in Photoshop?
While opening Photoshop, you will find a window above. After that, you will also see a toolbar on the left side of your screen. There is a working panel on your right side as well. You can customize both the toolbar, panel, and window later.
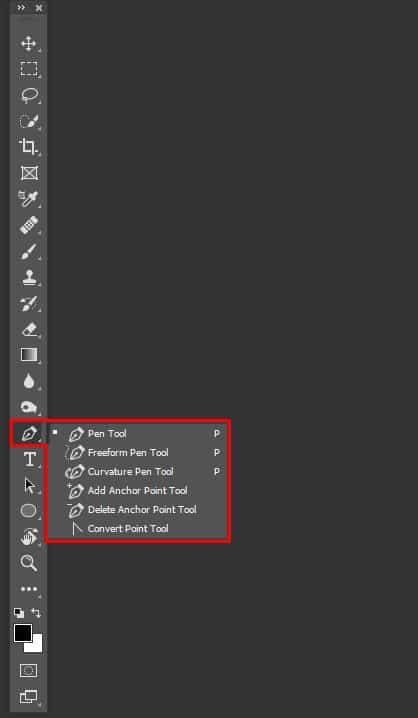
The Pen Tool is relatively easy to find, located in the lower part of the toolbar on the left side. It is located there by default in the Photoshop toolbar. There is a pen icon. Take the arrow there first. Then click and hold over there.
After that, six different Pen Tools will appear as options. Could you choose any of them as per your need? You will find six tools if you use the CC version of Photoshop, as the older version of CC 2018 contains five options. There is a shortcut process that will take you to the pen tool. Just click P from your keyboard to see the option.
Where is the Path Panel in Photoshop?
The Pen Tool and the paths panel are close, like hand-in-hand relations. They are both needed for each other. When you use the Photoshop Pen Tool, you will surely use the paths panel to continue your work. So, the path panel should be easily visible on the screen.
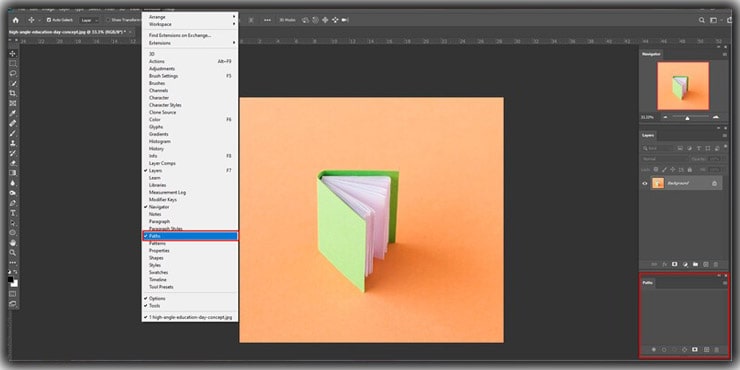
There are some options for workspace. Moreover, you can change and customize that too. The paths tab is relatively easy to find, as it will be visible on the Layers panel on your screen. If you don’t find that, there is another option as well.
You will see a menu named “Window” almost at the end of that bar. You have to click on that option. After clicking on that option, a long option bar will appear. Finally, you will see the Paths panel on the lower half of that bar. When you click on that option, the Paths panel will appear at the bottom right corner of your screen.
The Pen Tool to Create a Path
You can work with the pen tool to make straight and curved paths. You can art them with accuracy. But to master that tool by being a perfectionist, you must go through some practice.
It will be difficult when you use them for the first time. But I suggest you not to get discouraged by the difficulties. Find the option of adjusting the path after you create the path. This option will help you with mastering the tool.

To create a path, you must choose the Basic Pen Tool. Then, it would help if you chose the Path option from the drop-down menu bar. You will find that in the application window on the screen’s top-left corner.
How to Draw a Path With The Pen Tool
There are some procedures if you want to begin drawing paths with the pen tool. At first, you will have to click on that from where you want your path to start. After that, you must keep drawing the path simple and easy.
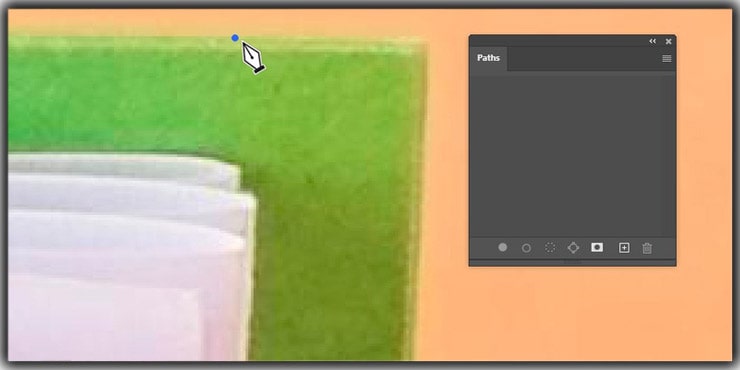
For that, find any straight line and the edge of it. Then, choose the starting point of your Closed paths from there. I will help you with an easy example here. You can see an image containing a coffee cup below.
You will see the coffee cup’s edge as an arrow pointing towards it. Choose that edge of the cup as the starting point of your path. Find an edge like that on the other images and start drawing the path.
After that, you must draw the first segment of the path you want to draw. Then, using the Photoshop Pen Tool, you must click along the edge of that object or the image.
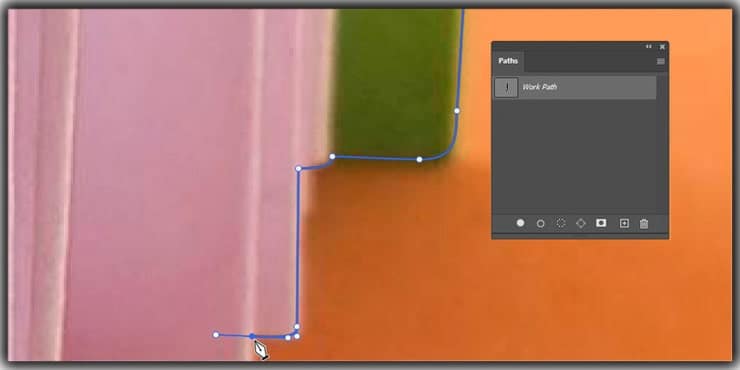
In the image below, you can see a straight line. That is the first segment of your clipping path. Like that, you can create the whole path area, which will become a selection at the end.
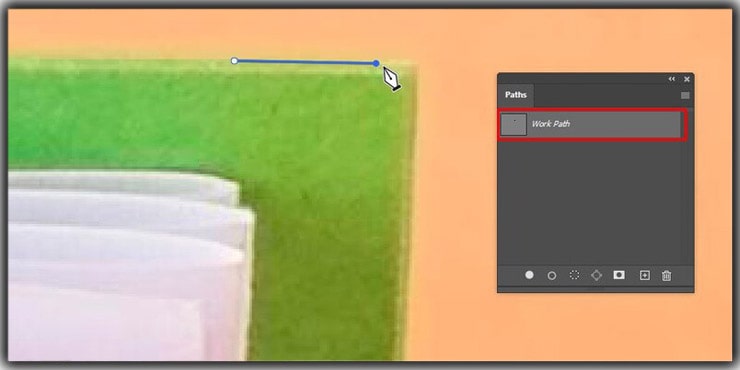
There is another point I want to mention as soon as you place the second point of the path, a path panel on your screen containing the Work Path, as you will see in the image below.
How to Draw a Curved Path Segment
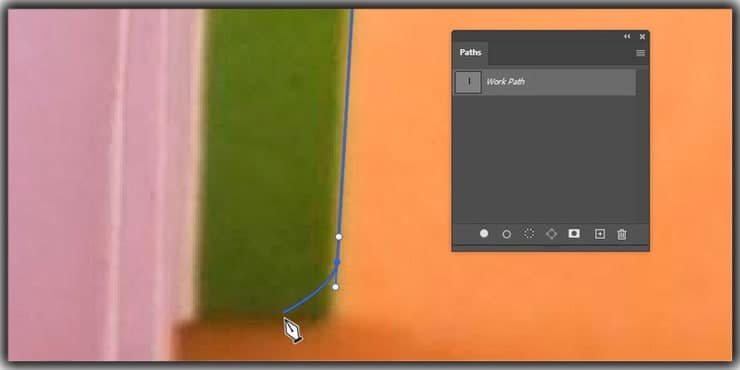
Sometimes, you may need to draw a curve for the selection process. Use the Basic Pen Tool to fulfill that task. For example, you can see the same task in the image below. At first, you have to click where you want to create your next point. Then, it would help if you dragged the Pen Tool without releasing the mouse button. And a handlebar appears in there.

Those handles are there for the curve being formed in the path. You will have to move the mouse to adjust the handles. When you do that, it will adjust the curvature of the line. Continue doing this until the curve forms in the shape you want.
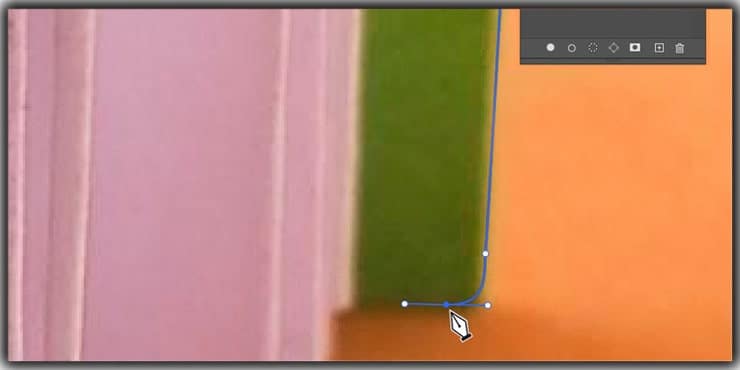
Once you are happy with the angle and shape of the curve, you can release the mouse button. You must remember that the handles formed from the curved line will appear before and after the point, as shown in the picture below.
While clicking for the new point to make, you can drag the mouse to create new handles.
How to Create a Straight Path Segment
After a curved path segment, the path segment should be straight. If you wish to prevent that, you have to corner the point. To do so, you have to type “Alt” from the keyboard, and at the same time, you have to click on that point.
You have to press “Alt” if you use a Windows-based computer. If you use the MAC, then press “OPTION” instead. After you do so, the second handle, curving the path, will disappear.
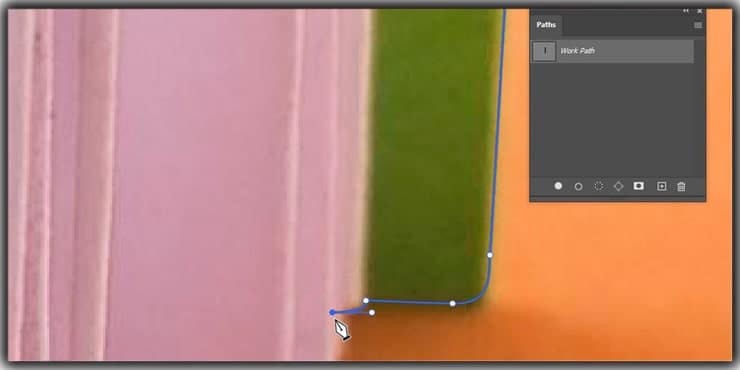
If you do everything correctly one after another, the following point sent by you will remain unaffected from the last curve.
How to Close Clipping Path
Once your path is completed, you will have to close that path. To do so, you must take the Pen Tool over the first point you created for the selection. While doing so, you will see a little circle appearing.
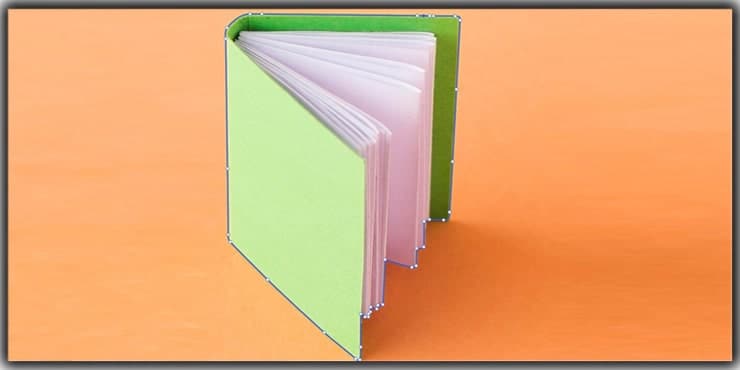
You will find the circle close to the Pen Tool; you only have to click on the point to close your path.
How to Save Your Clipping Path
Once you are done with the selection process, the next thing that comes to mind is how to save what you created. Save the created path is very important. If you save, everything will be recovered when you do anything over the image. It can be devastating and destroy all your courage.
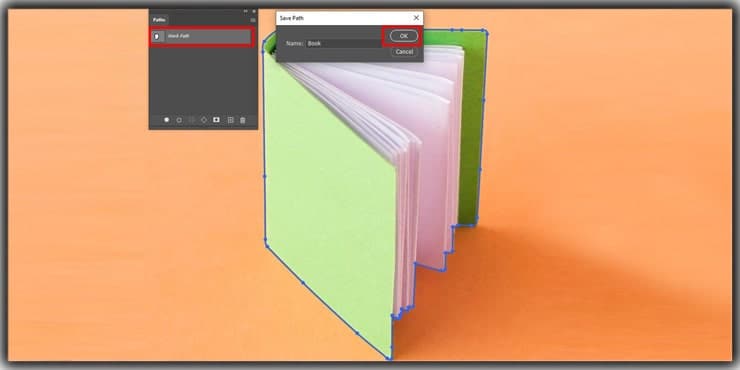
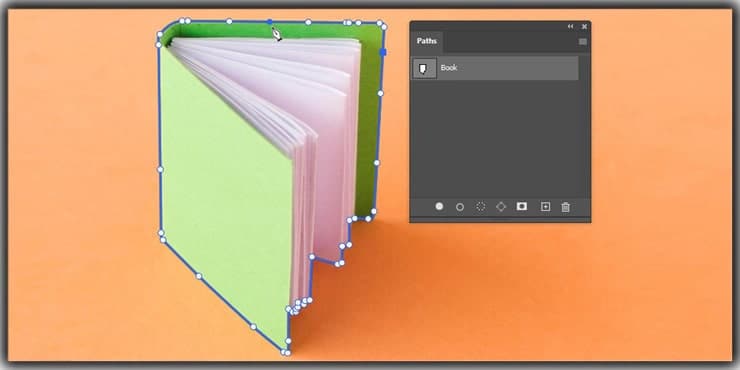
Now, I will show you how to save that. First, you have to go to the Paths Panel option. From there, you will have to look for a new Work Path. Then, it would help if you double-clicked on Work Path, and a blank space will appear.
You have to write down your Path name as you want. Then click on the “OK” button beside. You will save the path in the process. You will understand the whole process better when you see the picture below.
How to Modify an Existing Path
You can also modify the clipping path that you created. When you edit or modify the selection, zoom in as much as possible to ensure which part of the path you are working on. Your work will be more accurate by doing so.
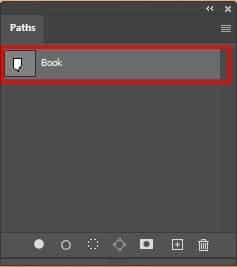
You may not find the path in your image. If you are in such a situation, go to the Paths Panel and click on the pathname. After that, the path area will appear over the image. Then, it’s all yours to make any changes or modifications.
How to Add Additional Paths to an Existing Path Area
Take an example of the cup image I used in the article. You will see some parts need to be selected in the handle area. If you want to isolate the cup from the background fully, you must create a selection area. So, we must create another path to separate the handle from the background area.
The path option needs to be kept for the process as it is from the Paths Panel. Then, you must select the pen tool from the toolbar on the left side. Then click on the overlapping square icon from the option bar that you will find above. You will see an option, Exclude Overlapping Shapes, then click on it.
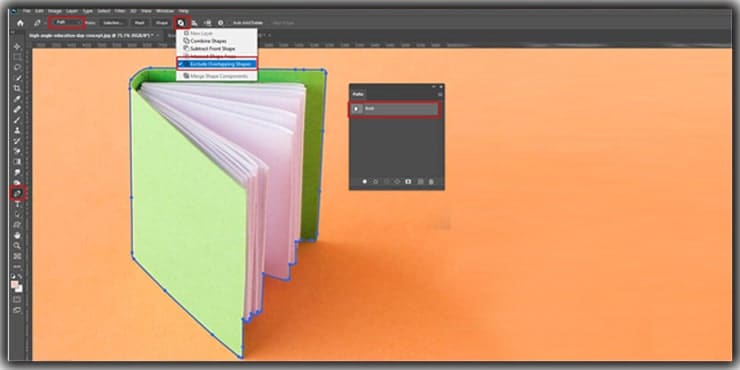
The selection that you made before will be visible to you. In the meantime, start drawing the area you want to separate from your older selection with the help of the Photoshop pen tool. Then, close the path.
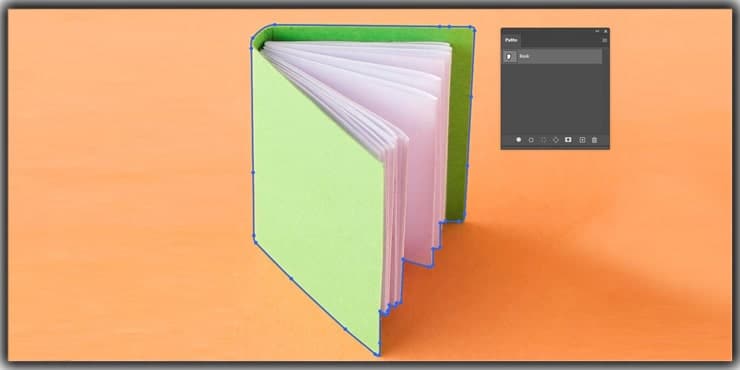
When you make the new selection with the pen tool, that selected area will be eliminated from the older selected area.
How to Modify Existing Points and Curves Along a Path
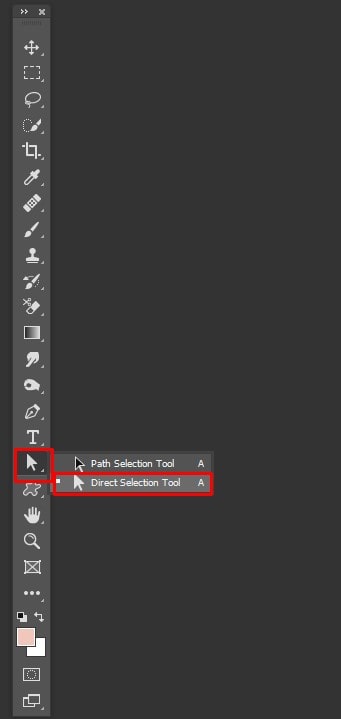
You need to find the Paths Selection tool from the toolbar on the left side if you want to modify any existing point. The symbol of that toolbar will look like an arrow.
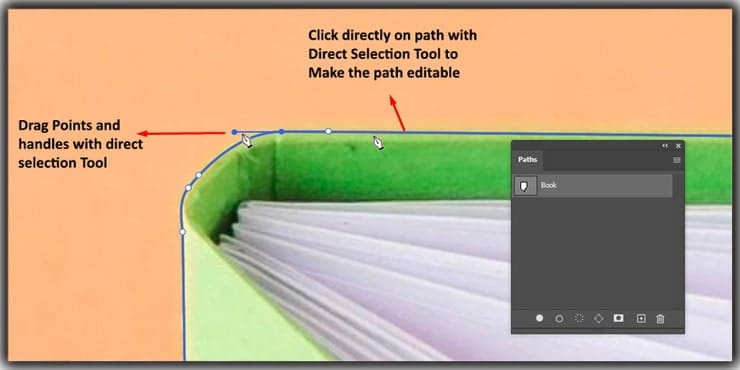
When you click on that tool, another option bar will pop up. You will see the Path Selection Tool and Direct Selection Tool. First, select the Direct Selection Tool containing the white arrow sign.
You will be able to change and fix the positions of the points in the clipping path. In addition, you can drag the handles and the points with the help of this Direct Selection Tool. As a result, you can fix any error in the path, points, and handles.
How to Add New Points to a Path
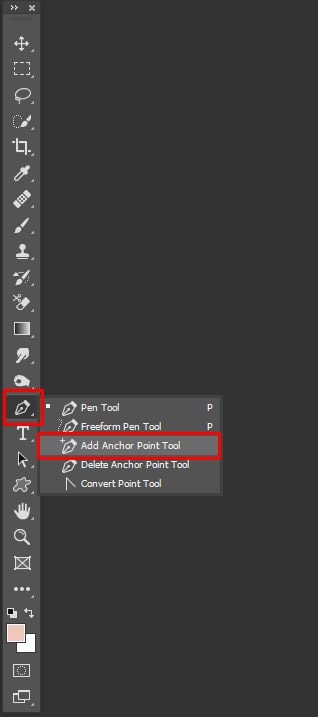
If you want to make additional changes to the points created before, you can do that using the Add Anchor Point tool. You will find this tool on the toolbar on the left side.
First, click on the pen tool sign. Then, you will see a total of six options. Click on the fourth option named “Add Anchor Point Tool.” With the help of this tool, you can add extra points to the path.
You can make a new point wherever you want on the older selected path with the help of this Add Anchor Point tool.
Once you have planted the new point in the path, you can change the position of it and make modifications. The Direct Selection Tool will help you in this matter.
How to Remove Points from a Path
Sometimes, you may need to delete any points from your created path. You will find the Delete Anchor Point Tool next to the Add Anchor Point tool.
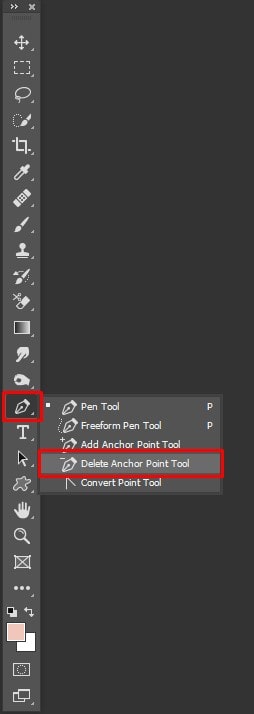
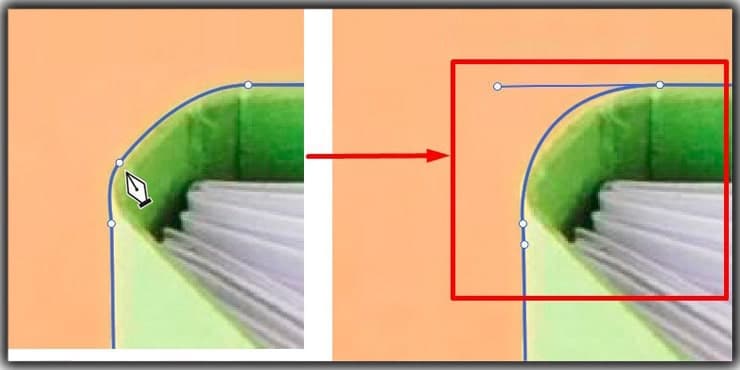
You can delete any anchor point with the help of this tool. First, select which point you want to delete, then take the arrow on that point with the Tool selected. After that, give a click, and the point will be deleted. The points before and after will join once the selected point is deleted.
How to Use the Convert Point Tool
You can easily manipulate the handles using the Convert Point tool. The job is almost the same as the Direct Selection Tool.
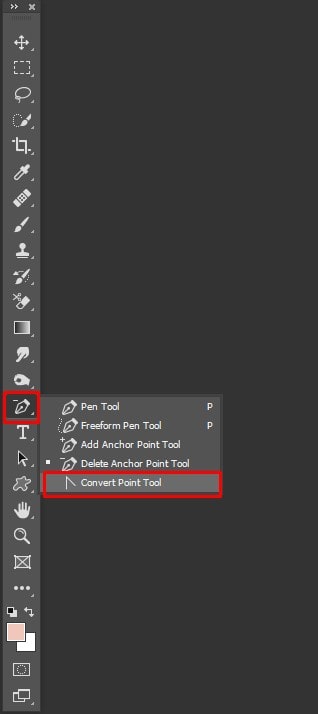
You cannot move the existing point with the help of this Convert Point tool. This tool will also convert the straight lines into curved lines and vice-versa.
When you click on the handle points, the handle will disappear. Then, the point will take the shape of a corner. If the anchor points contain the curving handle, these can affect the converted point.
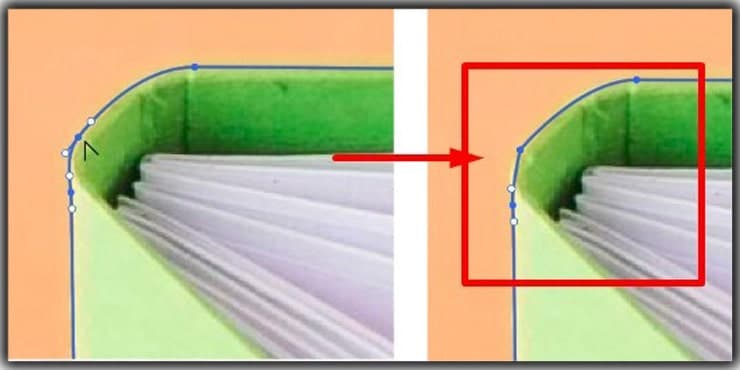
If any point does not have any handles and you click on them with the Convert Point tool, they will react differently. It will affect the anchor point by growing handles from the two sides of that point. As a result, both sides will be curved. You can manipulate them using the Direct Selection and Convert Point tools.
How to Create a Selection From a New Path
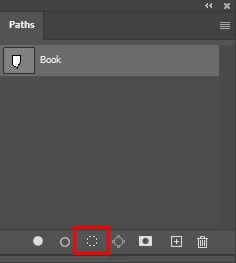
First, open the Paths Panel from the Windows drop-down menu to create a selection from a clipping path. Now select the path in the Paths Panel. On the bottom of the panel,
you’ll see an icon of a circular shape with a dotted outline. Click on that. After clicking on that, you’ll see a selection in that shape.
You can also create a clipping path Selection using the Photoshop Pen tool. To do so, you must select the path and the pen tool. Then click on the Selection option in the options bar next to Make.
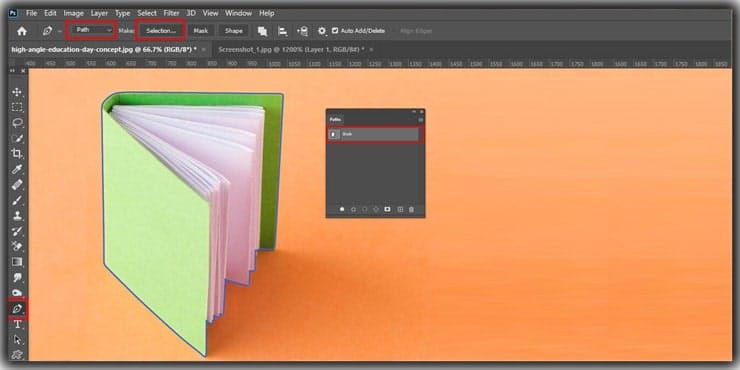
A dialog box will appear on your screen, allowing you to adjust the selection. For example, your purpose may be to separate the object from the background.
Then, put the value 0 to the Feather radius and check the Anti-Aliased box. For the very first selection, select the New Selection and click OK.

After making the selection, you can remove the selection from its background. You can do color correction as well.

How to Cut Out an Object From The Background
To cut an object from its background, you first have to select it from the Paths panel. After selecting the object, you can easily copy the object from one layer to another or create a Layer Mask.
To copy it or create a layer mask, you must be in that particular layer containing an image with the object you want to separate.
How to Remove a Background by Copying a Selection
You can copy your selection by clicking “CTRL+C” if you are a Windows user. The same thing can be done on the Mac by clicking “COMMAND+C.”
After that, you can copy what you pasted by typing “CTRL+V” for Windows and “COMMAND+V” on the Mac. By doing so, the selected area will appear as an entirely new layer.
Then, you can make the old layer invisible from the Layers Panel. To do so, you will have to unlock the layer first. After that, you will be able to see the isolated object that you particularly selected.
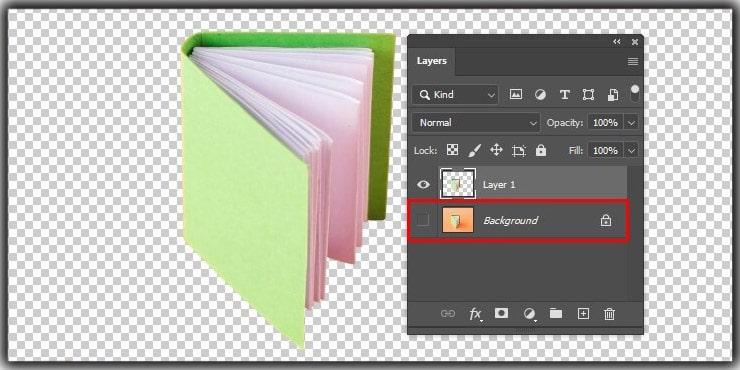
How to Remove a Background by Creating a Layer Mask
You can also remove the background with the help of the layer mask. At first, you have to locate the Layer Mask icon. You will find the icon in two places. You will find it in the Paths Panel or see it on the Layers Panel. In both places, the Layer Mask symbol will look like a white rectangle with a circle inside.
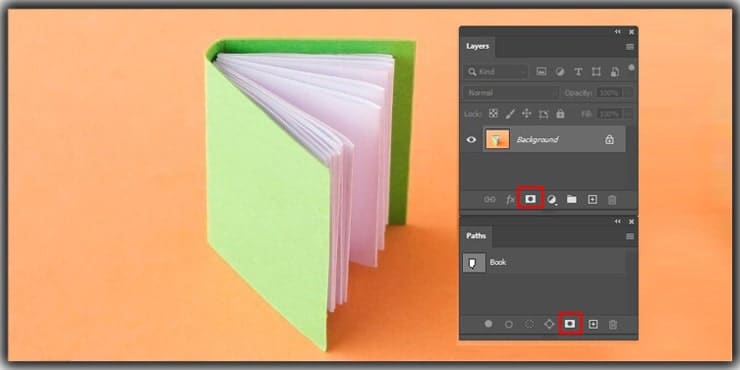
In this part, you must select the part you want to delete. Then you have to click on the “CTRL + Layer Thumbnail” and for MacBook, “COMMAND + Layer Thumbnail.” Then click on the Layer Mask icon.
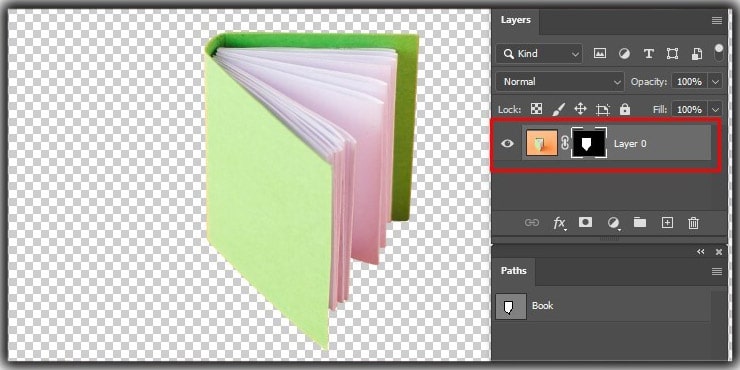
Thus, you will be able to create a Layer Mask.
How to Draw Shapes
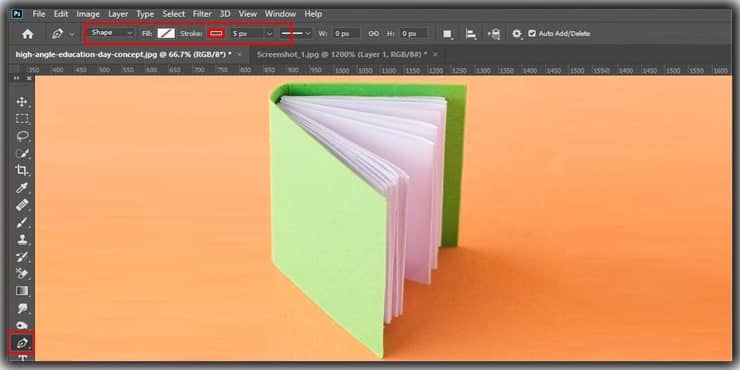
You can also draw shapes by using the Photoshop Pen Tool. You can select the Shape option from the upper left corner. I have given a hint in the earlier part of the article. You know where the Shape option is. Next to that, you will find the color option for the shape. There will be a total of five options. They are:
- Transparent (No Fill)
- Gradient Color
- Solid Color
- Custom Color
- Available swatches
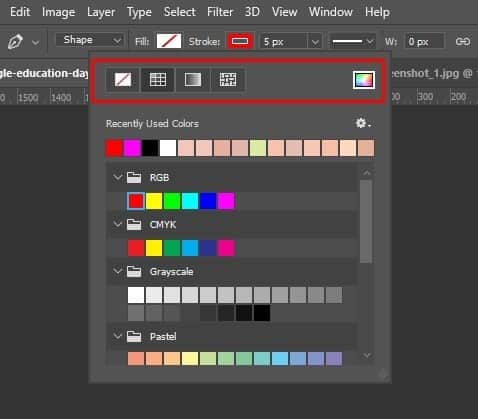
The outline of any shape is also changeable. Find the Stroke option right next to the Fill option. You can change the stroke color by clicking on that Stroke icon. In addition, you will find the option of changing the Stroke Width and Stroke Length from the option beside.
When all the settings procedures are correct, you can draw the shape. The shape can be drawn similarly to creating a clipping path using the Basic Pen Tool.
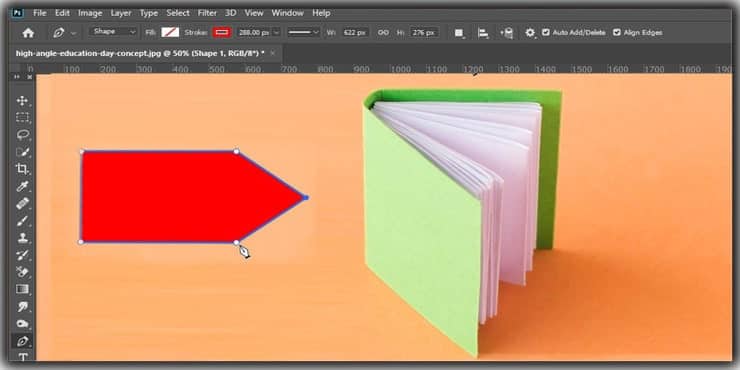
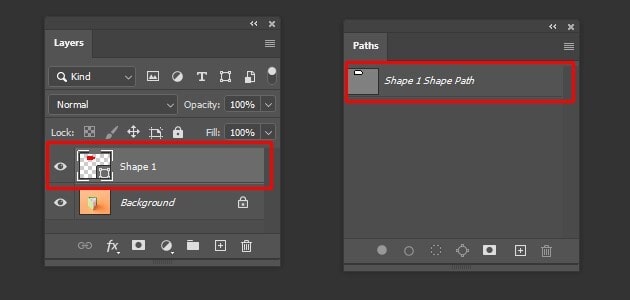
Once you create the shape with the Pen Tool, a Layer will be created on the Layer Panel with the shape you have drawn. At the same time, you will find A Shape Path in the Paths Panel.
How to Transform or Scale a Shape Path
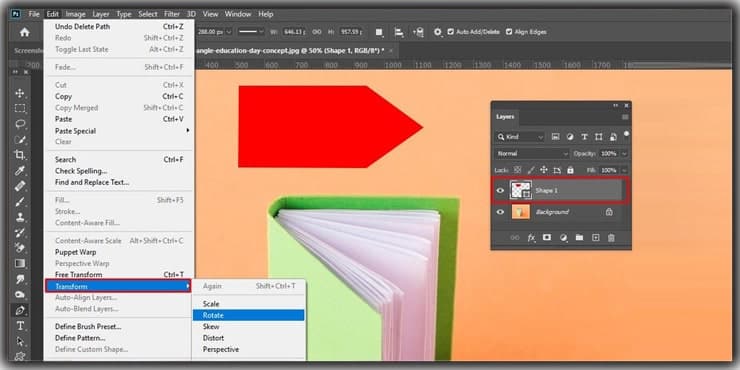
You can transform the shape that you created. You will see the “Edit” option from the menu bar at the top of the screen. Click on there. Another menu bar will appear from up to down. There will be an option named “Transform” on the lower half of that bar.
When you click there, you will see another menu bar. You will see the “Rotate” option on the first half of that bar. You can transform the shape from there.
The regular path is also transformable by using these functions. But that will never be necessary.
Can You Use a Stylus With Photoshop and the Pen Tool?
Usually, you use the touchpad or the mouse to work on Photoshop. This is because it might take time to master all the processes using a mouse or touchpad. A stylus can do the job in a better way, though.
You can tap to form the Anchor Points on the artboard. To create curved handles, you need to tap and drag the stylus. Please find all this information helpful. I will feel overwhelmed if you get any help from the article.
FAQs
Most selection tools — like the Magic Wand or Quick Selection — work by detecting color contrast and making educated guesses about edges. The Pen Tool puts you fully in control. Every anchor point is placed deliberately, which means complex edges, subtle curves, and tricky areas get handled with far greater precision than any automatic tool can manage.
Stick with the Basic Pen Tool first. It teaches you how anchor points and handles actually work, which is the foundation for everything else. The Freeform and Magnetic options might seem easier upfront, but they produce rougher paths that often need heavy correction. Learning the basics properly saves a lot of frustration down the road.
Handles are the small lines that extend from an anchor point when you click and drag while drawing. They control the curve of the path on either side of that point. Pulling them in different directions changes how smooth or sharp the curve turns out. Getting comfortable with handles is really the key to drawing clean, professional paths.
After drawing a curved segment, hold the Alt key (Option on Mac) and click the last anchor point. This removes the forward handle, which prevents the curve from carrying into the next segment. From there, your next click creates a straight line instead of continuing the curve.
Yes, and that’s one of the biggest advantages of the Pen Tool. You can go back and adjust any part of an existing path using the Direct Selection Tool — moving points, pulling handles, or reshaping curves entirely. Nothing is locked in until you decide it’s finished, so there’s no pressure to get it perfect on the first pass.
The Add Anchor Point Tool simply drops a new point onto an existing path without changing anything around it. The Convert Point Tool changes the nature of an existing point — turning a smooth curved point into a sharp corner, or the other way around. They’re both useful for fine-tuning paths but serve completely different purposes.
Many editors find a stylus more natural, especially for long, flowing paths where hand movement matters. That said, plenty of professionals work with a mouse just fine. It comes down to personal preference and practice. Whichever you use, the results depend far more on familiarity with the tool than the input device itself.
Last Words
Didn’t you find it so simple? So far, this article has covered a lot of information on the basics of the Pen tool in Adobe Photoshop.
Learning about the Pen tool, you will never struggle to work with it in the upcoming days. However, if you need clarification or more time to modify your images, get assistance from a photo editing service.
You may also read:

Salim Ahmed is the CEO of Graphic Experts India, with over 25 years of expertise in photo editing, clipping path, image retouching, and eCommerce image editing services.