This article provides a step-by-step Photoshop tutorial for adding a watermark to protect your photos online. You can learn how to add a Sami-transparent signature, text, or logo as watermarks to images and manually position them using Photoshop.
Digitalization has made it easier for people and photographers to share their creative works with the world. They usually share thousands of photos across various platforms. However, this has also made it challenging to safeguard such works from unlawful use.
Thankfully, one can add a watermark for photography to help protect their images. Adding watermarks on photos is an effective way to ensure that your unique art is always associated with you, regardless of where it ends up.
Making a watermark in Photoshop is an easy task. However, making something professional and beautiful takes work. Using Watermark is essential to brand and protect your online photos.
But there are a lot of digital thieves who steal pictures from the web & use them illegally. So to protect your valuable shots, watermarking is one of the oldest and most effective ways.
But it makes it harder for the theft to use your images. However, it is not possible to protect your images 100%. But prevention is always a better way to save your photography.
Why Create a Watermark for Photography?

Watermarking is a technique where you attach another relevant image logo or text to the photo. Thus, no one can use your photos without permission. There are lots of benefits to your pictures. They are discussing below-
Protect Valuable Shots
While uploading your shots on the web, saving them takes a lot of work. Some greedy people search in Google & choose some outstanding photos & keep doing their work. They use it for their purpose illegally. It takes your fame & your creativity, and that is unexpected.
But you can’t avoid digital platforms to cope with this competitive business field. Sharing your works on a digital platform is essential to grow your photography business. So, using a watermark for your photos will be helpful to protect.
It will be more complex to use than before. Watermarking makes it harder to reuse. Because they need to give time & effort to remove it before using it; otherwise, it will do your self-promotion.
Moreover, it discourages the theft of your images. According to statistics, it is proof that the ratio of stealing watermarking photos is lower than without watermarking.
Advertising
The theft always needs more time & dedication to remove your watermarking. Besides, some are also challenging to remove perfectly. So they use the photo with the watermark.
That performs indirect advertising of your photography business. It is also suitable for spreading your name quickly.

Effective Advice for Watermarking From Pros
A photography watermark gives your images protection. It is an easy way to protect your photos. But there are also some pros and cons. The cons may distract your valuable shots by attaching watermarks inaccurately.
So if you decide to add a watermark, consider the factors below.
Font & Style

Take some time to create your watermark. Then, do some research about your work to find out the contrasting watermark. You should find a consistent font style that focuses on your art. But if you go for default Photoshop fonts, it won’t attract the audience.
It is good to use your business logo with a signature. However, countless options are open for you, and you need to find the best option. That is fit for your shots. Your motive is to enhance the beauty of your photography. So, mark it in a way that can highlight your work.
Watermark Size
You should choose the watermark size considering your photograph size. You need to make it crystal clear. So that people can easily understand it. It will be challenging to read if you make it too small.

So, it is ideal to find out the appropriate size. That is not too small or too large. Your target is to select a size that can meet your requirements. Don’t choose it randomly. That can ruin your image beauty. People will feel bored with such images.
See below. The watermark looks odd. People won’t look at this image twice. So it just spoils your valuable work. Be careful in this step to generate a lucrative watermark.
Focus Point

Your focus point should be your photographic subject. If you add a watermark poorly, then it can grab the focus. So, your primary purpose will affect you.
At first glance, the audience sees your watermarking instead of your work. But, unfortunately, that can ruin the most important first impression. So it is essential to check so it won’t be a focal point.
Take some time to think carefully. You need to grab the audience’s eye on your art. So, fix the watermark position properly. That can meet your purpose perfectly.
How to Add Text Watermark to Photos in Photoshop
Watermarking your images is an effective strategy to protect them from unauthorized use. Learning how to use a watermark in Adobe Photoshop helps secure your ownership and promotes your brand in every image you share online.
Thus, learn how to add a custom watermark to photos, enabling you to create watermarked images with your design and style.
Whether you’re looking to protect a single image or watermark thousands of photos at once, Photoshop is a capable and adaptable tool. With this handy skill, you can easily do it and shield your images from unwelcome copying or misuse. signature
Here is the process to add a watermark to your photos. Follow this tutorial step by step. Hence, if you are a beginner at Photoshop, you should learn about A Beginner’s Guide to Photoshop CC.
Uploading the Image and Taking a New Layer
First, open Photoshop. Then Select File> Open > Choose your image. After opening the photograph, select Layer> New > Layer to create a New Layer for the watermark.
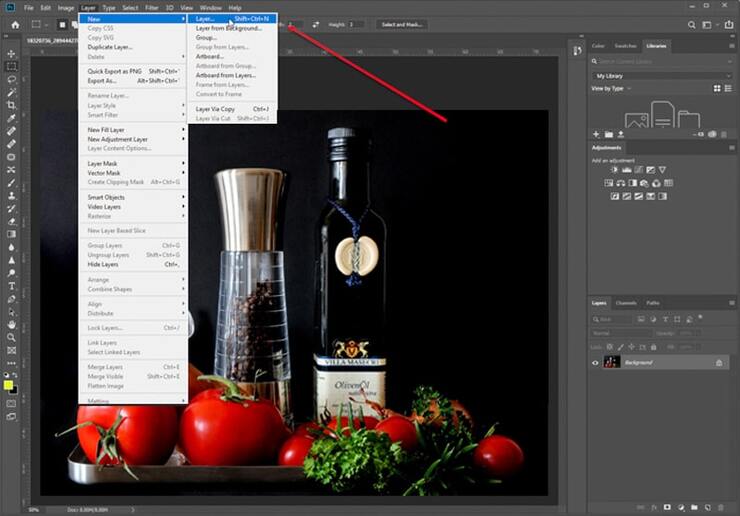
Name the new layer as watermarks or others according to your wish & click OK to save it.
Adding Text and Font Style
Now select the New layer. From the toolbar, choose the Text Tool. Next, you need to identify the accurate position to attach the watermark. After deciding on the correct position, draw a box with the pen tool.
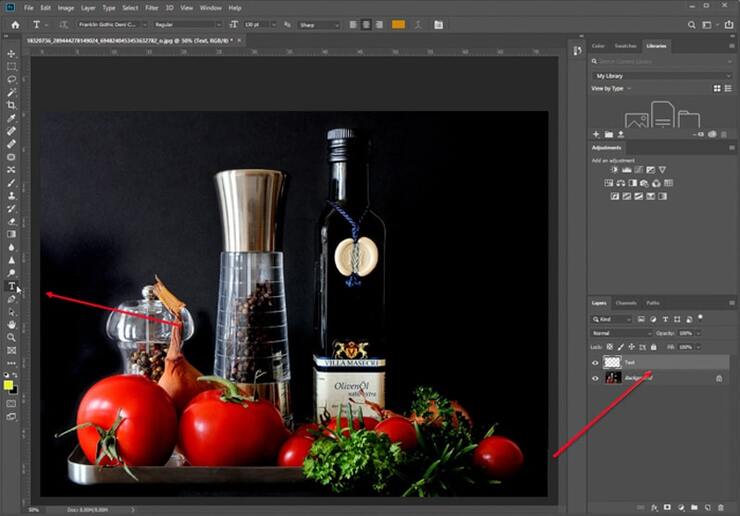
Now you can start writing. First, you should research your business objectives to find out compelling text. Then, you can add your business name or website address, etc.
Compare the font style with your photograph so that it will be contrasting. You can change the font style & font size from the above menu bar dropdown list. Then, play with the font to find the most beautiful one that can match your art.
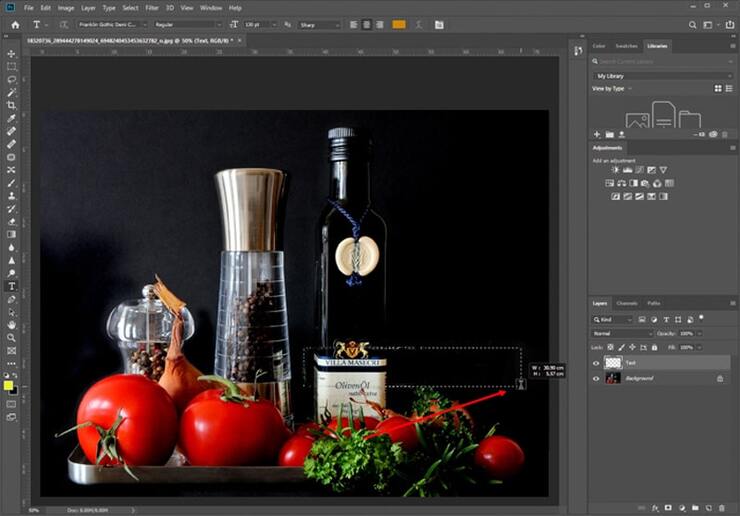
Font color is another essential point to make your watermarking perfect. If you use too much glossy color, it can grab the attraction. So you should avoid too many dark colors. Instead, use some soft color that helps you focus on the main image.
You can also modify the font size from the top menu bar easily. You should go for a legible size that is readable. Otherwise, It won’t be effective. Select the font size crucially to bring the best watermark design.
Styling Up Copyright Icon
You can add a copyright icon. It helps to discourage theft from using your photo. Besides, it makes people concerned about copyright laws.
You can attach the copyright icon easily. Just go to Google & type Copyright Icon and download it. Then paste it within the text area. It’s an easy one-step process, but it could be more efficient.
Because sometimes the background color won’t match your images. So you can use Photoshop’s built-in icon.
From the toolbar, Select Custom Shape Tool & select the Copyright Icon. You can enter “U” for quick selection.

Just drag it anywhere you want to place it.
The benefits of using this icon won’t affect your background color. Besides, you can change the icon color from the menu bar.
So it will easily match your text & blend with the background. You can also change the size of the icon according to your need. After releasing the mouse, if you need to reshape the icon, enter Ctrl +T. You can easily adjust the icon size.
Polishing Up Text to Make it Eye Catchy
After completing the text, if you want to modify it, then select the layer. Then, select Text Tool & see the top menu bar. Again, you can change it according to your need.

Suppose you want to replace the text, select it & Delete it. Now write your new text. If you’re going to change any portions, select only particular text. Then, choose your text style from the top menu according to your wish.
Place the Text in the Desired Place

Now select both text & icon layers by pressing shift. Right-click on the mouse & select merge layers. It will combine the text & icon layers. So you can easily reposition both layers at a time. It helps you to move the watermark to find out the best position.
Advanced Actions to Protecting the Focus

Here the main target is to keep the focus on your image. If the watermark becomes too attractive, then it is risky. It may spoil your primary purposes. So, to lighten it, you can adjust the opacity.
Select the watermark layer & find the Opacity option on the top. Reduce the opacity according to your needs. Don’t make it too light. Keep it readable but mild. Just move the slider to decrease the opacity.
A flat watermark can enlighten the beauty of your photograph. You can try some effects to make your image focus.
Now,
Right-click on the watermark layer & Select Blending. You will find a new popup window. Select Bevel & Emboss. You can adjust the effect by moving the slider & then clicking Ok.
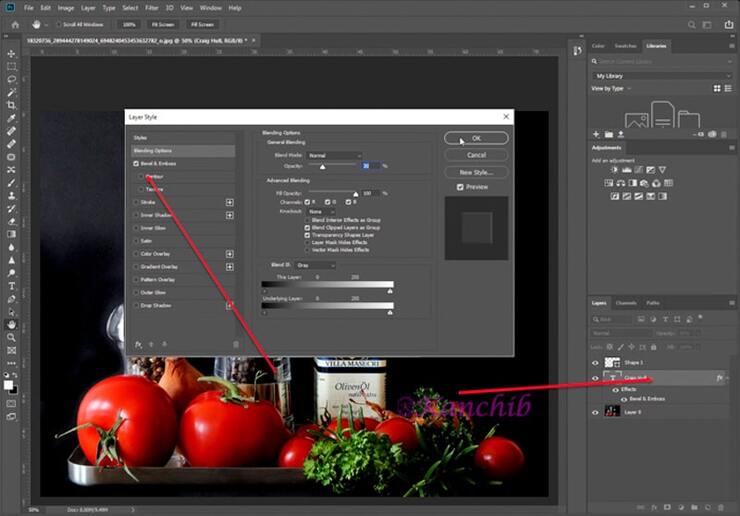
It helps you to make your image more attractive. Also, It makes watermarking more natural. So it won’t make your image distracting.
How to Watermark Photos Using Your Logo
You can also attach your business logo and use it as a transparent watermark for your photos. Attaching the logo is different. While you attach the logo, it won’t need to add text because it does your branding.
You need to have a transparent background logo file for attaching the logo. Name as png.
If you don’t have a transparent background file, you can Outsource Background Removal Services to get a factual background.
Uploading Logo and Adjusting Size
Then open Photoshop. Select File> Place Embedded> Choose your logo file to embed. After selecting, click on place.
You will find the logo too large. Don’t worry; drag your mouse & click on the corner to reduce the size.
Suppose you want to reduce the size in the same ratio press shift while adjusting the height. Then, it will resize the logo in the same ratio.
Placing it in Desired Location
After resizing the logo, you need to place it properly. Select the logo File & from the toolbar, select the move tool.
Now you can easily use your logo anywhere you want. But first, find out the best position that makes the image attractive.
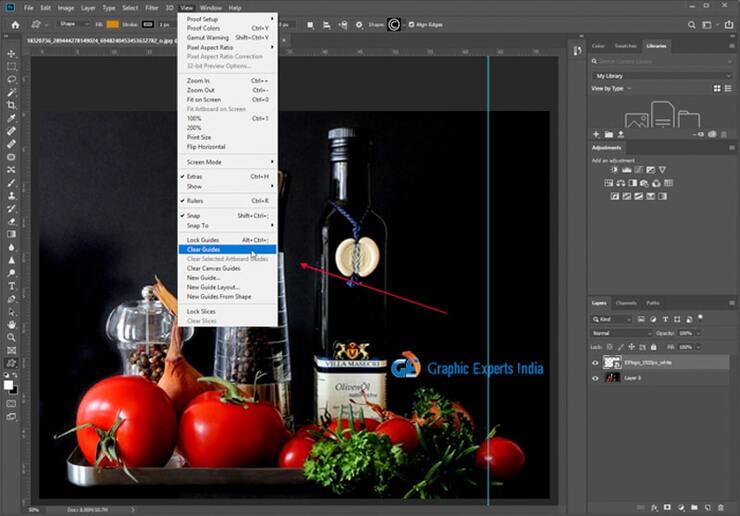
You must find the center point if you want to place it in the center position. Select View> New Guide.
You will get a new popup window. From that, Choose Vertical & Enter the position as 50%. Then Press Ok.

From the toolbar, select the move tool & select the logo File to reposition it on the center point.
Now remove the guideline. Just select View > Clear Guides.
Your watermark is ready. You just finished your work! Now save the File. And it comes out like this.
Add Watermark to Photo Using Custom Photoshop Brush Tool
This method is for you if you are looking for the easiest & super fast watermarking process. With this technique, you can make your photographic watermark within a minute. You can also convert this with both text or logo watermark.
After creating your custom brush, it’s one-step work to attach your watermark & reposition it crucially.
How you can make a custom brush to use as a unique watermark for your images is discussed below-
Using Custom Brush to Make Professional Watermark

Suppose here I take a logo file to apply the custom brush. You need to check that your file resolution is more than 500px. Low-quality images can result in a poor watermark. You don’t take the risk of attaching a poor one.
Another thing you need to consider is that your logo file has a solid white background. Suppose you don’t have your logo with a solid white background.
At first, outsource Remove Background Services to get a factual background. Make minor adjustments in resolution & grayscale before transforming it into a brush.
Open Your Logo Image
Now open your logo image on Photoshop. Next, select Edit->Define Brush Preset.

Give your file name according to your wish. For example, you can name it a watermark.

That is the most appropriate option. Also, you may need to add multiple watermarks. In that case, you can rename it as a custom watermark 1. After entering the name, click on OK to save it. Now your custom brush is ready.
Applying Brush Tool to Make A Photography Watermark
Now it comes to applying a custom brush to your image. First, open Your Image in Photoshop. Then, from the toolbar, select the brush tool.
For quick selection, you can enter B to select the Brush tool. Next, you should choose the watermark brush from the brush list.

You can select the brush type, color, & size to paint efficiently. Now you can click anywhere on the image to place it.
You can also modify the opacity of your custom brush from the top menu bar. So now your logo is working as a custom brush. You can paint it according to your needs.
You can also repeat the process to convert the text watermark to a custom brush. However, you don’t need to repeat custom brush-making steps to use your watermark brush in other images. Photoshop will automatically save your custom brush.
You can use it at any time for any image. The benefit of converting to a custom brush is that you can grab the brush & attach a watermark. It’s one-second work.
Common Mistakes To Make A Watermark Your Images
Watermarking creates a risk of making your image distracting.
- There is a high chance of grabbing the focus from the subject. It decreases the importance of your creative art. So, you need to take the utmost care to avoid poor watermarks. You should add a consistent & mild watermark.
- Some accessible text removal is not challenging. It will only work if you apply tricks like effects. So, watermarking will be effective if & only if you are strategic.
- A great lucrative watermark takes some time & dedication to match it with your shots. So compare your timing value with the benefits you gain. So, you can also take help from a Photoshop services provider to make it perfect. That can save valuable time & you can be more productive.
- But it can be a different watermark than you can apply. Because the theme of your photoshoots may vary. With the theme, you need to adjust it. So, it is time-consuming work. That can take energy & reduce your productivity.
Conclusion
As a photographer, sharing your photo on digital platforms is essential. It can bring a huge opportunity for you.
But it’s not acceptable to snatch your dream from a thief. So, it is necessary to know how to attach an effective one.
Here I share three ways with tips & tricks to make your photographic watermarks perfect & standard. That helps you to learn how to make a photography watermark.
To save time, you can convert it into a custom brush. But though in different scenarios, you need to recreate.
To protect your valuable images, give some time to make the watermark template lucrative. It is not wise to ruin the image of beauty with a poor one.
So follow these steps carefully to avoid mistakes & enhance the beauty of your pictures.
FAQs
They don’t provide absolute protection, but they make theft significantly less appealing. Removing a well-placed watermark requires time, skill, and effort — most opportunistic image thieves simply move on to easier targets. Even when someone uses a watermarked image without permission, your name or logo remains attached, effectively turning the theft into unintentional advertising for your work.
Avoid placing it directly over the main subject, as this frustrates viewers and undermines the impact of your work. Corner placements are common but easier to crop out. A position that overlaps both the subject and background slightly makes removal more difficult without being visually intrusive. The goal is visible enough to deter misuse but subtle enough that it doesn’t compete with the image itself.
There’s no universal answer, but somewhere between 20% and 40% opacity tends to balance visibility with subtlety for most images. Too transparent and it becomes unreadable, defeating its protective purpose. Too opaque and it becomes the first thing viewers notice rather than your actual photography. Adjusting opacity based on the specific image — lighter on dark backgrounds, slightly more visible on busy scenes — produces the most consistent results.
Both serve the purpose, but they work differently. A text watermark — typically your name or website — builds name recognition directly. A logo watermark strengthens visual brand identity, particularly if your logo is already recognizable in your market. Using a combination of both, merged into a single layer, covers both bases and gives viewers multiple ways to find and remember you.
Avoid default system fonts that look generic and forgettable. Something that reflects your photography style — clean and minimal for commercial work, more expressive for artistic photography — creates a more cohesive impression. Size should be legible without dominating the image. If it takes more than a second to read, it’s too small. If it’s the first thing you see when looking at the photo, it’s too large.
Yes, when using your logo as a watermark. A logo saved with a white or colored background will produce a visible box around it that looks unprofessional against most photo backgrounds. A PNG file with a transparent background allows the logo to sit cleanly over any image without any unwanted border. If your current logo file only has a solid background, having the background professionally removed before using it as a watermark is well worth the effort.
You may read:

Salim Ahmed is the CEO of Graphic Experts India, with over 25 years of expertise in photo editing, clipping path, image retouching, and eCommerce image editing services.