If you are a professional photographer or a freelance photo editor, Adobe is the top software company and it’s Lightroom has everything you need. You need to learn how to use Lightroom CC.
Lightroom is undoubtedly one of the best software in the creative cloud for RAW photo editing, and organizing tools. Learning the basics of Lightroom allows you everything you need to edit, moreover, batch edits thousands of photos into Lightroom.
Using presets of Photoshop and Lightroom can help beginners and professionals to create a Lightroom catalog and make photos stunning.
If you are a beginner, you can take online Lightroom courses for learning Lightroom and Photoshop. But this effective tutorial on “How to Use Lightroom” will teach you every Lightroom feature and Lightroom editing.
In this article, I have provided every bit of information, tips, and tricks that will surely ease your journey to using this application. On the other hand, to do so, I have picked the latest version, and illustrated things.
Don’t disappoint if you use an older version. Because the things you’re about to learn are independent of version or update.
Adobe Lightroom and Photoshop
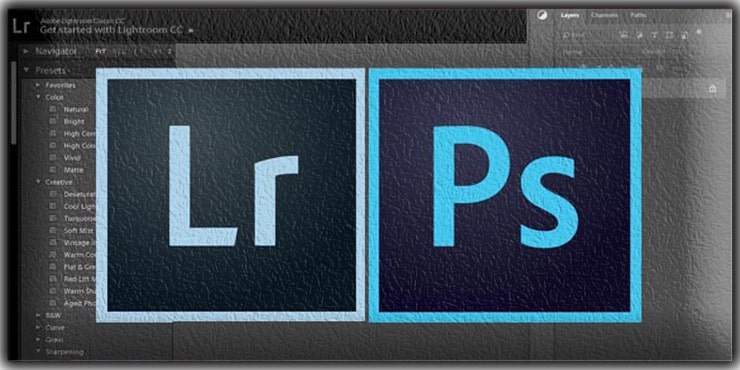
No doubt, Adobe Photoshop is the king of image editing software. But, when Adobe released it, everyone wondered why Adobe released Lightroom. Are they planning to come to an end with Adobe?
But the fact is, Adobe never planned to stop releasing newer versions of Photoshop with upgraded features and functions. Instead, they released Adobe Lightroom CC for three main reasons – sorting, exporting, and post-processing your photo.
Since Adobe Photoshop was already a myth and full of functions and features, adding more features will make it a sophisticated software. So, they released Lightroom.
However, Lightroom workflow and Lightroom presets have become popular among photographers and customers over the last few years. Its user interface is easy to use. In a blink of an eye, you can edit your photos like a pro.
This details Lightroom tutorial will guide you to use Adobe Lightroom Classic CC.
Why Utilize Lightroom?
Lightroom is a powerful software that assists users in editing photos and managing files efficiently. And most importantly, you can organize images into folders as required.
Following a no-nonsense layout, it will allow you to manipulate images. Interestingly, using this software, you can manage photos quickly and proficiently.
Let me give an example.
You have taken an image of a darker squirrel, and you want to make it lighter when manipulating the image with it.
It will not work in the main file; it will not rename the file; no changes will happen to the original file.
It is non-destructive editing software. Moreover, you are changing the preview or thumbnail version of the original image.
Also, once you finish working with the image, you can “save as” a new image in this software.
What Should You Consider Using Lightroom?
This is another top question that many people ask. It might not fulfill your expectations if you consider it another image editing software. And you will find it as a different software than Photoshop.
First, when you change any of your images using it, that change will show up only in this software.
What is the meaning of this?
Let’s say; you have increased the brightness of an image. However, you may be surprised to realize that opening the image in any other software will not see a brighter look than usual. The fact is, the original file remains untouched.
You can’t disable this option since this feature is built-in.
Now, the next question is, if the edited images are only visible in this software, then why are professionals using them?
This feature has many advantages.
However, you can see edited photographs using any other software. How? I believe some of you have already got the answer – exports.
When you do any editing, these will show up only in this app. And when you export an image – all the edits will come into the photo you have done.
After doing a lot of edits of an image using this Adobe software to see them in any other software, the fix is pretty straightforward.
Re-open Lightroom, click on the mouse’s right button, Export, to do it depending on your requirement.
Also, your copy will find all the edits in this image.
Now, why is this process better than editing the original image?
There are many reasons behind it, but the most practical reason is non-destructive editing. This means no changes are happening in your original photo. So the actual image stays without any modifications.
The Lightroom makes it terrible to disintegrate anything outside of repairs unintentionally.
For other photo editing software, you can’t do the same thing. For example, you opened an image, cropped it, saved it, and exited Photoshop. Here, your original image gets cropped permanently.
Why beginner and Professional Photographers Use Adobe Lightroom
Lightroom is non-destructive software that never works on the original images. And this is the best feature for the best Lightroom users and photographers.
Ease Photo Organizing
The best feature of Adobe Lightroom is your photos can be sorted and organized with the help of this software.
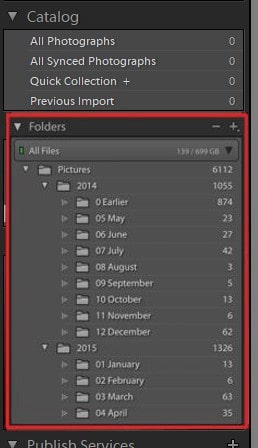
Whenever you import an image in the application from the computer, you will also see the exact location of the file.
You will see this information on the left side of the application window. The below image is for your easy understanding.
Another thing is images on your computer will not automatically show in the application. However, it will show if you add them to Lightroom.
You can do it smoothly even if you need to add a whole folder.
Not only this feature but also some other features available that will amaze you for sure.
Let’s say,
You liked a particular image and want to find it later when necessary. So, you want to mark it so you can find it effortlessly in the future.
Following several ways you can do this.
You can flag the image, give a 5-star rating, or add the image to the “Best Photo” collection, and many more options are available to accomplish this task.
Adobe Lightroom is undoubtedly one of the best image editors a photographer can rely on.
Ability to Edit Raw Photos
Adobe Lightroom is not all about sorting your images; you can also edit your pictures as required.
Although it doesn’t contain a wide range of editing features and functions similar to Adobe Photoshop or other software, that doesn’t mean it has poor features and services. The truth is, it will satisfy you with all its striking features.
Besides, many photographers are out there who love the photo-processing functions of Lightroom and use it for post-processing functions. Even a person can do graphic design with it.
Now one question popped up in your mind. What are the post-processing features it has?
It can cover color adjustment, contrast, brightness control, and other adjustments in an image. Additionally, you can do local edits too.
In a nutshell, it is an excellent option to edit your images. Please don’t assume it is seasonal software and will assist you very few times. You can use this software as your primary tool.
Photo Exporting Directly from Devices
You may have already got an idea of exporting your images.
Such as, you need to send many images to one of your friends. We all know email services like Gmail have limitations on file size – so while sending, you may need to change the resolution of your images. This way, the quality of your pictures is getting disturbed.
At this point, you have to shrink the images that you will send. For example, you can send 1000-pixel photos at 20% compression instead of 4000-pixel images at 0%.
And it is an excellent performer at this type of task. You can easily resize your photo. Also, you can effortlessly export photos in any setting.
Don’t get worried, thinking your original image gets deleted. Because when you export an image to Lightroom with a specific size, it is just a copy of that image. This image will receive a new name; you can send, modify, or delete the images as needed without affecting the original image.
What is a Lightroom Catalog?
If you plan to utilize Lightroom as your editing software, you might have heard of “Catalog.” Yes, This software is genuinely dependent on its catalog.
What is the meaning of that?
I have shared the answer to this question in the previous section – it never works with the original photos.
Whatever edits you do, balance brightness, white balance, adjust contrast, provide a 5-star rating to the image, flag it, etc. – every time your edited images are saved somewhere on your computer, no change happens to the original images.
So where does it get saved, then?
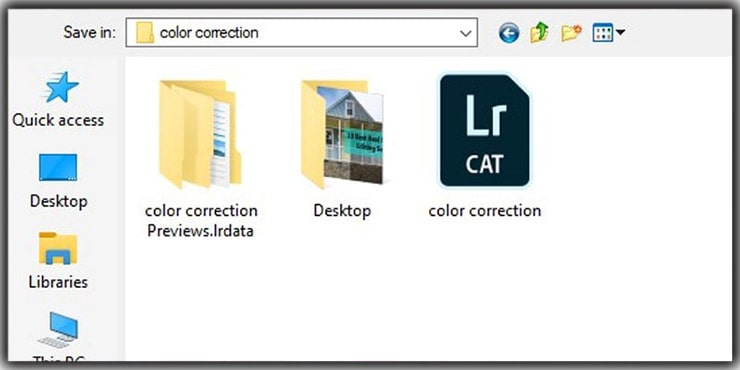
Lightroom catalog is a file where you will find every change and adjustment of your image. And the great news is it will not waste much space on your computer. Thousands of adjusted photos will take only 300MB of space. Great!
It will become more complicated if you want to dive deep. You can use the same catalog even if you can use several by sending images to your friends or on several computers.
The good news is; this option can be used if only you need it. First, you must learn how to add photos. The images will not be saved by default. You need to save them.
How to Import Photos in Lightroom?
Follow the below procedure to add an image to Lightroom. Click on the Import Dialogue > Next Below. The process is complete.
Just after opening a photo in Lightroom, you will find a box named “Import..” and the box is placed at the left side bottom of the window.
Once you click on it, an Import Dialogue will appear.
And when you need to add an image to Lightroom for manipulating or organizing purposes, you must work through the Import Dialogue box.
You may need to open the Dialogue box whenever you finish a photoshoot and store photos on your computer.
A lot of necessary options are available in the Dialogue box. Let’s discuss the essential features.
The Layout of Lightroom – Overview & How-to
The Left-hand Tab
The left-hand tab is the easiest part of this application. You will find all the image folders on your computer in this area. You can easily open an image in the app window by simply giving a right-click on the folder.
Discussing many things in this section is unnecessary because it is the most straightforward area. But one thing will amaze you.
You will not only be able to see images placed on your computer, but you will also be able to see images located on your memory card. In this case, you must connect the memory card to your computer.
The Top Portion
You will find a few more fantastic options at the top portion of the Lightroom. You can import any images in the catalog following four different methods: “Copy,” “Add,” “Move,” and “Copy as DNG.” Each option is unique, and its characteristics are also different.
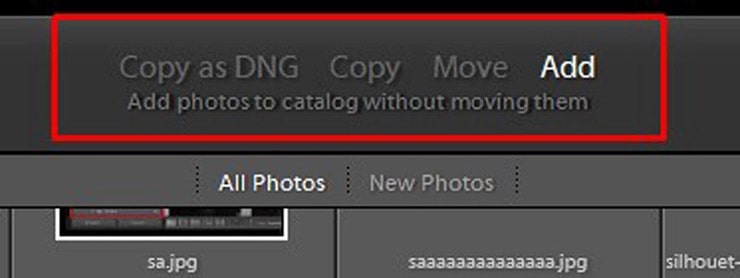
Sometimes we don’t want to add photos to our computer from a friend’s flash drive and work directly from their flash drive location. The copy is the best option to do this action. Following this method, you don’t need to add an image; you can duplicate it elsewhere.
If moving the original file of an image to a new location is unnecessary, and you only want to display the image when Lightroom opens, Add is a great choice in this regard. It is the best option if your photo is already placed in the right place on your computer.
When you want to add an image to Lightroom, which is placed in the wrong place on your computer, Move will assist you in doing so.
For example, let’s say you have an image placed on your desktop, and you want to see the same image under Images > 2020 > May, move the image to the correct location, and at the same time, command I to add the image.
Copy as DNG is the least convenient feature for many photographers. But it is a handy feature when you want two versions of the same photo. You can maintain one version on your memory card and another on your computer by following the Copy as DNG feature.
You may think of using the Move feature now, but Copy as DNG will be the best solution.
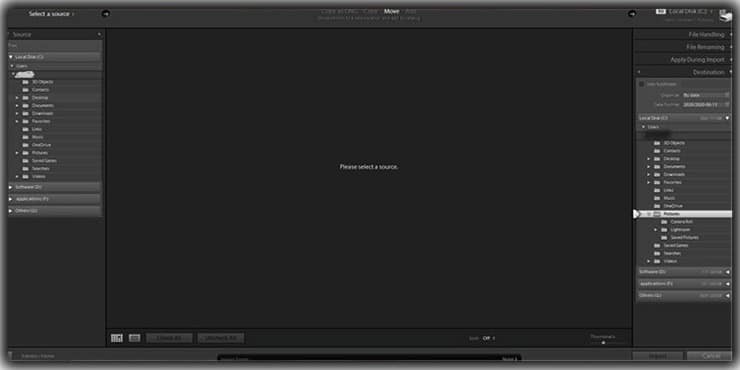
The Right-hand Tab
Since you are a beginner, the right-hand tab will overwhelm you with all its features in this area.
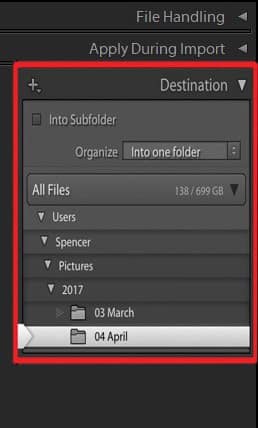
The primary responsibility of the right-hand tab is to show the correct destination of your copied, added, moved, or copied as DNG images where they can take their place.
Other than it, balanced options depend on you. For example, you can provide a new name to the files you are attaching, which may be effective for the organization.
The “Applying to Develop” setting is also possible for the image you added – say, applying noise reduction and sharpness to any predefined photos. Additionally, you can create a backup of every photo you add by copying them.
The Bottom Bar
The bottom bar is the last portion of the Import dialogue. “Import Preset” is the central part of this section. This is what allows you to access all the newly selected settings.
Excluding these, your primary task is finished after you add all the nominated images. After that, whenever you need to organize or edit your photos, hover your mouse on the “Import” button at the right-bottom corner of your screen.
And you are ready to proceed to the next step.
How to Organize Images in Lightroom
This section gives you a clear understanding of how to organize Images in Lightroom. Below are the most basic rules for organizing your images in Lightroom. Finding old photos is always troublesome, especially if it was taken at an event several months ago.
Stars- A Feature that Eases Your Digital Photography Career
This option is similar to many other photo editing software. For example, you can rate your edited photos from 1 – 5 stars; if you dislike your selected image, you can keep it unrated.
You can give the star rating the following two simple steps.
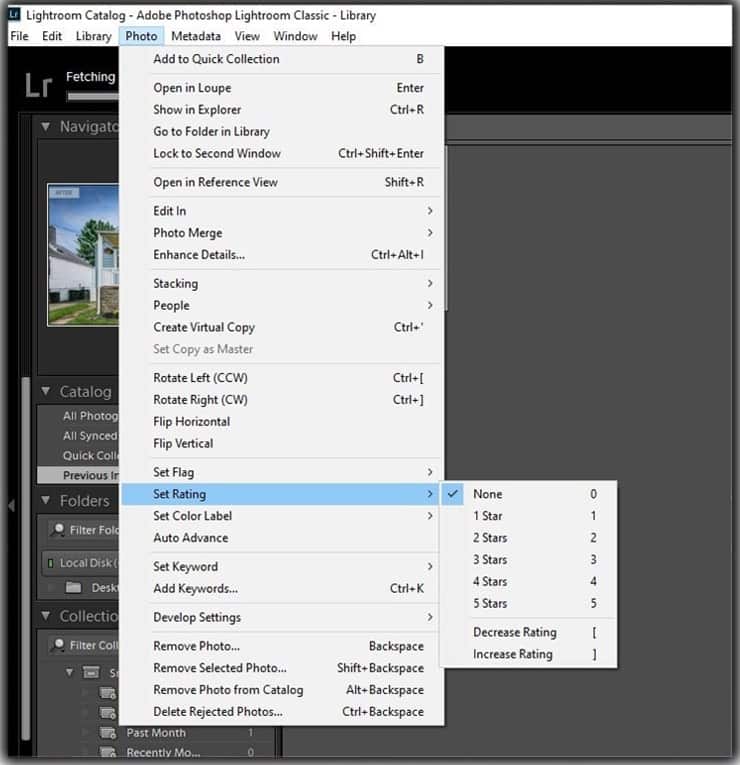
The simplest way to do this is to press the number on your keyboard with the stars you want to give.
Also, you can do the same thing following.
Photo > Set Rating > Five Star
You can choose your rating, too, from the selected option.
Flags – Allows you to Pick or Reject Photos.
Organizing a photo with the Flag option is similar to the Star rating but doesn’t contain many options.
PICK and REJECT are the two options on the Flags. So if you like a photo, you should give it a PICK, and for any unwanted image, choose REJECT.
And needless to say, if you don’t want to provide any flag to any of your images, leave it unflagged.
Simply pressing “P” can give the PICK flag, and pressing the “X” button, will reject the image.
Color Labels – Another Way to Organize Your Photo
Providing a “color label” is another way to organize photos.
This option is not doing anything in the images. There is no additional fact in this color labels options similar to Star or Flags.
This option allows you to identify your favorite photos through an organizing process.
For instance, you can choose the Red color to create a separate group of photos. And in the future, you can adjust them as per your need.
Another example is picking a blue color and keeping all your selected photos where the bride and groom are present. You can choose any color and follow the color labels option to organize your images.
You can press the 6,7,8 and 9 numbering buttons to use a color label option on your computer keyboard.
Keywords – The Most Useful Way to Find Photos
This is another best option to find your images in the future without any trouble. Pick a Keyword and use it for the photo-organizing process.
To describe this feature more quickly – you can organize your photo and select a keyword that will assist you in finding the images rapidly when you require them.
So, how will you give a keyword to any photo?
Well, firstly, you need to go to the Library Module first. You will find a pop-out tab on the right side with an option named “keywording.” Click on the options and type any keyword that comes to your mind. If you want to give several keywords, separate them with a comma.
This option is most accessible to photographers from the event and wedding sectors. However, whether you use this option or not, you can check if it is worth your work.
Filter Bar – Advance Photo Organizing Options
Every time you put a label on your photo, it becomes easier to find the picture in the future. The primary tool that will assist you in finding your images is Filter Bar.
The important thing is the filter bar will allow you to sort images following any option mentioned above. It is a thin gray bar placed at the top of your screen. If you cannot locate it, press the keyboard “\” button or hover your mouse to view> Show Filter Bar in the Menu option.
Let’s say you are searching for an image and don’t have that much detailed information to find the image.
Don’t worry. Even if you can remember any information related to the image such as photo capturing month, ISO value, any sign or part name of the picture – following this information, you can narrow down your list significantly by following the Filter Bar option.
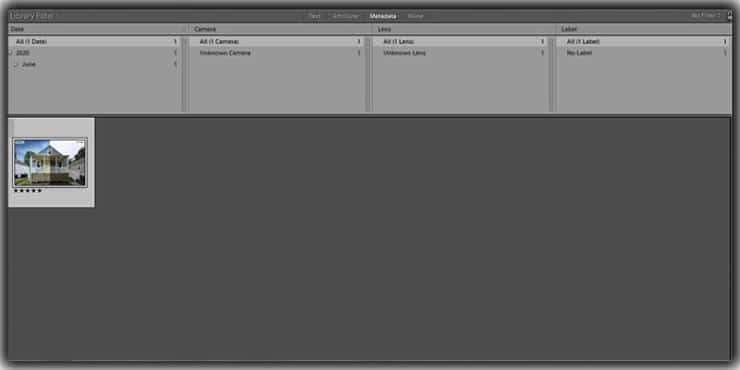
For instance, you took an image with your NIKON d7200 camera and gave it a 5-star 1-year back. Now you are unable to find the picture anywhere. Go to the “All Photographs” option placed on the top-left corner of the Library Module tab, click on the Filter bar, and look for the image.
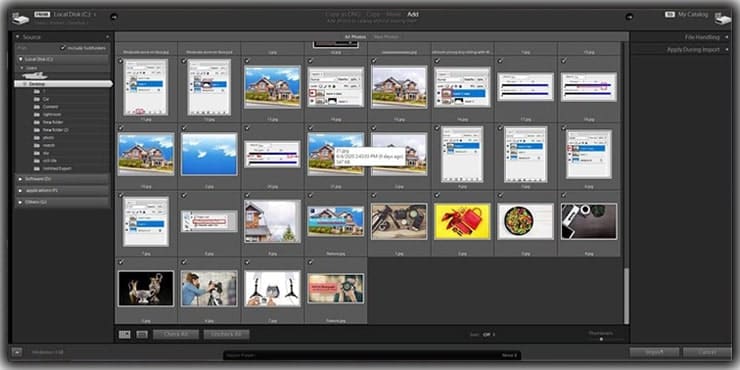
Look at the example below, where I can narrow the search option to 369 photos using the filter bar.
It is a great option to find out any missing images. No images can escape from you if you know how to use this filter bar option.
Adding Images to Groups – Grouping Similar Photos
“Collections” is a great option to organize your photos. Many professionals appreciated this option because of its effectiveness in managing images.
Let me tell you the definition of Lightroom collections.
In easy words, the collection is a process of organizing images similar to the file structure of our computer. The unique thing is you can list down a single image to many collections without creating any trouble.

For example, I have an image on my computer hard drive at Nikon > Photos > 2018 > 02 March.
Now I want to store the same photo in the folder “Best Portrait Images” in a folder named “For Landscape Photography” and in a folder named “Printing Images.”
When I need to save the same image on my computer, I need to copy it several times, and the hard drive will take much space to store the image.
Also, if I modify the image anytime I do a modification, the other copies will remain unchanged. And to fix this apparent problem, Lightroom is the option.
Now, I have a photo that I want to store on my hard drive at Nikon > Photos > 2018 > 02 March. You will find it in the left-hand Library Module bar in the application.
At the same time, I want to add the photo to the “Best Portrait Images”> “For Landscape Photography”> “Printing Images” folder.
When you use this option of Lightroom without changing the file location, the same image will be duplicated to another folder.
The best thing about this option is that you are not duplicating the original images whenever you add them to any collections.
A photo in a collection effectively takes the same amount of space as a collection of 5, 12, or 50! And whenever you make any changes to any of the photos, the changes or edits will be visible to other images.
This is how photos should be organized correctly.
Virtual Copies – Allows Storing Several versions of a Photo.
Are you looking for a way to edit a photo following several methods? For instance, how will you do so if you want to store an image in both black and white color?
This application is much simpler: follow “Virtual Copies.”
Virtual copies are just like copying an image to your hard drive, only in Lightroom, and it doesn’t double the space.
Virtual copies are an efficient method to make several adjustments to the same photo, and the storage penalty will surely not happen.
However, be careful about storing different virtual copies of your images. You can quickly lose your virtual copies because you are blind. Which one is the most updated?
Keep virtual copies of those images that are different from the original ones. This way, the chance of losing any photos gets minimized.
Smart Previews
If you use an external hard drive/ SD Card to save your images and once you remove the hard drive from your computer, those images will still be available in Lightroom.
But those images will appear with low resolution, and you will find an exclamation mark at the top right corner, which means it is confused about the picture.
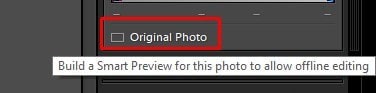
In the latest versions, Adobe has an innovative idea so that you can use these images following a helpful method: Smart Previews.
A smart preview is an option where a photo preview performs as an image in itself.
You can adjust the photo, reorganize it if necessary, and do many other things without a standard preview option.
Smart previews will not do any damage to your original image. They appear with lower resolution and are stored in the Lightroom.
The advantage of using smart preview is that you can upgrade a smart preview image precisely like a regular one. Furthermore, once you connect the external hard drive, all these edits will be backed up to the photos as if nothing had been adjusted.
Photo Editing in Lightroom – How to
Photo Editing in Lightroom is one of the crucial features. The thumb rule of Lightroom photo editing is; your images need to look natural after post-processing work. Anyone who recognizes your images as fake will not react positively.
At this point, Lightroom will give you the right solution. The processing features will not give you any fake or faux photos.
As I stated, it is not an advanced software similar to Photoshop. But it has all the necessary options to make your image gorgeous.
Let’s have a look at a few Photo editing features of Lightroom.
The Develop Sliders
The post-processing slider is placed at the right sidebar of the Lightroom window.
You can adjust the brightness, contrast, saturation, and many other global edits using this slider. Remember, the developer slider will modify the whole image, not a specific portion of any photo.
You need to play around with the sliders to learn more about them. Once you play with it, you will clearly know its working procedure.
Adjusting the local areas
Lightroom has a bunch of local adjustment features for your photos and those are significantly helpful. For example, let’s say; you want to highlight a specific area of your photos. The best solution is to increase the brightness of that area using the adjustments.
However, the adjustment feature varies from version to version. However, you will find five types of adjustments within Lightroom.
Find details of every adjustment below.
Spot Removal
Spot Removal is one of the best features of Lightroom. So many photographs are there which have some dark spots in them. And except for those dark spots, the whole image looks fantastic. Now you want to remove those dark spots.
Here, you need to use the spot removal tool. For example, find the image below, where some unwanted dark spots in different areas damage the image’s appeal.
Firstly, zoom in on the image by pressing “Z.” Or you can go to the left-hand tab and select “Navigator.” From there, choose navigation as per your requirement.
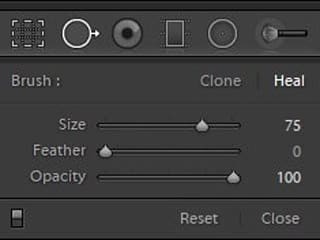
Two options are available in the spot removal tool: one is “clone,” and the other one is “heal.”
Both options work to replace the pixel of the spotted area taking pixels from other portions of the image.
If you pick the “clone” option, it will look for the exact pixel from other areas and replace the spotted areas pixel.
On the other hand, the “heal” option works more precisely to remove the spot from the image. It will look at the algorithms of the spotted areas, look for similar pixels, and replace the spotted area with the best pixels.
The option “heal” will always give you a better result than “clone.” But for hard corners, “heal” will provide you with inconsistent performance, and at this point, “clone” is the best solution.
Correcting the Red Eye
Sometimes, the red-eye is a common problem for those who take a picture using the on-camera flash option. This option will support you in correcting the red eyes of your subject.
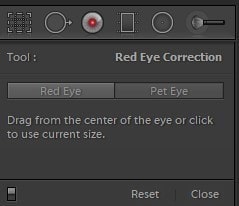
It doesn’t require much explanation. However, one important note you should keep in mind is that while correcting the red-eye, don’t forget to zoom the image. It will make your work more comfortable than your expectation.
Graduated Filter
If you are looking for an option to adjust a specific area of your photo without hampering the other areas, this option will be a wise choice.
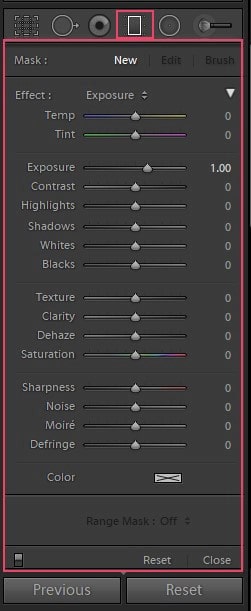
For this exact reason, the graduated filter is a great tool. This tool can adjust all the standard settings – brightness, contrast, saturation, and many others- but only a specific portion of an image.
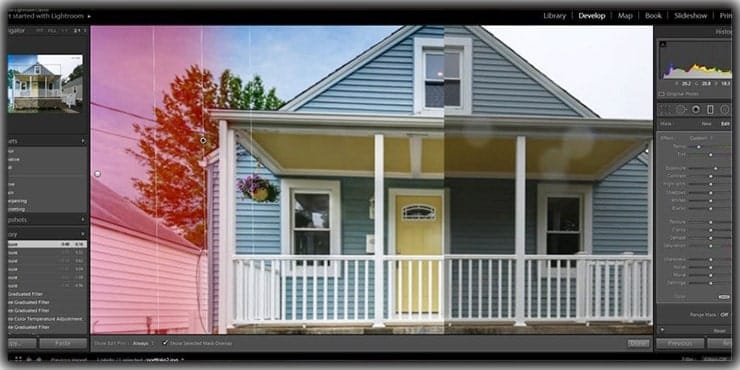
Below is an example where I have changed the brightness of a specific part of an image. In addition, I used the Graduated filter on the left-hand side of the picture. Finally, the image received an unnatural look.
Also, if you want to determine if your combination is setting a goal, here is a helpful tip: Press the “O” button. You will highlight the area of your gradient in red, which makes the process relatively straightforward.
Note that all versions of Lightroom don’t have this option available. However, this is a valuable feature if your application consists of this option.
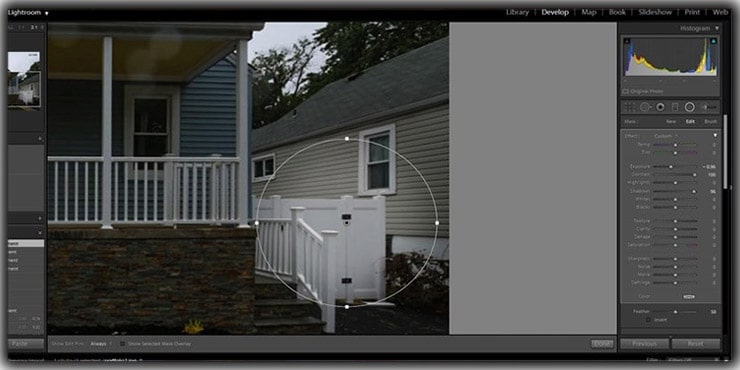
Radial Filter
Differences are few between Graduated Filter and Radial Filter.
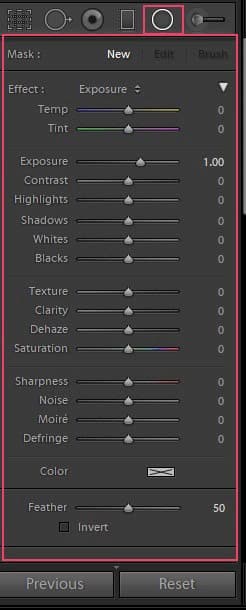
This filter is oval-shaped and can be inverted. If you choose an area to work with, the radial filter will change outside or inside the oval-shaped area. Check or uncheck the “invert mask” option to switch between the options.
Adjustment Brush
It is the last option of Lightroom Local Adjustment.
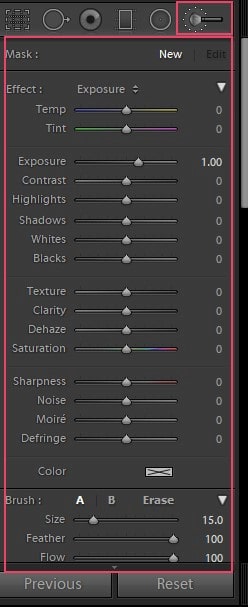
Working with an adjustment brush is easy, but the chance of misuse is high. First, stop clicking the “auto mask” option when working with a brush tool. So what does the auto mask do?
An auto mask finds the harsh edges in your photo and then closes/starts the border of your adjustment so you don’t overdo it.
Initially, it is good. But it is a bad idea at all. If the “auto mask” option is turned on accidentally. Moreover, if you are working on something like a cloud, the clouds look weird on the whole magnifier.
Because the brush adjustment you wanted to apply works on some pixels, not others. The final result will give you granular and splotchy sections that look weird.
Moreover, you will find halos around your image subject if you don’t show carefulness while using the adjustment brush. Therefore, be attentive when working with a brush so your edited image always looks natural.
If you pay attention to working with the adjustment brush, you will find it the most valuable and flexible tool in Lightroom.
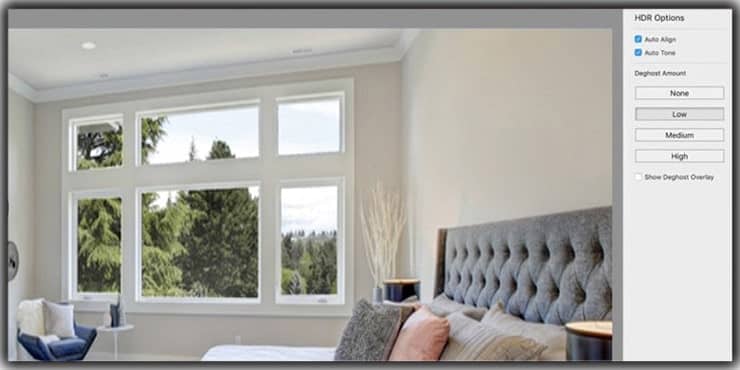
Merging Photo
Lightroom 6 Classic consists of this Merging photo option.
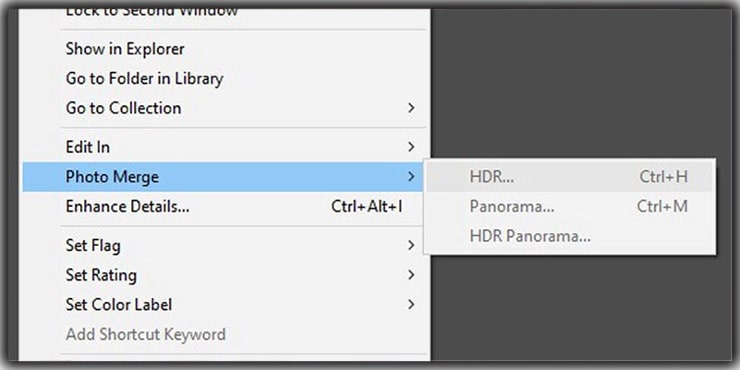
Firstly, you must highlight all photos in the Grid view area you plan to merge. To do this, press and hold the Shift button, then click on the first and last image you want to merge.
Then click the right button, select the Photo Merge option, and pick HDR or Panorama as per your need. A dialog box will pop up during both selections, where you will find a few other options.
Below is an HDR panel
Exporting Images in Lightroom
We are at the last stage of Lightroom guidelines, and it is photo exporting. To learn more about this feature, you need to enter Export Dialogue.
Learning this step is not a challenging task.
To begin the process, at the same time, click on a single image or several images. Even by pressing “A,” you can highlight every photo in any folder.
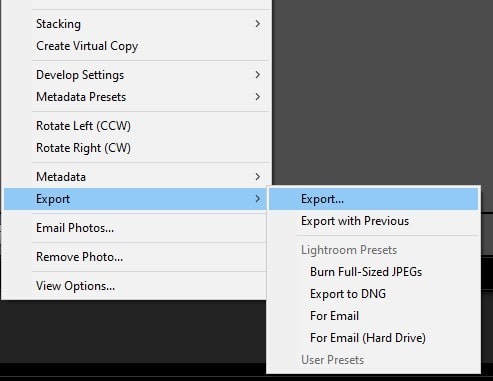
Then, click on the right button, and select Export > Export. A dialog box will appear.
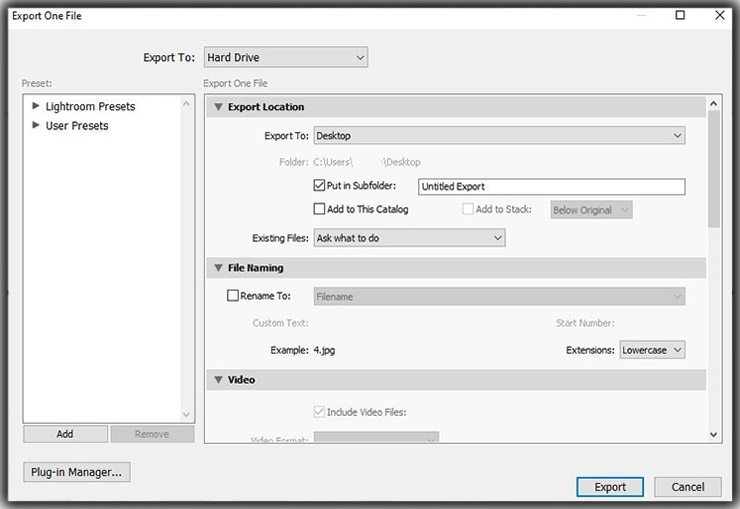
All these settings are self-explanatory. For example, how would you like to see the longest edge of your image? Whatever is your required pixel, select it. And if you need to compress the image slightly to JPEG, select JPEG with 80% quality.
Here, you need to note down a few points.
First, underneath the “Image Sizing” tab, if “pixel” is your dimension unit, the “resolution” option has nothing to do with this point.
Whether you pick 10 PPI, 80 PPI, or 500 PPI, the digital image will be 100% identical and displayed on full screen. If you choose inches or mm instead of pixels, this setting will only matter.
If so – which only happens when you decide to take a printout of your photo and avoid doing calculations – you can command Lightroom to print out a 6 X 8 inches photo with 500 PPI.
It will spontaneously analyze that you require a 1400 X 2000-pixel image.
Secondly, below the Metadata tab, you will find a lot of additional information about the photo, such as the camera’s setting, lens information, the image captured to date and time, and many more.
If you don’t want to expose this information to anyone, select Include > Copyright Only.
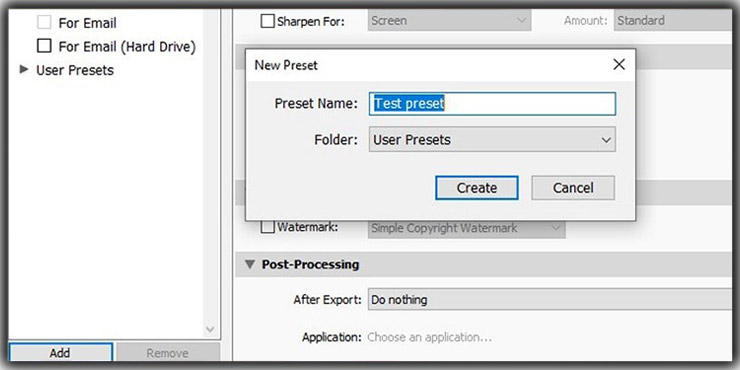
Finally, if you like any of the settings you want to use in the future, you can save it too. Go to the export dialogue on the left-hand side, left-click the “Add” button, and give a name to your preset option.
Catalog Backing Up
Once you finish everything and click on the CLOSE option, a pop-up window will appear below.
It is known as Backup Dialogue. While closing, if it doesn’t appear, follow the below steps.
Lightroom > Catalog Settings > General > Backup Catalog > Every Time it Exits.
You can follow or no-follow this step. Yet, It doesn’t require you to take a backup whenever closing this software. You can clock on the “Skip this Item” option often.
Want to know why?
This option doesn’t take a backup of your every image. Instead, it is backing up the Lightroom file.
You have already learned catalog files containing every edit, adjustment, label, Star, flag, and many more that you have done while editing your images. You must do it separately if you need to take a backup of your pictures.
Also, I have already mentioned the catalog doesn’t take up much space in your hard drive. So, without any tension, you can take back up every time.
FAQs
They serve genuinely different purposes. Lightroom excels at organizing large photo libraries, batch editing, and non-destructive RAW processing — everything a working photographer needs after a shoot. Photoshop handles more complex, pixel-level manipulation like compositing, clipping paths, and detailed retouching. Most professional photographers use both, with Lightroom handling the bulk processing and Photoshop stepping in for anything requiring surgical precision.
It means your original photo file never gets touched. Every adjustment you make — brightness, contrast, color grading — gets recorded in the catalog file rather than written into the image itself. The original stays exactly as it was captured. When you export, Lightroom applies all those recorded changes to a copy, leaving you free to revisit or completely reverse any edit at any point.
The catalog is essentially a database file that stores every edit, rating, flag, keyword, and organizational decision you’ve ever made in Lightroom. It’s separate from your actual photo files. Thousands of edited images worth of catalog data takes up surprisingly little disk space — around 300MB — which makes it practical to back up regularly without any significant storage burden.
Using a combination of tools works far better than relying on any single one. Star ratings help you identify your strongest images quickly. Flags let you pick or reject shots immediately after import. Color labels group photos by category or project. Keywords are the most powerful long-term option because they let you search across your entire library using descriptive terms rather than trying to remember when or where a shot was taken.
Clone copies pixels from another part of the image exactly as they appear and stamps them over the spot. Heal is smarter — it analyzes the texture and tone around the problem area and blends the replacement pixels to match seamlessly. Heal produces more natural results in most situations, but Clone gives more predictable output along hard edges where the blending algorithm can behave inconsistently.
The Graduated Filter applies adjustments in a linear transition across the frame — ideal for skies, horizons, or any scene where you want changes to sweep gradually from one edge. The Radial Filter works in an oval shape and can affect either inside or outside that oval depending on whether you invert the mask. It suits situations where you want to draw attention to a central subject or create a vignette-style effect around a specific area.
Not at all. Exporting creates a completely new copy of the image with all your edits baked in, saved wherever you direct it. The original file and catalog data remain completely unchanged. You can export the same image multiple times at different sizes, formats, or quality settings without any impact on the source material.
Bottom Line
You have nailed it.
It was an in-depth and informative article about Lightroom. I never thought it would be so long when I started writing it. But it has become so long because of the complicated functions.
This article will help you make a great foundation regarding this application. The best advice I can give you to improve your skill in Lightroom is to practice, practice, and practice.
We all know “practice makes a man perfect.” So the more you give time to it to learn new techniques and tricks, the more it will pay you back.
Thank you for reading the article.
You may read:

Salim Ahmed is the CEO of Graphic Experts India, with over 25 years of expertise in photo editing, clipping path, image retouching, and eCommerce image editing services.