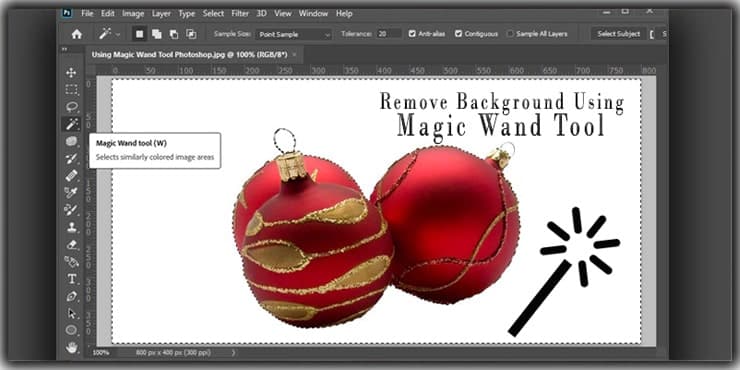
The Magic Wand Tool Photoshop allows you to select and remove backgrounds with just a few clicks. It analyzes the tone and color of the pixels you click on and selects similar pixels within a certain tolerance range.
It helps to select any part of an image to replace, remove, or edit.
Whether you are a beginner or a seasoned graphic designer, this is everything you need to know about using the Magic Wand Tool to enhance your Photoshop editing skills, notably in removing backgrounds easily and precisely.
Go through this step-by-step tutorial, become a master of the tool, and learn how to make the background transparent within a few seconds.
What is the Magic Wand Tool?
Magic Wand Tool is a selection tool in Photoshop that helps users make a selection of an image or part of the image based on tone and color.
This tool will assist you in selecting specific areas within an image and editing it independently. It selects solid backgrounds or any other colored area.
The tool functions by analyzing the pixels in the image within the region where you’ve clicked.
When you click with the tool, it selects the area. It will analyze and select all adjacent pixels that fall within a certain range of color and tone from the selected pixel.
This range, known as the tolerance value, can typically be adjusted according to the user’s needs. For instance, a low tolerance value will result in a more precise selection, selecting pixels very similar to the clicked pixel.
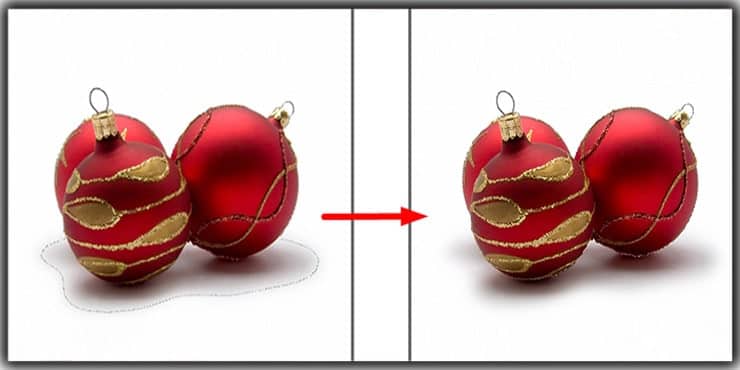
You can conveniently replace or remove backgrounds with Photoshop’s magic wand tool without changing the subject. Product photography and eCommerce shots are the areas where this tool is extensively used.
The pixel selection process is entirely dissimilar to a Quick Selection. Based on a similar color and tone, it selects pixels.
This tool doesn’t search for individual borders; it looks for a similar color canvas to complete its choices.
Start Using the Magic Wand Tool to Remove a Background
The Magic Wand tool makes selections to remove a background with just a few clicks, saving time and effort. To start using, it is important first to understand the working process.
It gives the best result for images with a constantly colored background.
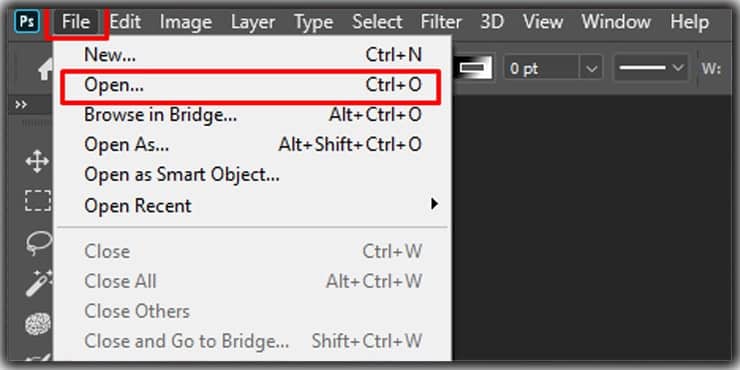
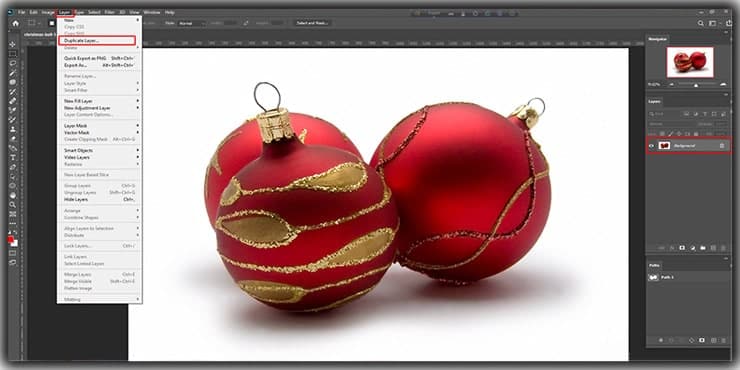
Open the Image and Duplicate the Layer
Opening it in Photoshop and Making a Duplication Layer of the Background Layer. In Photoshop CC, go to the File option at the top of the Menu Bar, select Open, and choose the image that will be Edited.
Once the image is opened in Photoshop CC 2020, the Layer panel must be opened by selecting Window > Layer.
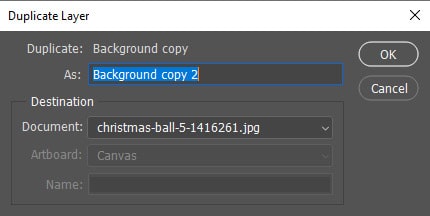
Don’t forget to highlight the Background Layer at this stage. Now, make a duplication of the background layer. To do so, select Layer>Duplicate Layer
You have to give a customized name to the duplicated Layer. Providing a name to the Duplicated Layer. As a result, you or your team member can easily access and use the file in the future.
Background Layer Hiding
Before starting the image editing, hiding the Original Background Layer will be significantly useful. This way, distraction will not happen when working in the duplicate Layer.
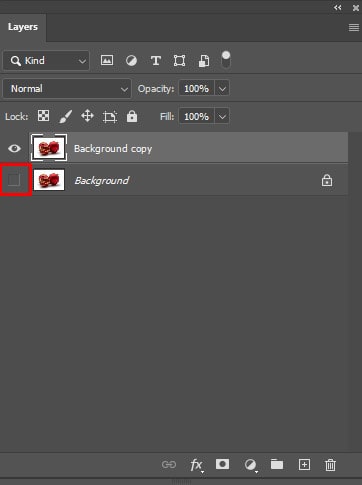
Look at the left portion of the image thumbnail in the Layer Palette, and you will see an eye icon. Click on it to hide the Original Background Layer.
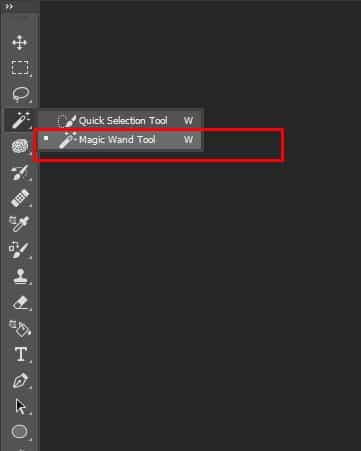
Config The Magic Wand Tool in Photoshop
In the Tools Palette, you will find the Magic Wand icon. The tools palette is placed on the left side of your computer screen.
Or select the shortcut key “W.” If you don’t find the tool in the Tools palette, be sure it is hidden behind the Quick Selection Tool, and now, click on it and hold it for a few seconds. The tool will appear, and you can select it then.
After selecting with the help of tool Parameters, you can control the maximum and minimum selection levels at a time.
You will find the adjusting options on the working process at the upper portion of your computer screen.
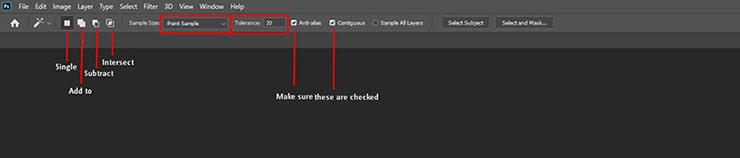
Single-Selection
If you use the tool for the first time, this option must be selected.
Add to Selection
This option is automatically accessible if you press and hold the “Shift” key when working with the tool.
Subtract from Selection
With the help of this selection, removing pixels becomes accessible from your selection while you click on your selection area.
Intersect with Selection
The new selection, including the previous selection pixels, gets created in this selection.
Sample Size
Adjust the sample size by selecting only one color pixel at once, which is its default characteristic.
If you command the tool to increase the size of the sample, it will average the pixel color around the sample into its selection criteria.
Tolerance
You can’t do it to select a larger area at once without adjusting the tolerance. It would be best to keep the range of Tolerance between 15–30. In our example image, you will find the tolerance level is 20.
Make Selection With The Photoshop Magic Wand Tool
There are two methods of selecting.
- Background Selection
- Subject Selection
Depending on the image’s background color, you must pick any method from the above.
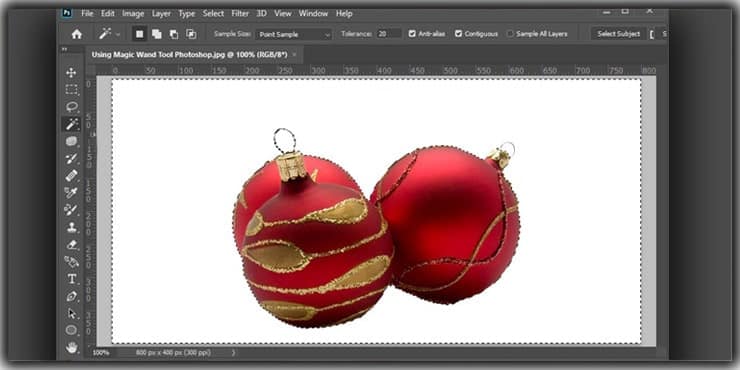
Background Selection
Does your image have a solid-colored background? If yes, you can select the background using the Magic Wand Tool. Then, you have to make Inverse to the selection.
- Refraining from doing any work in the Original Layer is essential. So, select the duplicate Layer and complete your work.
- Select the tool, and click on any portion of the image per your preference.
- Now press and hold the Shift key. At this point, don’t forget to click on background areas not selected at the initial stage—for example, the orange shadows.
- Then press Shift + Ctrl + I (for Windows), Shift + Command + I (for Mac). This will allow you to select Inverse, or the subject will be selected.
Subject Selection

Your working image backgrounds may have multiple colors.
Photoshop CC 2020 or above has an advanced feature named “Select Subject”. This feature will help you to select the subject of the image. You can also select the most intricate subject easily with this feature.
- Make a duplicate Layer to do the editing work.
- Now, choose the Magic Tool and do not click on any image portion.
- Click on the Select Subject button at the top of the application. You will get a rough selection of the subject.
- You will find the Subtract from Selection option at the top of the screen. Next, click on any portion of the image except the subject’s shadow. These areas will be out of selection while editing the image.
Now, maybe the question is in your mind.
Can I use this tool if I have Photoshop’s older version?
Yes, you can but there may be some limitations. Selecting the subject will not be an issue using the Magic Wand in the older version of Photoshop.
For this, the background must be complex and a one-colored subject. To select the subject, you have to follow Method 01.
The key difference is that you will not be able to select the Inverse after finalizing the selection.
Inverse the Selection
Once the background is mostly selected, you should inverse the selection to select the subject instead. To do this, go to the “Select” menu at the top of the screen and choose “Inverse.”
Delete or Mask the Background
With the subject selected, you can now delete the background. Click the “Delete” key on your keyboard and delete the selected background pixels.
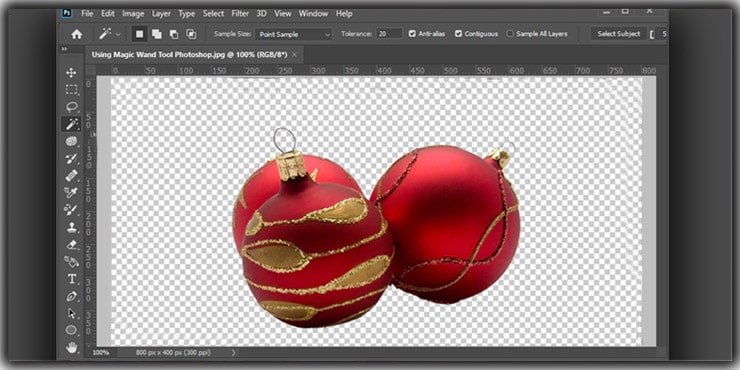
Alternatively, you can create a layer mask by clicking the “Add Layer Mask” button at the bottom of the Layers panel. This will allow you to make the background transparent non-destructively.
After removing the background or making it transparent, you may need to do some cleanup.
Zoom in and use the Eraser Tool or a soft brush on the layer mask to fine-tune the subject’s edges, ensuring a smooth transition between the subject and the transparent background.
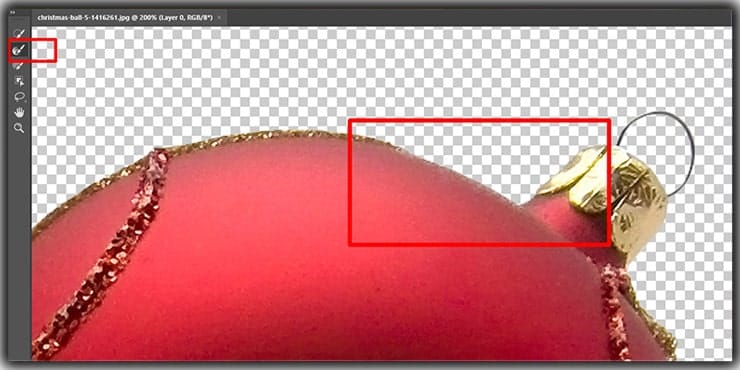
Refine Your Selection Edges
Next, you must choose Select and Mask… positioned at the Select Subject option’s right side.
In the older version of Photoshop, you will have this option: Select > Refine Edge.

Now, a new window will appear. You will find a series of global controls on the right side, and Spot Adjustment Tools will appear on the left side.
Select the View button from the Properties tab at the top right corner. Select the button, and if On Layers (Y) is deselected, select it. Don’t forget to do it.
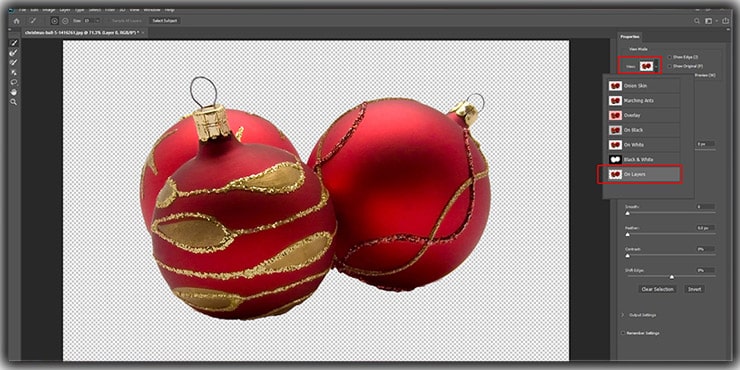
Now, you will see an isolated subject that doesn’t have a background.
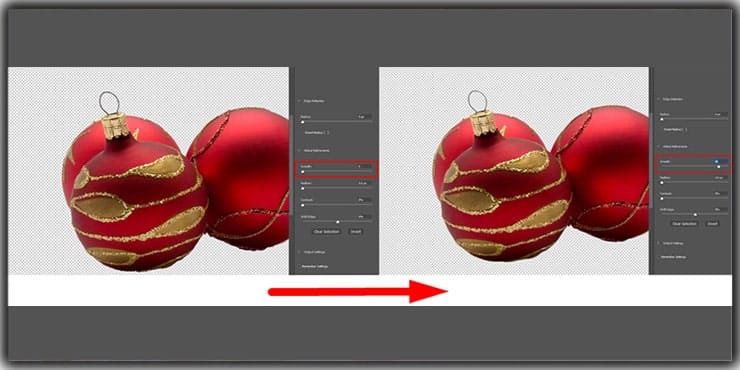
You can play with the features at this stage, but we will not use different features. Underneath Global Refinements is an option named Smooth function, and to the left of the screen, there is the Refine Edge Brush tool. We will take assistance from these two features.
To smoothen any rough edges of the subject, drag the Smooth slider to the right side.
Now click R to get access to the Refine Edge Tool. This feature will allow you to spot any specific areas of the photo. Using this tool is simple. First, select the tool and paint over the selection area where refinement is needed.
Once you finish as per your requirement, go to the Output Setting in the lower right corner of your computer screen. From there, choose Output to Layer Mask and then hit OK.
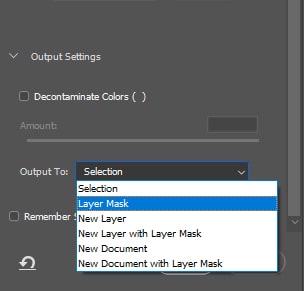
The subject is entirely isolated from the background by applying the Layer Mask option.
Apply New Image Background
We are at the final stage of this tutorial.
You must have a preferred image you want to use as a background in your editing image.
First, open the file of the background image. Press Ctrl + A to select the entire image. Then press Ctrl + C to copy it.

Now, go to the file that contains the isolated subject. First, the unaltered background needs to be selected. Then press Ctrl + V to paste the background image into the isolated subject file.
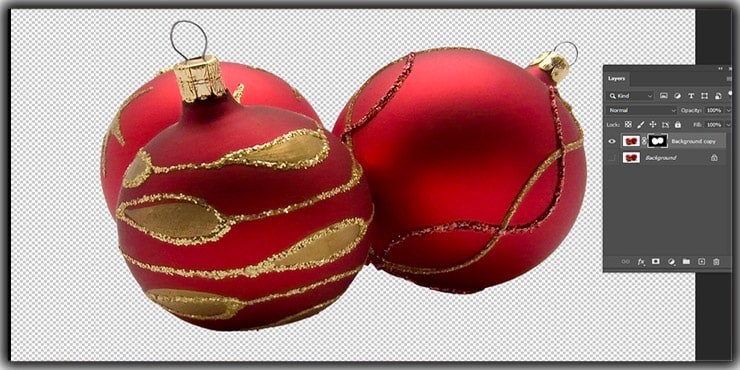
A new layer (with a new background) will appear in the Layer palette between the original and duplicate backgrounds. Now click on the eye icon of the original background to make it visible again.
If your original image’s background is white, it will help if you decide to select the blend mode to multiply the new background image. As a result, you can drag the actual shadow back to the new image.
Adding more layers as an additional background is also possible. You can see how the image will appear with a different background by toggling the eye icon.

After creating layers, fill them up with solid colors to see your subject against a background that comes with a solid color option.
Save Your Image
Once satisfied with the result, save your image in a format that supports transparency, such as PNG.
When to Apply the Magic Wand Tool?
You can remove or replace the sky background or any other without any hassle. Moreover, It helps to remove the white background easily.
Below are a few scenarios about when to apply the magic wand tool in an image.
- You can show your product in different environments. Your customer can see your product against a familiar and beautiful background. It will help you to improve customer engagement as well as product sales.
- With this technique, you don’t need to change the settings of your original image. You can change your product’s shape, background, and size without affecting the original image. This means that capturing multiple images is unnecessary, while you can change the background of the image.
- Most 3rd party marketplaces such as Amazon, Alibaba, and eBay want product advertisements with white backgrounds. Magic Wand Tool allows a person to make the background white. After making your product image with a white background, you can list your product on those 3rd party marketplaces without any trouble.
If you want a more precious result for pixel-perfect selection, you can use the Pen Tool Photoshop.
FAQs
The Magic Wand Tool is a tool in Photoshop that allows you to make a selection of a specific color or tone in an image with just a single click.
Yes, you can use the tool to remove the background of an image. By selecting the background with this magic wand tool, you can delete or replace it with a new one.
Magic Wand Tool selects pixels based on their similarity to the pixel you click on. It looks for pixels with a similar color or tone and includes them in the selection.
To make a contiguous selection ensure that the “Contiguous” option in the options bar is checked. This means that Photoshop will only select pixels that are connected or adjacent to the clicked pixel.
Yes, you can use this tool to select a part of an image that is not connected. Uncheck the “Contiguous” option in the bar, and Photoshop will select pixels depending on their similarity throughout the image.
If this tool isn’t selecting the desired area, adjust the tool’s tolerance in the options bar. A higher value will expand the selection, while a lower value will make it more precise.
Yes, with practice and learning more about Photoshop, you can become a master of using the tool. There are many tutorials available online that can help you improve your skills.
Final Thought
You will face the challenge of using the magic wand tool in a few images. While using it in other images will give you little trouble. You can get great images with a couple of easy tips and tricks.
Follow the above step-by-step guidelines and learn how to remove and replace an image background using the discussed tool and give your image a beautiful look.
You may Read:
- How to Create a Clipping Path in Photoshop
- How to Remove All of One Color in Photoshop in 2 Minutes
- How to Use Background Eraser Tool in Photoshop CC
- How to Edit Photos in Photoshop
- How to Edit Car Photos in Photoshop: The Complete Dealership Workflow
- How to Remove the Background from a Car Photo

Salim Ahmed is the CEO of Graphic Experts India, with over 25 years of expertise in photo editing, clipping path, image retouching, and eCommerce image editing services.